This document is a note on the Construction of the watchOS App “Notes”
Learn about the main topics of this watchOS project
In this SwiftUI tutorial, we are going to develop a modern Notes application for Apple watches. By creating this app, we will learn how to develop a standalone watch extension using the watchOS and SwiftUI frameworks together.
TOPICS WILL BE COVERED:
* How to get familiar with the basics of the watchOS framework
* How to create multiple views and navigate between these views
* How to develop a standalone Apple Watch application with SwiftUI
* How to permanently save notes and store data on Apple Watch
* How to show a list of notes on Apple Watch
* How to select and delete notes from Apple Watch
* How to show SwiftUI views conditionally
* How to create and utilize uniform design language across pages
* How to use Swift’s Codable protocol for serialization
* How to test a Watch app fullscreen in Simulator or on a device
* How to develop a new feature using SwiftUI’s Slider element
* How to create custom user interface elements
* How to add icons and asset files to a Watch extension
* How to use the input tools:
** Dictate,
** Scribble,
** Emoji,
* How to do with these actions types List of notes:
** Input interface,
** Dictate function,
** Deleting a note from the list with SwiftUI’s gesture,
** Detail page,
** Settings – line adjustment,
** Credits page,
** and App icon.
Setting up the Apple Watch Application
Our primary goal in this Swift UI class is to develop a standalone notetaking application for Apple Watch.
What are the main features of this nice watchOS app, called Notes? A watchOS app experience differs from app experiences on other platform.
An Apple iWatch is meant to be worn. So the UI should give wearers a lightweight and responsive experience.
Our priority is to make the app’s interface “highly glanceable.” What does this mean?
We start adding a well distinguished icon for the watch app, then the student does some customization. Then, we add an UI without adding complexity for it. That sounds like it can take some doing.
Objectives
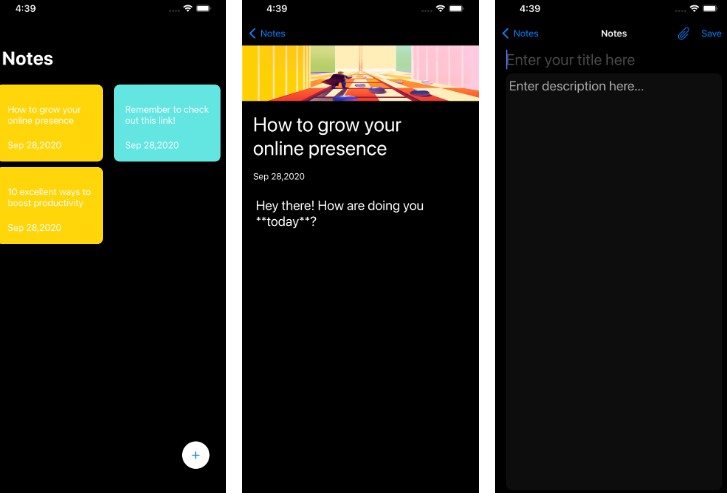
Home
The home screen is where the users can add a new note and save it into the list of notes depending on the
Inputs
There are at least four input interfaces to create a new note, such as:
* Dictating
* scribbling,
* Entering emojis
* Typing from external devices like the iPhone
While creating this unique Apple Watch application with the Swift UI framework, we also learn:
* how to save
* Load
* Delete on local storage
Detailed View
Moreover, we will build up a detailed view for each individual note item as well.
After that, we are going to develop a new feature so that users can change the line numbers of the in the new settings.
Settings
This time we will learn how to properly use the get and set closures in a custom binding with SwiftUI to update the lines count in the App Storage.
Credits
And finally, we will create a credits view as well with this, our Apple Watch application will be a well rounded app so that we can add it to a portfolio.
This effort begins by launching XCode and the start of the coding efforts.
Getting Started
There is a resources directory supplied with pre-fabricated icons and artwork. There is also JSON property list files to supply needed augments to the app.
New Project
Launch XCode and create a new project for the Apple Watch platform.
Select the watchOS for platform templates. Select the standalone application as the template for this watchOS demo App.
In this case, I named this app Notes. I selected my personal account for the team on this app. Also, I supplied a rather unique organization identifier. These steps allow us to provide configuration that is unique for our application that can be used later on during the distribution of our application.
There is something different than expected in setting up this watchOS app. There is a Life Cycle and interface selection. The instructor’s screen shows the Life Cycle selection where as my editor does not show this. Is this good or bad?
The instructor iterates that the interface must be SwiftUI. So, this is what I did.
So, if we don’t have a Life Cycle to select is SwiftUI App the resulting default choice?
Also the instructor has elected to uncheck the Include Notification Scene from this app. The instructor says this so we don’t create any notifications in this project.
For this demo app, we also leave the unit tests box unchecked. In production apps, many outfits use the unit test feature to help verify that requirements make it in to the app. Likewise, these verification help provide assurance that the implementation meets the expectations from the requirements.
Once we click next, Xcode takes through the process of placing our project in a good place on the file system. I use GIT to support my development and document learning as I go.
Last, I closed the instructor provided final version of the notes project. As I did, I copied the notes on notes documentation and pictures folder. I placed a copy in the new project so I can continue to document this work.
Resources for the Project
This is where I acquired resources produced by the instructor. This is handy as there are tools and steps one can be expected to follow to apply some “prettyness” to the app.
First, I select the assets catalog in the Note’s watchKit in the navigator panel.
I selected the AppIcon icon in the middle pane. The selection pane shows an empty set of icons. I right clicked and selected to show the AppIcon asset in the Finder. There I could copy the premade assets Resources/App-Icon folder. This gives me a JSON plist with same icon description we had before but with filenames for each of the icons that I have. Notice, there are few icons left unidentified or provided. Are we going to use these?
We can also make the Accent Color that we desire for this app. I select the Accent Color in the left pane of the Assets’ file interface. Here the Accent Color configuration appears and the Universal slot for the accent color is empty. I selected this and opened the inspector.
The Accent Color JSON/plist has two objects. One is the colors and the second is info. The info is a dictionary with author and version as member objects. Where as colors object/dictionary has an item “idiom” with value of universal.
The inspector shows that the Appearances is set to none. We select dark and light+dark that give us slots to put such colors.
Here we kind of cheat in selecting colors. The instructor says to select color content of SRGB. Furthermore, the instructor gives us a 8-bit hexadecimal code representing the color #FFE12D. This gives us a yellow-ish color. The instructor says the app shall use this color through out.
Time Index 7:25
Illustrations
Now it is time to add the rest of the asset files to the project, to do that, we need to select the rest of the asset files to the project.
These are found in the resources directory.
There is a Assets catalog in the Notes WatchKit Extension group. I selected this and got another asset interface for this Asset file.
The number one item in a WatchKit Extension asset file is a complication grouping. These complications include circular, extra large, graphic bezel, graphic circular, graphic corner, graphic extra large, graphic large rectangular, modular, and utilitarian.
So what are these complication assets good for?
Well, the instructor tells us to find the Illustration folder in the Resources folder. The instructor tells us to drag and drop the Illustration folder into our WatchKit Extension asset under the Complication group.
We see that an icon is there for 3 developers. They are cartoonish, but seem to convey some meaning for the app.
The instructor suggests we can add an image for say “developer no 4” with our picture or cartoon. I guess this is to give the customer some sense of us when they look for our app.
Build and Test on a Simulator or Real Device
Time index: 8:17
There is a preloader that watches automatically create using our icons for this application.
The next thing the application loads some content view with a Hello World text.
Get Familar with Apple Watch Input Interfaces
We are going to get familiar wtih Apple Watch input interfaces. Depending on the watch capability and the user’s settings, there are at least four input interfaces that we can utilize to create a new note. To trigger these input interfaces, first, we need to tap on the text field. By doing that, the watch operating system will bring us all available options to enter some content.
It could be a feature to dictate, scribble, or enter emojis. But not only that, we can even type some text from our external device like iPhone and iPad as well. Let us give this a try.
First, we are going to try how we can dictate using the Apple Watch, shall we? The instructor has a demo app in which he can use the dictate feature of the watch. The watch prints out what the instructor says.
The second input feature, we can use the scribble pad of the watch. Here people write one character at a time. This little feature since the Apple Newton attempts to gage what the user is “writing”.
Now, let us see how easy it is to add some images from the whole emoji catalog. The demo app allows a user to tap on the emoji catalog icon and bring up the catalog (3 by 3 ) table on the watch. The user can scroll up or down then select the emoji they want to communicate a thought.
The fourth input is an external keyboard from a paired iPad or iPhone. This is an input form that can not be tested by the watch simulator. This requires the real devices to evaluate and test.
Let the coding begin.
Data Model
First, we start with some housekeeping, select the content view file from the Project Navigator and let’s create a new group from the selection. Give it a name and save it. So why was Notificiation View not included also?
Next, we make a group for the data model. In this case, we call it Model. We then add a new Swift file to this group. Name the new Swift file Note and ensure that it has the target Notes WatchKit Extension. We then create a struct to encapsulate the data model for the app. Now, we can select the content view file and keep going along the proces.
Text Field and Button
First of all, we need to mark all the main possible bidings sections for the form before hand to keep track of what’s going on later. These areas include the following:
* property
* function,
* content body,
* Preview
All right, after all of this, we’re going to create two properties. one for the note’s and another one for the text field.
Notice something in the preview canvas.
Time Index 4:49
Ok, why is the Notes navigation title note showing in the preview. Well, it shows up in the simulator.
This is a content wrapper. It is also a new navigation title. However, the instructor’s preview shows this correctly. Mine does not. Why?
The accent color scene works on this wrapper, at least in the simulator.
The instructor says to replace the hello world text field with a horizontal stack with a new textfield inside. The stack also needs a button inside.
Both the text fields appearance and the button are totally different on the Apple Watch as opposed to the iPhone and iPad. The operating system describes how each user interface elements should look. Keep in mind that these two UI elements are quite different on the watchOS platform than on the iOS, iPadOS, tvOS, and macOS.
We put the text field and the button beside each other in a horizontal stack container. This entails that the two items widths are identical. To change this default behavior, we need to add a specific modifier to the button. In this case, we give it a fixed size. We can also add some color.
There are other ways to apply a modifier to the button and other enclosures to make this app look well.
These augments on the image, let alone the change to another system image for the plus within a circle, do add some crisp appearances to this watch app.
The instructor wants to next push the textfield and combo field up to the top with a new spacer.
Testing the App
Time Index 8:54
My app appears similar to the instructor, but with some so OS changed effects.
Button’s Action
Making the button useful for us, it’s not enough to say that we need to save a new note on the watch. That is why we need to think about all potential steps that our code should do step by step.
Can we declare all steps in plain English? What should the code do to accomplish this task? It is time to make a list that will declare all parts of these algorithms. This activity in computer science is also described as making pseudocode.
The first step in this action is the follow.
Knowing what our code should do step by step before hand will make our job mcuh more straightforward (than writing codes mindlessly.)
Time index 11:30/17:46
Algorithm
We start with the first operation following by the other ones, enter the following code.
As you noticed, this one line of in the “guard” command replaces the use of a complete if statement.
If the text fields is still empty, then our code will stop running in this action. The rest of the clauses code will not be executed since we escaped from it.
Note, that the save the notes (function) does require a member method in the module.
The instructor observes that the subject of save can’t be properly covered without covering how to retrieve them from local storage. Since this would make this tutorial extemely lengthy, therefore we should focus on a quicker way to do the job.
Don’t forget that at this point, our goal is to call this safe function each time when the user creates a new note and be sure that this algorithm works well without any glitches.
What do you think about the possible ways to do that? That said, wouldn’t it be great if we could print out somehow in the console the notes and make sure code logic works correctly? We can use the print method for this.
But, the instructor would like to introduce us to a slightly better way to do that.
Time Index 15:07/ 17:46
We can see evidence that each entrance into the add note followed by tapping the plus circle button. We can see this action increasing the count for the notes.
Learn How to Store and Read Data with SwiftUI on Apple Watch
The instructor begins with a demo. We can open the app in the simulator. Then test the text entry by dictating some sentence.
After producing this content, we can demonstrating the save operation by tapping the circle plus button. All of the actions of the button then occur. This action creates a note structure with the text and an unique ID. Note, every class in a Core Data structure has an UUID as a hidden element.
The instructor’s application demo shows a new note has replaced the icon on previous empty home page. Our previous model simply has a text label with the notes array member count.
Notice that the list with the notes is totally different from its iOS/iPadOS counterparts.
The notes list structure / container also has a swipe left to reveal a delete button.
Thus the instructor tells us that this section carries steps to make this starter page fully function with these capabilities. This kind of page is the objective for this example app.
Data File
This example does note use Core Data or other web services to store data in a persistent online database. Therefore, this app stores its data locally as a data file.
Fortunately, it does not make it hard to do it all with the use of the Codable Protocol. But before we start decoding and encoding each new note, first we need to know where to save the data file on the watch. How do we know the strucutre and file system management of the watch?
watchOS Sandbox
When you develop apps for the Apple Watch, then you should keep in mind that watchOS runs in a so-called sandbox. This is basically a protected file system that prevents us from simply navigating to specific files.
Document Directory
Time Index 2:01
Instead, we must run some specific code to ask for the targeted apps document directory. It is an unique directory allocated for each watch app and this is where we can write and read data files.
All that said, please this method to the function section of the Content View struct/module.
Notice the method function getDocumentDirectory sets up a constant path to the document directory in the user domain.
Obvious question, Swift uses a notion of optionals to handle cases where a nil is returned instead of loaded data type. The nil is technically a member of said data type and exists to handle the absense of data.
The zero index on path grabs the first neutral site where the file manager permits storing and reading of data. This method permits any kind of URL such as web URLs and locations for local files stored directly on the Apple Watch.
Encoding Data
Now, after we know where to write the notes data file, we can go back to editing the previously created save function.
Second, we will create a new do-catch statement so that we can run our code safely inside it later on.
Explanation time index 5:02
Decoding Data
This is a similar process to the writing. The same coding protocol provides the structure for marshaling in the data. We create a new function with the proper error handling we call later.
Notice that our catch block can do nothing because it is not a problem if there is no data file found. This implies that if no such file is found, the assumption is that the app is running for the first time and does not have one. The erasing of the notes from the array also results in removing the file. Therefore, the load process can not find such a file and must make a new one.
We lay down some pseudocode to outline the needed steps that our code shall fulfill. We note this first in the do block.
Observe the code made for these steps. This is similar to its Objective-C counterpart.
Also note, that we have just create a new load function that should be called when the content view appears on the Apple Watch.
If we call this function immediately using the on appear view modifier, then SwiftUI will get confused. Why? The app is changing the program state immediately and it could crash the application. To avoid it from, we need to add some delay before we load the notes from local storage. This time interval could be such as short, like a few milliseconds so that users could not notice the delay. Therefore, our code will run without crashing itself. We can make this happen with a notion of a dispatch queue used for the purpose of multitask operations.
Dispatch Queue
Time Index 8:10
Let us make the multitask and delay handling happen by wrapping our code into a new method called dispatch queue. First of all, select all of the code inside the load function, then cut this code into the clipboard.
The Grand Central Dispatch, of which dispatch queue is a part of, was unveiled by Apple in WWDC 2008. The GCD also introduced into Objective C the notion of a closure. Admittedly, I was thrown for a loop when I first saw this at WWDC 2008. Look this good stuff on the Apple Documentation as part of the help functionality.
This method tells watchOS to run the actions at the next possible opportunity, that is not right now. In a nutshell, we will run these actions and change the program state with a millisecond delay. This is done to protect the Notes app from crashing. We call this load function with a new on appear modifier.
There is nothing more satisfying in app development than we can see our app work. That all said, it is time build and run the project to test it.
Testing
Notice the load function is called twice during the test. Granted, I added two note items to the list.
But, when I run the app a second time, the app shows that there are two items in the array.
The instructor’s demo went something like this.
Run the app in the simulator. Enter some new notes using on of the input methods. Then close the app by tapping on the side button on the watch. This gives us the means to close the app. We simply slide left on the application in the running apps list. Then we tap on the “X” button to close the app. Then, we run the app again.
In the second half of this tutorial, our goal is to create a new list on this page and populate it all the notes from the local data file.
Notes List
Time index 10:57
We can replace the text view at the end of the vertical stack with a new list structure / component to represent the items already in the notes.
We create a List component and this also has an closure to serve as a container. We use a for each loop to account for each item in the notes array.
We make an horizontal stack with a capsule and text view for the specific text member of the Note item at the index of the array. We also apply some modifiers to the capsule and text view.
Now time for another test of this demo app.
Well, when I add three items, then it gets ugly.
Time to commit to the repository so we can us this feature to trail back and make sense of the work.
Time Index 13:13
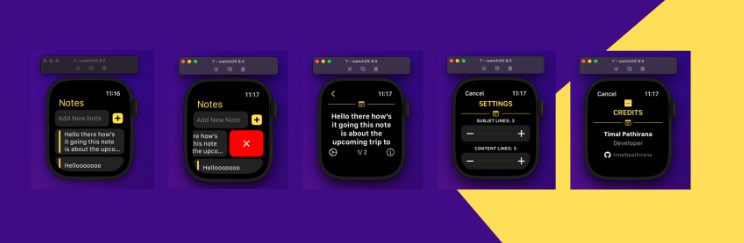
Deleting Notes
This note app gets better and better now the next useful feature that we will develop is the note deleting functionality. Jump back to Xcode and let us create this new function for this feature.
Notice the delete method function. We include some needed code within an “withAnimation” modifier.
We make a call to the array to remote an element at “offsets”. This is of type Index Set that allows us to include more than one index offset.
We also need a call for this function. So we make it as a modifier of list component in the body.
Now time to commit again to the repository and test these features.
Testing
During testing, I was able to generate an error when I reached the last item to delete. So, how do we catch for this kind of error?
Time Index 14:32 / 17:31
Empty State
? Does this help eliminate the error produced when trying to delete the last item?
We add a conditional wrapper around the loop. This is a simple if-else state conditional on notes.count being greater than or equal to 1 (or greater than 0).
On testing, this little conditional does help by catching the empty state. If I try to delete the last entry, the empty view ensures that I don’t have another entry or its ghost to make false deletion possible.
We also add a portion of spacers and images in the else part. Careful to select the system name image correctly. One can try to ask for an image that is not there, and Apple will catch the error by returning nothing. Also, the modifiers added can be adjusted to account for smaller watch faces.
Final Test
One should try to regenerate the error of a last note deletion. Does the else condition fire? Do we get the error?
Create A Detail View For A Note
A 10 minute lesson.
First, we make a “model” for the detailed view. There are many ways to devise such views. One could have more than one view for each entity. For example, there can be edit views, list element views, and detail views to facilitate working with an entity or some other elements.
With the sample data supplied to the Detail View, we can produce a preview to guide development. For example, a good detail view for the Note would entail a vertical stack.
There is nothing visible in the photos so far. Now let us add some UI elements to it.
As you can notice, we wrapped it into a vertical scroll view so that we can read the note no matter how long it is, the final part that we need to develop is the footer.
We have in the header some capsules to form a left and right line surrounding a text image.
We have a gears button to the left and a credits button to the right. In the center, we have text to represent what note out of the array we are looking at.
This finishes the layout for the detailed view.
This is a kind of unsexy detail view. In many cases, that is just fine and serves the purpose. This enough to make the view look light weight and professional. The watch face has little room for clutter.
This is just the layout and design for this detailed view. Now, we need to tie this to the homepage.
Navigation Link
We add a container around the horizontal stack in the for-each list (in the content view body). In particular, we select the NavigationLink container. Here we can specify the destination for the link, namely our Detail view. Next, we test this feature.
Testing
We add a note to allow us some material to test with. The new note in the list allows us to tap and get a detailed view. Thre is automatically placed in an arrow to return to the main content view.
However, we don’t have functionality for the bottom icons.
This work is for the remaining two sections.
Create Credits View
We create a new SwiftUI file called CreditsView. There is nothing special about this view, but we do need it to exist for user edification.
We make a new vertical stack in the body and start developing a new header component. Also, we apply spacing in the call for the vertical stack.
Header Component
We create a variable to manage title displays. We also add a conditional to put a textview with the title, if the title is not empty.
New Headers
The new headers we need. We add the Header View with a title of credits. Next, we add text views for our name and title. Last we work on a profile image. This image will require some artistic modification.
Now, let us get down to business. Let’s add a new image to this view with some modifiers. We need resizeable and scale to fit. The resizeable allows us to include this in the vertical stack and stay within a reasonable watch face size.
We can check out the first illustration in the preview now.
We also need 2 properties for the sake of practicing swift programming.
The watchOS Sheet
We first add a state variable to the detail view. Namely, we define isCreditsPresented. Then we add a tap gesture option to the info image to toggle this value each time the user taps on it. So insert the onTapGesture with a instruction to toggle the isCreditsPresented. Now, how do we make the credits sheet call?
We get a cancel button for free on this credit sheet. On running the preview, we can tap on the info icon and get the credits sheet. When we tap on the cancel button, the credit sheet is dismissed.
Develop A New Feature and Settings Page
This is the last section in this demonstration app. It is indeed a pretty important feature that we develop for the watchOS app. When a user taps on the gear button, then a new setting sheet will show up. And in this setting sheet, users can set the maximum number of lines in each row in the list view using a SwiftUI slider. This also gives us experience building a custom binding in the Swift programming language.
We could use this tutorial for our own portfolio (it is a class and academic honesty should exist somewhere.) The notes app and notes acquired in the class is for personal edification. None the less, the instructor thinks this is the proper way to do binding of a settings page.
We create a new view module and call it SettingsView.
We add a vertical stack to the body and use the header view to reuse a component in this view.
We also have comments in the vertical stack to outline our basic approach to making this settings page.
We also need a new line count to properly store the current value.
App Storage
We use a binding to the app storage to enable a value to carry through as essentially a global value. The default value of the line number count is 1. As a matter of fact, this value is stored in a rather permenant manner on the Apple Watch, with our app. The app storage property wrapper uses the user defaults under the hood and it has a major benefit as follows.
The app storage automatically invokes the viewer’s body property when the line count key changes in user defaults, and it will refresh the user interface immediately. In our case, when users increase or decrease the maximum line number, then the notes app will automatically be refreshed with the requested modification.
Time index 3:24
Of course, to make this happen with the use of the slider is not as simple as that. Yet, this is manageable.
Current Line Count
Now, let’s continue the work with the second section in the layout, shall we? Our goal is to display the actual line number in the list item. To do this, first, go to the body and enter the following code.
Slider View
When we add code for the slider and value state, we use the preview to observe this change. This new slider has some properties in the settings page. Why doesn’t the preview show the slider in our accent color? We show this in the setting sheet.
Setting Sheet
Notice the code we add to the gear image in Detail View. We also add a state variable for isSettingPresented. This allows us to use the sheet and on tap gestures like we did for info-circle. Now, we can test this code. But, how do we connect the value of the slider to the app storage line count?
Testing
Sure enough, we can navigate with a note and find the setting and info page work, to a point. We see the slider moving, but the number does not change. So what do we do?
Update Function
The next step is to create a new function that will make this feature work.
Time index 7:04
So, how does the new update function get called anytime the setting’s slider is changed?
We need to replace the existing value binding with a new custom binding.
So, we setup closures for the bindings for the Slider. The rest of the slider’s code is unchanged.
The newValue parameter is acquired when the slider moves. The set binding applies this value to the private variable value. Also, the set binding calls the update function that makes the connection to the User default value.
Line Limit
We can copy the property from settings view to content view. This ensures that the content view will set this user default on loading, assuming it is not already there. If it is, then the user default takes precidence.
We also apply this value to the line limit in the list.
Testing
Sure enough the settings do get applied to the line limit in the list. You have to go into a detail view to set these settings. Does it work from settings on the watch itself?
No? What is the magic sauce?