Swiftui Spring Animations
This repository serves as your reference for SwiftUI Spring Animations. It demonstrates use cases for the various types of spring animations and their parameters. No more guessing the values for the parameters of spring animations you create for your next iOS app. Enjoy!!!
Chained Spring: Swift file
SwiftUI Spring Animation Types
1 .spring()
A spring with no parameters. It applies gentle and sensible spring-feel to the object you want to animate.
Menu – Close icon transition: Swift file
2 .interactiveSpring()
An interactive spring with no parameters. This creates a spring animation with a high stiffness and a low response. It creates a spring animation that is less snappy:
Menu – Close icon transition: Swift file
3 .interpolatingSpring(stiffness, damping)
This allows you to create a spring animation that is based on stiffness and damping.
- Stiffness:
It is defined as the tensile strength of the spring. A higher stiffness will result in a snappier animation. This affects the force applied to the object
and changes how quickly the object moves towards its target. - Damping: You can think of damping as the braking of a car or the back-drag frictional force of the surface the object is resting on. Its purpose is to stop the object over time. It also affects the ability to overshoot the object. Hint: Start with a damping of 15 and stiffness of 170. Reducing the
damping to for example, 5 will create a spring animation that has a higher bounciness.
Chat message reactions: Swift file
4 .interpolatingSpring(mass, stiffness, damping, initialVelocity)
This allows you to create a spring animation that is based on mass, stiffness, damping, and initial velocity. Default values: .interpolatingSpring (mass: Double = 1.0, stiffness: Double, damping: Double, initialVelocity: Double = 0.0).
- Mass: Think of mass as the weight of the object animating. It changes the inertial of the object attached to the spring. That is the willingness of an object to move or stop moving. It is conceptually heavier and can be used to create a spring animation that overshoots. The heavier the mass, the longer it takes to move the object, speed it up, and slow it down.
- Initial Velocity: The initial velocity defines the speed at which the animation object changes at the beginning of the animation. The default initial velocity is set to zero. It is measured in units per second of the animation.
Chat message reactions (Heart icon): Swift file
5 .spring(response, dampingFraction, blendDuration)
This allows you to create a spring animation that is based on response, damping fraction, and blend duration. Default values: .spring (response: Double = 0.55, dampingFraction: Double = 0.825, blendDuration: Double = 0). A higher response value will slow the down the animation. A lower response speeds it up.
-
Response: Think of mass as the weight of the object animating. It changes the inertial of the object attached to the spring. That is the willingness of an object to move or stop moving. It is conceptually heavier and can be used to create a spring animation that overshoots. The heavier the mass, the longer it takes to move the object, speed it up, and slow it down.
-
Damping Fraction:
Damping fraction causes a gradual reduction in a spring oscillation. By using the damping fraction, you can define how rapidly the
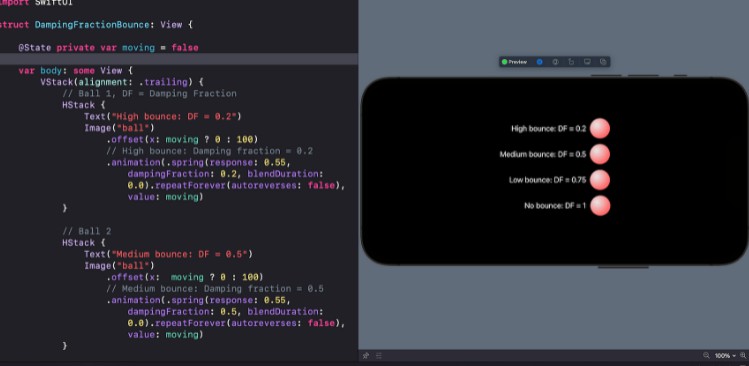
oscillations decay from one bounce to the next. You can damp the spring in the following ways:- Over Damping: Set the damping fraction to a value greater than 1. It lets the object you are animating, quickly return to the rest position.
- Critical Damping: Set the damping fraction = 1. It lets the object return to the rest position within the shortest amount of time.
- Under Damping: Set the damping fraction to be less than 1. It lets the object overshoot multiple times passing the rest position and gradually reaching the rest position.
- Undamped: Set the damping fraction = 0. It lets the object oscillate forever.
-
Blend Duration: Blend duration is a frame of time during which a previous animation stops and the next animation starts. Changing the blend duration of any the examples here, does not produce any visual change. This makes it difficult to see what it actually does.
Chat message reactions (Thumbs up icon): Swift file
6 .interactiveSpring(response, dampingFraction, blendDuration)
This allows you to create a spring animation that is based on response, damping fraction, and blend duration. Default values: interactiveSpring (response: Double = 0.15, dampingFraction: Double = 0.86, blendDuration: Double = 0.25). You can use this spring as an alternative to .spring(response, dampingFraction, blendDuration). Always start with the default values above. To check the default values in XCode, Control-click the spring modifier and select “Show Quick Help”. The thumbs down animation below uses this spring. The damping fraction is inversely proportioan to the springiness of the animation. Reducing the default damping fraction will make the animation more bouncier. As mentioned in 5 above, blend duration has not visible effect on the spring, at the time of writing this.
Chat message reactions (Thumbs down icon): Swift file
SwiftUI Spring Animation Properties and Effects
Damping Fraction: High, medium, low, and no bounce
Stiffness Bounce: High, low, medium, and very low stiffness
SwiftUI Spring Animation Examples
Position Spring Animation:
Animate a ball’s position so that it appears to be pulled towards a target by a spring. Swift file

Scale Spring Animation:
Create a spring animation that bounces a ball into view by animating its scale from 1 to 2.
Swift file

Recording Spring Animation:
Create a recording effect using different springs.
Swift file

Animate a photo preview to full view
Create a recording effect using different springs.
Swift file

** Related Links **
- https://developer.apple.com/documentation/quartzcore/caspringanimation
- https://developpaper.com/ios-spring-animations/
- https://popmotion.io/
- https://www.raywenderlich.com/books/ios-animations-by-tutorials/v6.0/chapters/4-springs
