UniCamEx
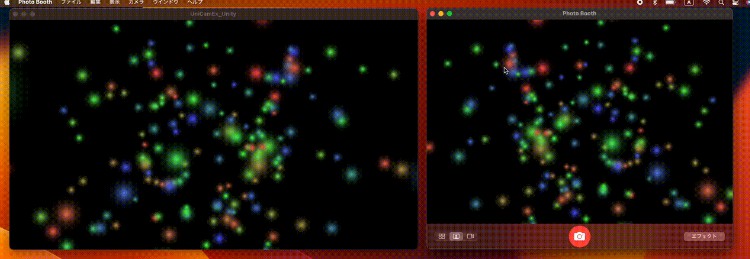
UniCamEx is a virtual camera for MacOS that can display textures output from Unity.
You can use in macOS 12.3 and later because UniCamEx use Apple’s Camera Extension with Core Media I/O.
Install
UniCamEx can be installed with Unity Package Manager.
UniCamEx can be installed from npm or GitHub URL.
Install from npm (Recommend)
UniCamEx can be installed by adding following sections to your manifest file (Packages/manifest.json).
To the scopedRegistries section:
{
  "name": "creativeikep",
  "url": "https://registry.npmjs.com",
  "scopes": [ "jp.ikep" ]
}
To the dependencies section:
"jp.ikep.unicamex": "1.0.0"
Finally, the manifest file looks like below:
{
    "scopedRegistries": [
        {
            "name": "creativeikep",
            "url": "https://registry.npmjs.com",
            "scopes": [ "jp.ikep" ]
        }
    ],
    "dependencies": {
        "jp.ikep.unicamex": "1.0.0",
        ...
    }
}
Install from GitHub URL
UniCamEx can be installed by adding below URL on the Unity Package Manager’s window
https://github.com/creativeIKEP/UniCamEx.git?path=UniCamEx_Unity/Packages/UniCamEx#v1.0.0
or, adding below sentence to your manifest file(Packages/manifest.json) dependencies block. Example is below.
{
  "dependencies": {
    "jp.ikep.unicamex": "https://github.com/creativeIKEP/UniCamEx.git?path=UniCamEx_Unity/Packages/UniCamEx#v1.0.0",
    ...
  }
}
Usage
Demo Sample
This repository has the demo that send textures from Unity.
Check a Unity scene and scripts in the “/Assets” directory.
Usage for Develop send textures from Unity Editor
1. Send textures from Unity
Send textures with the UniCamExPlugin.Send method.
UniCamEx/UniCamEx_Unity/Assets/Scripts/TextureSender.cs
Lines 1 to 13 in 12ca144
2. Install an Auxiliary app for UniCamEx
Download UniCamExExtensionInstaller.zip for auxiliary app of UniCamEx from release page and Open the zip file.
Move UniCamExExtensionInstaller.app to ~/Applications directory and run UniCamExExtensionInstaller.app.
3. Install UniCamEx Virtual Camera
Push Install button.
Allow using System Extension from the Mac setting if the dialog that blocked System Extension is displayed.
Then, you can select the camera named “UniCamEx” with any camera appication and can see textures output from Unity Editor!
Usage for Build the Standalone App
1. Send textures from Unity
Send textures with the UniCamExPlugin.Send method.
UniCamEx/UniCamEx_Unity/Assets/Scripts/TextureSender.cs
Lines 1 to 13 in 12ca144
2. Export Xcode Project with Unity
Turn on “Create Xcode Project” on the Build Settings window.
Also, build from the “Clean Build…” button.
Exporting Xcode Project can does the necessary settings for Camera Extension with Core Media I/O. Necessary settings for Camera Extension with Core Media I/O is set with post process build of UniCamEx. Post process build of UniCamEx may not work if you did not build from the “Clean Build…” button.
3. Build .app with Xcode
Open exported .xcodeproj file with Xcode and sign in with your Apple developer account.
You must enroll the Apple Developer Program membership for building the app used System Extension.
You can build an app after sign in with Apple developer account that enrolled Apple Developer Program membership.
4. Run the Builded App
Move builded app from build directory to ~/Applications directory and run your app.
Allow using System Extension from the Mac setting if the dialog that blocked System Extension is displayed.
Then, you can select the camera named “UniCamEx” with any camera appication and can see textures output from your app made with Unity!
Author
LICENSE
Copyright (c) 2023 IKEP
Others
- UniCamEx implementation is inspired by article below and I referenced it. Thanks!


