This is a command line utility to download and install Xcode in headless mode (from a Terminal only).
![]()
License
This project is licensed under the Apache 2.0 License.
TL;DR


What is it
xcodeinstall is a command line utility to download and install Xcode from the terminal only. It may work interactively or unattended. In interactive mode, it prompts you for your Apple Developer account username, password and MFA code. In unattended mode, it fetches your Apple Developer username and password from AWS Secrets Manager. (Instructions to configure this are below).
When MFA is configured (which we highly recommend), a human interaction is required to enter the MFA code sent to your device. This step cannot be automated.
The Apple Developer Portal username and password ARE NOT STORED on the local volume. They are used to interact with Apple’s Developer Portal API and collect a session token. The session token is stored in $HOME/.xcodeinstall or on AWS Secrets Manager.
When using AWS Secrets Manager, Apple session token and cookies are securely stored on AWS Secrets Manager. The session token and cookies may be shared from multiple cloud machines. For example: you may authenticate interactively, using MFA, from your laptop, and have the command running unattended, from a script running on your cloud machine.
The session stays valid for several days, sometimes weeks before it expires. When the session expires, you have to authenticate again. Apple might prompts you for a new authentication when connecting from a new IP address or location (switching between laptop and EC2 instance for example)
When using Secrets Manager for authentication, it is required to use it FROM THE SAME AWS REGION, for the
listanddownloadcommand.
Demo

Why install Xcode in headless mode?
When preparing a macOS machine in the cloud for CI/CD, you don’t always have access to the login screen, or you don’t want to access it.
It is a best practice to automate the preparation of your build environment to ensure they are always identical.
How to install
Most of you are not interest by the source code. To install the brinary, use homebrew package manager and install a custom tap, then install the package.
First, install the custom tap. This is a one-time operation.
➜  ~ brew tap sebsto/macos

==> Tapping sebsto/macos
Cloning into '/opt/homebrew/Library/Taps/sebsto/homebrew-macos'...
remote: Enumerating objects: 6, done.
remote: Counting objects: 100% (6/6), done.
remote: Compressing objects: 100% (5/5), done.
remote: Total 6 (delta 0), reused 0 (delta 0), pack-reused 0
Receiving objects: 100% (6/6), 5.55 KiB | 5.55 MiB/s, done.
Tapped 1 formula (13 files, 21.7KB).
Once the tap is added, install the package by typing brew install xcodeinstall
➜  ~ brew install xcodeinstall

==> Downloading https://github.com/sebsto/xcodeinstall/archive/refs/tags/v0.1.tar.gz
Already downloaded: /Users/stormacq/Library/Caches/Homebrew/downloads/03a2cadcdf453516415f70a35b054cdcfb33bd3a2578ab43f8b07850b49eb19c--xcodeinstall-0.1.tar.gz
==> Installing xcodeinstall from sebsto/macos
?  /opt/homebrew/Cellar/xcodeinstall/0.2: 8 files, 25.6MB, built in 2 seconds
==> Running `brew cleanup xcodeinstall`...
Once installed, it is in the path, you can just type xcodeinstall to start the tool.
How to use
Overview
➜  ~ xcodeinstall

OVERVIEW: A utility to download and install Xcode

USAGE: xcodeinstall [--verbose] <subcommand>

OPTIONS:
  -v, --verbose           Produce verbose output for debugging
  --version               Show the version.
  -h, --help              Show help information.

SUBCOMMANDS:
  authenticate            Authenticate yourself against Apple Developer Portal
  signout                 Signout from Apple Developer Portal
  list                    List available versions of Xcode and development tools
  download                Download the specified version of Xcode
  install                 Install a specific XCode version or addon package

  See 'xcodeinstall help <subcommand>' for detailed help.
Authentication
➜  ~ xcodeinstall authenticate -h

OVERVIEW: Authenticate yourself against Apple Developer Portal

USAGE: xcodeinstall authenticate [--verbose]

OPTIONS:
  -v, --verbose           Produce verbose output for debugging
  -s, --secretmanager-region <secretmanager-region>
                          Instructs to use AWS Secrets Manager to store and read secrets in the given AWS Region
  --version               Show the version.
  -h, --help              Show help information.
Interactive authentication
➜  ~ xcodeinstall authenticate

⚠️⚠️⚠️
This tool prompts you for your Apple ID username, password, and two factors authentication code.
These values are not stored anywhere. They are used to get an Apple session ID.

The Session ID is securely stored on your AWS Account, using AWS Secrets Manager.
The AWS Secrets Manager secret name is "xcodeinstall_session"

⌨️  Enter your Apple ID username: <your apple id email>
⌨️  Enter your Apple ID password:
Authenticating...
? Two factors authentication is enabled, enter your 2FA code: 000000
✅ Authenticated with MFA.
Using AWS Secrets Manager
When your Apple Developer Portal credentials are stored on AWS Secrets Manager, you can just specify the AWS Region
➜  ~ xcodeinstall authenticate -s us-east-1

Retrieving Apple Developer Portal credentials...
Authenticating...
? Two factors authentication is enabled, enter your 2FA code: 00000
✅ Authenticated with MFA.
When using Secrets Manager for authentication, it is required to use it FROM THE SAME AWS REGION, for the
listanddownloadcommand.
The two above command (interactive and AWS Secrets Manager based) triggers the following prompt on your registered machines (laptop, phone, or tablet)


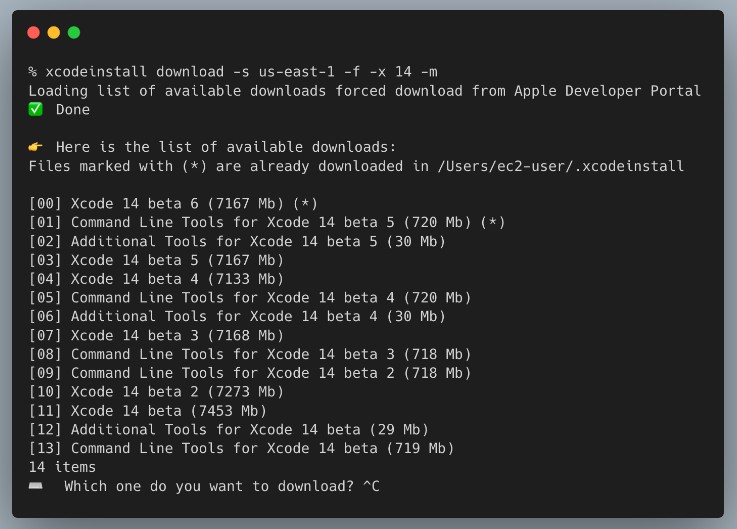
List files available to download
➜  ~ xcodeinstall list -h
OVERVIEW: List available versions of Xcode and development tools

USAGE: xcodeinstall list [--verbose] [--force] [--only-xcode] [--xcode-version <xcode-version>] [--most-recent-first] [--date-published]

OPTIONS:
  -v, --verbose           Produce verbose output for debugging
  -f, --force             Force to download the list from Apple Developer Portal, even if we have it in the cache
  -o, --only-xcode        Filter on Xcode package only
  -x, --xcode-version <xcode-version>
                          Filter on provided Xcode version number (default: 13)
  -m, --most-recent-first Sort by most recent releases first
  -d, --date-published    Show publication date
  -s, --secretmanager-region <secretmanager-region>
                          Instructs to use AWS Secrets Manager to store and read secrets in the given AWS Region
  --version               Show the version.
  -h, --help              Show help information.
Download file
➜  ~ xcodeinstall download -h
OVERVIEW: Download the specified version of Xcode

USAGE: xcodeinstall download [--verbose] [--force] [--only-xcode] [--xcode-version <xcode-version>] [--most-recent-first] [--date-published] [--name <name>]

OPTIONS:
  -v, --verbose           Produce verbose output for debugging
  -f, --force             Force to download the list from Apple Developer Portal, even if we have it in the cache
  -o, --only-xcode        Filter on Xcode package only
  -x, --xcode-version <xcode-version>
                          Filter on provided Xcode version number (default: 13)
  -m, --most-recent-first Sort by most recent releases first
  -d, --date-published    Show publication date
  -n, --name <name>       The exact package name to downloads. When omited, it asks interactively
  -s, --secretmanager-region <secretmanager-region>
                          Instructs to use AWS Secrets Manager to store and read secrets in the given AWS Region
  --version               Show the version.
  -h, --help              Show help information.
When you known the name of the file (for example Xcode 13.4.1.xip), you can use the --name option, otherwise it prompts your for the file name.
xcodeinstall download --name "Xcode 13.4.1.xip"
Install file
This tool call sudo to install packages. Be sure your userid has a a sudoers file configured to not prompt for a password.
➜  ~ cat /etc/sudoers.d/your_user_id
# Give your_user_id sudo access
your_user_id ALL=(ALL) NOPASSWD:ALL
➜  ~ xcodeinstall install -h
OVERVIEW: Install a specific XCode version or addon package

USAGE: xcodeinstall install [--verbose] [--name <name>]

OPTIONS:
  -v, --verbose           Produce verbose output for debugging
  -n, --name <name>       The exact package name to install. When omited, it asks interactively
  --version               Show the version.
  -h, --help              Show help information.
When you known the name of the file (for example Xcode 13.4.1.xip), you can use the --name option, otherwise it prompts your for the file name.
xcodeinstall install --name "Xcode 13.4.1.xip"
Minimum IAM Permissions required to use AWS Secrets Manager
The minimum IAM permisions required to use this tool with AWS Secrets Manager is as below (do not forget to replace 000000000000 with your AWS Account ID)
{
    "Version": "2012-10-17",
    "Statement": [
        {
            "Sid": "xcodeinstall",
            "Effect": "Allow",
            "Action": [
                "secretsmanager:CreateSecret",
                "secretsmanager:GetSecretValue",
                "secretsmanager:PutSecretValue"
            ],
            "Resource": "arn:aws:secretsmanager:*:000000000000:secret:xcodeinstall-*"
        }
    ]
}
Once associated with an IAM Role, you can attach the role to any IAM principal : user, group or an AWS service, such as an EC2 Mac instance. Here are instructions to do so.
Create an IAM role that contains the minimum set of permissions to allow xcodeinstall to interact with AWS Secrets Manager, then attach this role to the EC2 Mac instance where you run xcodeinstall.
From a machine where the AWS CLI is installed and where you have AWS credentials allowing you to create roles and permissions (typically your laptop), type the following commands :
- First create a role that can be attached (trusted) by any EC2 instances:
# Create the trust policy file
cat << EOF > ec2-role-trust-policy.json
{
  "Version": "2012-10-17",
  "Statement": [
    {
      "Effect": "Allow",
      "Principal": { "Service": "ec2.amazonaws.com"},
      "Action": "sts:AssumeRole"
    }
  ]
}
EOF

# Create the role itself (with no permission at the moment)
aws iam create-role \
    --role-name xcodeinstall \
    --assume-role-policy-document file://ec2-role-trust-policy.json
- Second, create a policy that contains the minimum set of permissions to interact with AWS Secrets Manager
# Create the policy file with the set of permissions
# CHANGE 000000000000 with your AWS Account ID
cat << EOF > ec2-policy.json
{
    "Version": "2012-10-17",
    "Statement": [
        {
            "Sid": "xcodeinstall",
            "Effect": "Allow",
            "Action": [
                "secretsmanager:CreateSecret",
                "secretsmanager:GetSecretValue",
                "secretsmanager:PutSecretValue"
            ],
            "Resource": "arn:aws:secretsmanager:*:000000000000:secret:xcodeinstall-*"
        }
    ]
}
EOF

# Create the policy
aws iam create-policy                      \
    --policy-name xcodeinstall-permissions \
    --policy-document file://ec2-policy.json
- Third, attach the policy to the role
# Attach a policy to a role
# CHANGE 000000000000 with your AWS Account ID
aws iam attach-role-policy                                                     \
     --policy-arn arn:aws:iam::000000000000:policy/xcodeinstall-permissions    \
     --role-name xcodeinstall
- Fourth, attach the role to your EC2 Mac instance (through an instance profile)
# Create an instance profile
aws iam create-instance-profile                   \
     --instance-profile-name xcodeinstall-profile

# Attach the role to the profile
aws iam add-role-to-instance-profile             \
    --instance-profile-name xcodeinstall-profile \
    --role-name xcodeinstall

# Identify the Instance ID of your EC2 Mac Instance.
# You may use the AWS Console or search by tags like this (replace the tag value with yours)
INSTANCE_ID=$(aws ec2 describe-instances                                                 \
               --filter "Name=tag:Name,Values=M1 Monterey"                               \
               --query "Reservations[].Instances[?State.Name == 'running'].InstanceId[]" \
               --output text)

# verify you have an ID (you may add --region to target the correct AWS Region)
echo $INSTANCE_ID

# Associate the profile to the instance
aws ec2 associate-iam-instance-profile \
    --instance-id $INSTANCE_ID         \
    --iam-instance-profile Name="xcodeinstall-profile"
When you start other EC2 Mac instance, you just need to attach the profile to the new instance. The Policy and Role can be reused for multiple EC2 instances.
How to store your secrets on AWS Secrets Manager
When using AWS Secrets Manager to retrieve your Apple Developer Portal username and password, you have to prepare an AWS Secrets Manager secret as following:
- secret name :
xcodeinstall-apple-credentials - secret format : a JSON string similar to this one :
{"username":"your_username","password":"your_password"}
To help you to create this secret, you may use the following command.
Be sure to adjust the name of the AWS Region to your requirements. Using an AWS Region geographically close to you helps to reduce latency)
➜  ~ xcodeinstall storesecrets -s us-east-1

This command captures your Apple ID username and password and store them securely in AWS Secrets Manager.
It allows this command to authenticate automatically, as long as no MFA is prompted.

⌨️  Enter your Apple ID username: [email protected]
⌨️  Enter your Apple ID password:
✅ Credentials are securely stored
How to contribute
I welcome all type of contributions, not only code : testing and creating bug report, documentation, tutorial etc… If you are not sure how to get started or how to be useful, contact me at [email protected]
I listed a couple of ideas below.
List of ideas
- add a CloudWatch Log backend to Logging framework
- add possibility to emit SNS notifications on error, such as Session Expired
Credits
xcode-install and fastlane/spaceship both deserve credit for figuring out the hard parts of what makes this possible.