Getting Started | Customization | Installation
Getting Started
Basic usage
Using Pages is as easy as:
import Pages

struct WelcomeView: View {

    @State var index: Int = 0

    var body: some View {
        Pages(currentPage: $index) {
             Text("Welcome! This is Page 1")
             Text("This is Page 2")
             Text("...and this is Page 3")
             Circle() // The 4th page is a Circle
        }
    }
}
One can also use Pages with dynamic content:
import Pages

struct Car {
    var model: String
}

struct CarsView: View {
    let cars = [Car(model: "Ford"), Car(model: "Ferrari")]
    @State var index: Int = 0

    var body: some View {
        ModelPages(cars, currentPage: $index) { pageIndex, car in
            Text("The \(pageIndex) car is a \(car.model)")
                .padding(50)
                .foregroundColor(.white)
                .background(Color.blue)
                .cornerRadius(10)
        }
    }
}
How it works
Pages uses a function builder to accomplish a SwiftUI feel while using a UIPageViewController under the hood. As in VStack or HStack, the current limit of pages to add in a static way using the Pages view is 10. If more are needed use a ModelPages instead. The Pages view will take up all the available space it is given.
Note: The
Pagesview needs more than one page. Otherwise the compiler treats what’s insidePagesas a closure.
Customization
The following aspects of Pages can be customized:
navigationOrientation: Whether to paginate horizontally or vertically. Default is.horizontal.
Pages(navigationOrientation: .vertical) {
    Text("Page 1")
    Text("Page 2")
}
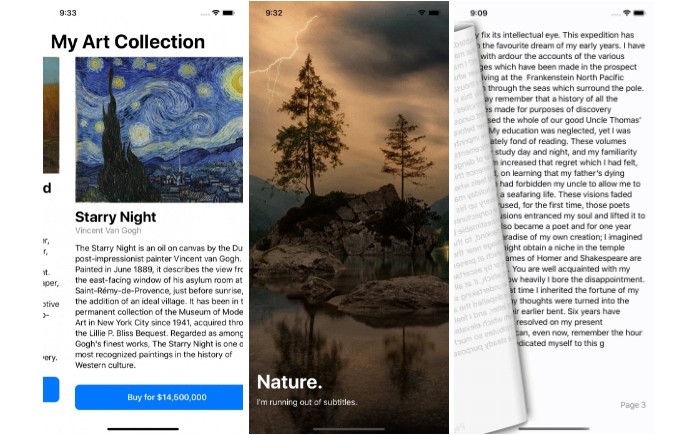
transitionStyle: Whether to perform a page curl or a scroll effect on page turn. The first two examples in the GIFs above use a scroll effect, and the last one uses page curl. Default is.scroll.
Pages(
    navigationOrientation: .vertical,
    transitionStyle: .pageCurl
) {
    Text("Page 1")
    Text("Page 2")
}
bounce: Whether to perform a bounce effect when the user tries to scroll past the number of pages. Default istrue.
Pages(
    navigationOrientation: .vertical,
    transitionStyle: .pageCurl,
    bounce: false
) {
    Text("Page 1")
    Text("Page 2")
}
wrap: Whether to wrap the pages once a user tries to go to the next page after the last page. Similarly whether to go to the last page when the user scrolls to the previous page of the first page. Default isfalse.
Pages(
    navigationOrientation: .vertical,
    transitionStyle: .pageCurl,
    bounce: false,
    wrap: true
) {
    Text("Page 1")
    Text("Page 2")
}
hasControl: Whether to display a page control or not. Default istrue.
Pages(
    navigationOrientation: .vertical,
    transitionStyle: .pageCurl,
    bounce: false,
    wrap: true,
    hasControl: false
) {
    Text("Page 1")
    Text("Page 2")
}
control: A user-defined control if one wants to tune it. If this field is not provided andhasControlistruethen the classical iOS page control will be used. Notecontrolmust conform toUIPageControl.
Pages(
    navigationOrientation: .vertical,
    transitionStyle: .pageCurl,
    bounce: false,
    wrap: true,
    control: MyPageControl()
) {
    Text("Page 1")
    Text("Page 2")
}
controlAlignment: Where to put the page control insidePages. Default is.bottom.
Pages(
    navigationOrientation: .vertical,
    transitionStyle: .pageCurl,
    bounce: false,
    wrap: true,
    controlAlignment: .topLeading
) {
    Text("Page 1")
    Text("Page 2")
}
FAQ
-
How do I position my view to the left (
.leading) or to the bottom right (.bottomTrailing)?- For example, if we want to position our
Textview on the bottom trailing corner, we can use aGeometryReaderto fill the available space:
Pages(currentPage: $index) {
    GeometryReader { geometry in
        Text("Page 1")
            .frame(width: geometry.size.width,
                   height: geometry.size.height,
                   alignment: .bottomTrailing)
    }
    .background(Color.blue)
    GeometryReader { geometry in
        Text("Page 2")
    }.background(Color.red)
}
Or the
Spacertrick:Pages(currentPage: $index) { VStack { Spacer() HStack { Spacer() Text("Page 1") } } .background(Color.blue) GeometryReader { geometry in Text("Page 2") }.background(Color.red) }
- For example, if we want to position our
Demos
All of the demos shown on the GIF can be checked out on the demo repo.
Installation
Pages is available using the Swift Package Manager:
Using Xcode 11, go to File -> Swift Packages -> Add Package Dependency and enter https://github.com/nachonavarro/Pages
Running the tests
Once you select an iPhone destination on Xcode, press ⌘U to run the tests. Alternatively run xcodebuild test -destination 'name=iPhone 11' -scheme 'Pages' on the terminal.
Requirements
- iOS 13.0+
- Xcode 11.0+
TODOs
- Add unit and UI tests.
- Improve function builder to include conditional clauses.
- Merge
ModelPagesandPagesinto one common view?
Contributing
Feel free to contribute to Pages!
- Fork
Pages - Create your feature branch with your changes
- Create pull request
License
Pages is available under the MIT license. See the LICENSE for more info.
