RichEditorView
RichEditorView is a simple, modular, drop-in UIView subclass for Rich Text Editing.
Written in Swift 4
Supports iOS 8+ through Cocoapods or Carthage.
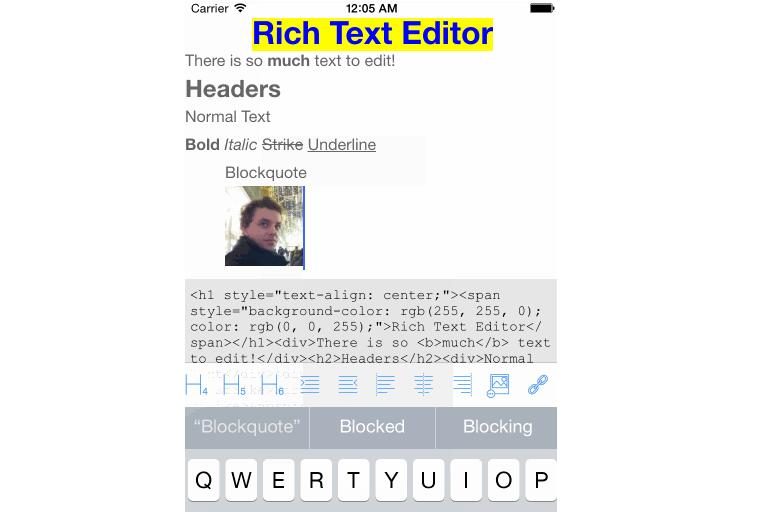
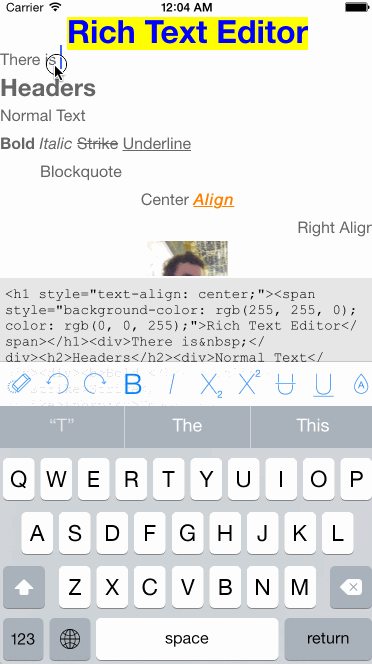
Seen in Action
Just clone the project and open RichEditorViewSample/RichEditorViewSample.xcworkspace in Xcode.
Features

- [x] Bold
- [x] Italic
- [x] Subscript
- [x] Superscript
- [x] Strikethrough
- [x] Underline
- [x] Justify Left
- [x] Justify Center
- [x] Justify Right
- [x] Heading 1
- [x] Heading 2
- [x] Heading 3
- [x] Heading 4
- [x] Heading 5
- [x] Heading 6
- [x] Undo
- [x] Redo
- [x] Ordered List
- [x] Unordered List
- [x] Indent
- [x] Outdent
- [x] Insert Image
- [x] Insert Link
- [x] Text Color
- [x] Text Background Color
Installation
Cocoapods
If you have Cocoapods installed, you can use Cocoapods to include RichEditorView into your project.
Add the following to your Podfile:
pod "RichEditorView"
use_frameworks!
Note: the use_frameworks! is required for pods made in Swift.
Carthage
Add the following to your Cartfile:
github 'cjwirth/RichEditorView'
Using RichEditorView
RichEditorView makes no assumptions about how you want to use it in your app. It is a plain UIView subclass, so you are free to use it wherever, however you want.
Most basic use:
editor = RichEditorView(frame: self.view.bounds)
editor.html = "<h1>My Awesome Editor</h1>Now I am editing in <em>style.</em>"
self.view.addSubview(editor)
Editing Text
To change the styles of the currently selected text, you just call methods directly on the RichEditorView:
editor.bold()
editor.italic()
editor.setTextColor(.red)
If you want to show the editing toolbar RichEditorToolbar, you will need to handle displaying it (KeyboardManager.swift in the sample project is a good start). But configuring it is as easy as telling it which options you want to enable, and telling it which RichEditorView to work on.
let toolbar = RichEditorToolbar(frame: CGRect(x: 0, y: 0, width: 320, height: 44))
toolbar.options = RichEditorDefaultOption.all
toolbar.editor = editor // Previously instantiated RichEditorView
Some actions require user feedback (such as select an image, choose a color, etc). In this cases you can conform to the RichEditorToolbarDelegate and react to these actions, and maybe display some custom UI. For example, from the sample project, we just select a random color:
private func randomColor() -> UIColor {
    let colors: [UIColor] = [
        .red, .orange, .yellow,
        .green, .blue, .purple
    ]

    let color = colors[Int(arc4random_uniform(UInt32(colors.count)))]
    return color
}

func richEditorToolbarChangeTextColor(toolbar: RichEditorToolbar) {
    let color = randomColor()
    toolbar.editor?.setTextColor(color)
}
Advanced Editing
If you need even more flexibility with your options, you can add completely custom actions, by either making an object that conforms the the RichEditorOption protocol, or configuring a RichEditorOptionItem object, and adding it to the toolbar's options:
let clearAllItem = RichEditorOptionItem(image: UIImage(named: "clear"), title: "Clear") { toolbar in
    toolbar?.editor?.html = ""
    return
}
toolbar.options = [clearAllItem]