SwiftUISentiment

A simple SwiftUI modifier for collecting user sentiment. SwiftUISentiment works by showing a native alert with options that indicate the users sentiment (usually either positive or negative), which then navigate to a series of configurable actions such as submitting a review, sharing on social media, sending an email, or redirecting to a URL.


Installation
SwiftUISentiment is a Swift Package so to install it to your project, simply add it as a package dependancy with File -> Add Packages.
https://github.com/zane-carter/SwiftUISentiment.git
Usage
To use SwiftUISentiment in your project, use the view modifier sentimentAlert on any view you’d like to display the sentiment alert on.
Configuration
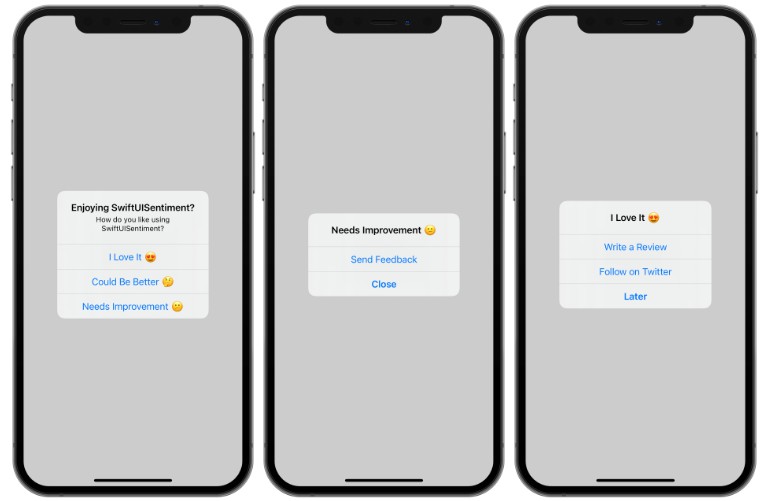
When creating a sentiment alert, you must provide a SentimentAlertConfiguration. This is where you specify the title, details, what options you would like to present the user. This is usually a few options with varying sentiments, usually positive and negative.
A SentimentAlertConfiguration can become quite big so it’s best to create your configurations in an extension for code cleanliness.
extension SentimentAlertConfiguration {
    static let example = SentimentAlertConfiguration(
        identifier: "SwiftUISentiment",
        title: "Enjoying SwiftUISentiment?",
        details: "How do you like using SwiftUISentiment?",
        options: [
            SentimentAlertOption(label: "I Love It ?", actions: [
                .review("Write a Review", appId: "1234567"),
                .twitter("Follow on Twitter", handle: "example"),
                .close("Later")
            ]),
            SentimentAlertOption(label: "Could Be Better ?", actions: [
                .review("Write a Review", appId: "1234567"),
                .email("Send Feedback", address: "[email protected]"),
                .close("No Thanks")
            ]),
            SentimentAlertOption(label: "Needs Improvement ?", actions: [
                .email("Send Feedback", address: "[email protected]"),
                .close("Close")
            ])
        ]
    )
}
Manual (Binding)
You can present a sentiment alert using your own SwiftUI Boolean binding. See an example below link to a Button.
struct ContentView: View {
    @State var isPresented = false
    var body: some View {
        Button("Show Alert") {
            self.isPresented.toggle()
        }
        .sentimentAlert(configuration: .example, isPresented: $isPresented)
    }
}
Triggers
If you’d like to present a sentiment alert after a certain amount of views for example, you can use a trigger.
⚠️ Important ⚠️
Triggers use UserDefaults and the identifier provided in the configuration to track view counts.
It is important that the identifier is unique for each individual screen that you’d like view counts to be tracked on.
Uses of the same configuration (and identifier) across the app will all count toward the tracking of view counts.
To reset the count during testing (or between version releases) then you can use the reset method on a SentimentAlertConfiguration
let configuration = SentimentAlertConfiguration.example
configuration.reset()
Trigger Once
struct ContentView: View {
    var body: some View {
        Text("Trigger Example")
            .sentimentAlert(configuration: .example, trigger: .once())
    }
}
Trigger Once After 3 Views
struct ContentView: View {
    var body: some View {
        Text("Trigger Example")
            .sentimentAlert(configuration: .example, trigger: .once(after: 3))
    }
}
Trigger Every 5 Views
struct ContentView: View {
    var body: some View {
        Text("Trigger Example")
            .sentimentAlert(configuration: .example, trigger: .repeating(every: 5))
    }
}