SPPermissions

About
SPPermissions is a library to improve the user flow when asking permissions. You can also check state of permissions, available are: .authorized, .denied & .notDetermined.
The library has three ready-use controllers: list, dialog & native. Supports iPad, dark mode, and localizations. To get going with using the library, see Quick Start.
If you like the project, don't forget to put star ★
Check out my other libraries:

Permissions
![]()
![]()
![]()
![]()
![]()
![]()
![]()
![]()
![]()
![]()
![]()
![]()
![]()
![]()
![]()
![]()
Navigate
- Installation
- Imports
- Quick Start
- Status
- Request
- DataSource
- Delegate
- Localizations
- Keys in Info.plist
- Apple Review
- Сontribution
- Other Projects
- Russian Community
Installation
SPPermisions is ready to use on iOS 11+, and supports iOS, tvOS, and SwiftUI. SPPermissions works with Swift 5+, and requires Xcode 12.0 or higher.

Swift Package Manager
The Swift Package Manager is a tool for managing the distribution of Swift code. It’s integrated with the Swift build system to automate the process of downloading, compiling, and linking dependencies.
To integrate SPPermissions using Xcode 12, specify it in File > Swift Packages > Add Package Dependency...:
https://github.com/ivanvorobei/SPPermissions
Next choose the permissions you need. But don't add all of them, because apple will reject your app.
CocoaPods:
CocoaPods is a dependency manager for Cocoa projects. For usage and installation instructions, visit their website. To integrate SPPermissions using CocoaPods, specify it in your Podfile:
pod 'SPPermissions/Notification'
Due to Apple's new policy regarding permission access you need to specifically define what kind of permissions you want to access using subspecs. For example if you want to access Camera, Location & Microphone you define the following:
pod 'SPPermissions/Camera'
pod 'SPPermissions/LocationAlways'
pod 'SPPermissions/Microphone'
Available subspecs
pod 'SPPermissions/Camera'
pod 'SPPermissions/Contacts'
pod 'SPPermissions/Calendar'
pod 'SPPermissions/PhotoLibrary'
pod 'SPPermissions/Notification'
pod 'SPPermissions/Microphone'
pod 'SPPermissions/Reminders'
pod 'SPPermissions/SpeechRecognizer'
pod 'SPPermissions/LocationWhenInUse'
pod 'SPPermissions/LocationAlways'
pod 'SPPermissions/Motion'
pod 'SPPermissions/Music'
pod 'SPPermissions/Bluetooth'
pod 'SPPermissions/Tracking'
pod 'SPPermissions/FaceID'
pod 'SPPermissions/Siri'
pod 'SPPermissions/Health'
Manually
If you prefer not to use any of dependency managers, you can integrate SPPermissions manually. Copy code and add compile flags from CONTRIBUTING.md file.
Imports
If you install via Swift Package Manager, you shoud import each module:
import SPPermissions
import SPPermissionsCamera
import SPPermissionsPhotoLibrary
If you install via CocoaPods, you only need to import one class:
import SPPermissions
Its required because library split to modules. After importing you'll see available permissions by typing SPPermissions.Permission.camera for example.
Quick Start
// MARK: 1. Choose the permissions you need:

let permissions: [SPPermissions.Permission] = [.camera, .notification]

// MARK: 2. Choose present style:

// 2a. List Style
let controller = SPPermissions.list(permissions)
controller.present(on: self)

// 2b. Dialog Style
let controller = SPPermissions.dialog(permissions)
controller.present(on: self)

// 2c. Native Style
let controller = SPPermissions.native(permissions)
controller.present(on: self)

// MARK: 3. Optional: Check permission state (available `authorized`, `denied`, `notDetermined`):

let authorized = SPPermissions.Permission.calendar.authorized
For more details check Request section.
Status
To check the state of any permission, call SPPermissions.Permission:
let authorized = SPPermissions.Permission.calendar.authorized
Also available are status for: denied & notDetermined.
Request
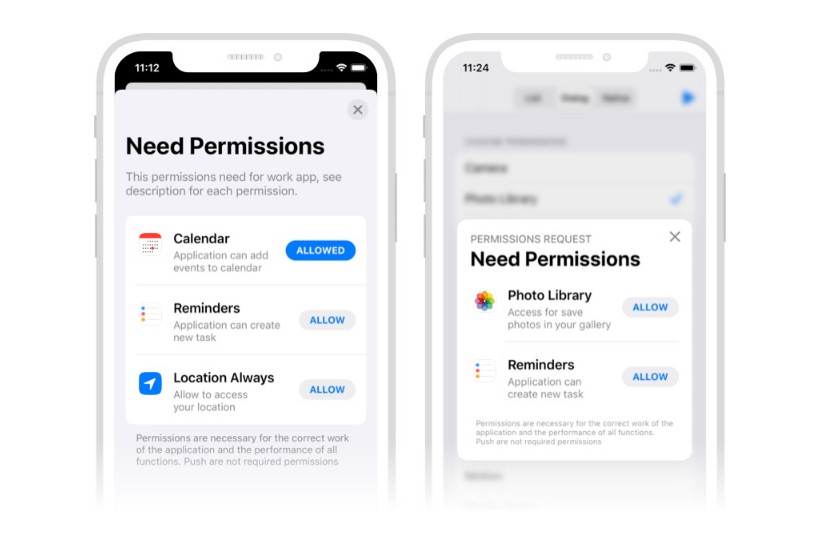
SPPermissions has three presentation styles: Dialog, List and Native. Each interface has delegates and a data source. If you want see an example app, open Example Apps/SPPermissions.xcodeproj.
Dialog
This is a modal alert. I recommend using this alert style when you have less than three requested permissions. Usage example:
let controller = SPPermissions.dialog([.camera, .photoLibrary])

// Ovveride texts in controller
controller.titleText = "Title Text"
controller.headerText = "Header Text"
controller.footerText = "Footer Text"

// Set `DataSource` or `Delegate` if need.
// By default using project texts and icons.
controller.dataSource = self
controller.delegate = self

// If you want auto dismiss controler,
// when all permissions has any determinated state
// set dismiss mode `allPermissionsDeterminated`.
// By default dismiss controller happen only when all permission allowed.
controller.dismissCondition = .allPermissionsDeterminated

// Always use this method for present
controller.present(on: self)
List
Native UITableViewController with support for the iPad. Use it when you have more than two permissions. An example of how it is used:
let controller = SPPermissions.list([.calendar, .camera, .contacts])

// Ovveride texts in controller
controller.titleText = "Title Text"
controller.headerText = "Header Text"
controller.footerText = "Footer Text"

// Set `DataSource` or `Delegate` if need.
// By default using project texts and icons.
controller.dataSource = self
controller.delegate = self

// If you want auto dismiss controler,
// when all permissions has any determinated state
// set dismiss mode `allPermissionsDeterminated`.
// By default dismiss controller happen only when all permission allowed.
controller.dismissCondition = .allPermissionsDeterminated

// Always use this method for present
controller.present(on: self)
Native
Request permissions with native alerts. You can request many permissions at once:
let controller = SPPermissions.native([.calendar, .camera, .contacts])

// Set `Delegate` if need.
controller.delegate = self

// Always use this method for request.
controller.present(on: self)
DataSource
For data source using protocol SPPermissionsDataSource. You can customise the permission cells / provide denied alert texts.
extension Controller: SPPermissionsDataSource {

    func configure(_ cell: SPPermissionsTableViewCell, for permission: SPPermissions.Permission) {

        // Here you can customise cell, like texts or colors.

        cell.permissionTitleLabel.text = "Title"
        cell.permissionDescriptionLabel.text = "Description"

        // If you need change icon, choose one of this:

        cell.permissionIconView.setPermissionType(.bluetooth)
        cell.permissionIconView.setCustomImage(UIImage.init(named: "custom-name"))
        cell.permissionIconView.setCustomView(YourView())
    }
}

Denied alert
If a permission is denied, you can provide an alert to the user with an option to open settings. An example of how you can customize the alert text:
let texts = SPPermissionsDeniedAlertTexts()
texts.titleText = "Permission denied"
texts.descriptionText = "Please, go to Settings and allow permission."
texts.actionText = "Settings"
texts.cancelText = "Cancel"
Next implement the following method and return:
func deniedAlertTexts(for permission: SPPermissions.Permission) -> SPPermissionsDeniedAlertTexts? {

    // Custom texts:
    return texts

    // or default texts:
    // return .default
}
Delegate
To get hidden, allowed or denied events , set the delegate with protocol SPPermissionsDelegate:
extension Controller: SPPermissionsDelegate {

    func didHidePermissions(_ permissions: [SPPermissions.Permission]) {}
    func didAllowPermission(_ permission: SPPermissions.Permission) {}
    func didDeniedPermission(_ permission: SPPermissions.Permission) {}
}
Localizations
SPPermissions has ready-to-use localizations for:
- English
en - Arabic
ar - German
de - Spanish
es - French
fr - Polish
pl - Portuguese
pt - Ukrainian
uk - Russian
ru - Chinese Simplified Han
zh_Hans - Italian
it - Chinese Traditional
zh_Hant
If you want to add more, please, create folder language_id.lproj and make a pull request. If you want to use your custom strings, check the DataSource section.
Keys in Info.plist
You need to add some keys to the Info.plist file with descriptions, per Apple's requirement(s). You can get a plist of keys for permissions as follows:
let key = SPPermissions.Permission.bluetooth.usageDescriptionKey
List of keys:
- NSCameraUsageDescription
- NSContactsUsageDescription
- NSCalendarsUsageDescription
- NSMicrophoneUsageDescription
- NSAppleMusicUsageDescription
- NSRemindersUsageDescription
- NSPhotoLibraryUsageDescription
- NSPhotoLibraryAddUsageDescription
- NSSpeechRecognitionUsageDescription
- NSMotionUsageDescription
- NSLocationWhenInUseUsageDescription
- NSLocationAlwaysAndWhenInUseUsageDescription
- NSBluetoothAlwaysUsageDescription
- NSBluetoothPeripheralUsageDescription (iOS 12 and earlier)
- NSUserTrackingUsageDescription
- NSFaceIDUsageDescription
- NSSiriUsageDescription
- NSHealthUpdateUsageDescription
- NSHealthShareUsageDescription
Do not use the description as the name of the key.
If you use xliff localization export, keys will be create automatically. If you prefer do the localization file manually, you need to create InfoPlist.strings, select languages in the right side menu and add keys as keys in plist-file. See:
"NSCameraUsageDescription" = "Here description of usage camera";
Apple Review
Apple changed its review guidelines in May/June 2021. When requesting permissions, apps should require users to always request and make a decision whether to allow or decline the permission. For this reason, the close button in SPPermissions is hidden by default. If you want to force show the close button, run the following code:
// Show & hide close button
controller.showCloseButton = true

// Enable or Disable drag intercation
controller.allowSwipeDismiss = true
Also changed title for button. Instead of allow now using continue. The Apple Review Team asked for this. For details, check out this issue.
Сontribution
My English is very bad. You can see this once you read the documentation. I would really like to have clean and nice documentation. If you see gramatical errors and can help fix the Readme, please contact me [email protected] or make a Pull Request. Thank you in advance!
Other Projects
I love being helpful. Here I have provided a list of libraries that I keep up to date. For see video previews of libraries without install open opensource.ivanvorobei.by website.
I have libraries with native interface and managing permissions. Also available pack of useful extensions for boost your development process.

Russian Community
Подписывайся в телеграмм-канал, если хочешь получать уведомления о новых туториалах.
Со сложными и непонятными задачами помогут в чате.


Видео-туториалы выклыдываю на YouTube: