YXYDashLayer
YXYProgressDashLayer is composed of YXYColorfulDashLayer, which is masked by YXYMaskDashLayer. They can draw dash rounded rects.
YXYMaskDashLayer controls the dash path. YXYColorfulDashLayer is a subclass of CAGradientLayer, so it can draw colorful dash path. YXYProgressDashLayer uses two instances of YXYColorfulDashLayer.
? Usage
self.progressDash = [YXYProgressDashLayer layer];
self.progressDash.underLayer.colors = @[(id)[UIColor blueColor].CGColor, (id)[UIColor greenColor].CGColor];
self.progressDash.progressColor = [UIColor grayColor];

CGFloat radius = self.cornerRadiusSlider.value;
self.progressDash.dashCornerRadius = radius;

CGFloat dashGap = self.dashGapSlider.value;
self.progressDash.dashGap = dashGap;

CGFloat dashWidth = self.dashWidthSlider.value;
self.progressDash.dashWidth = dashWidth;

NSInteger count = self.totalCountSlider.value;
self.progressDash.totalCount = count;

self.progressDash.progress = self.grayCountSlider.value;

CGRect dashRect = CGRectMake((self.view.frame.size.width - 200) / 2, 50, 200, 300);
self.progressDash.frame = dashRect;
[self.progressDash refresh];
[self.view.layer addSublayer:self.progressDash];
For better performance, you can use refreshProgress after modifying totalCount、dashGap and progress. NOTE: refresh must be called when frame, dashWidth or dashCornerRadius changes.
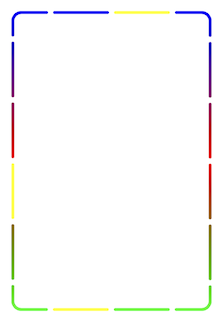
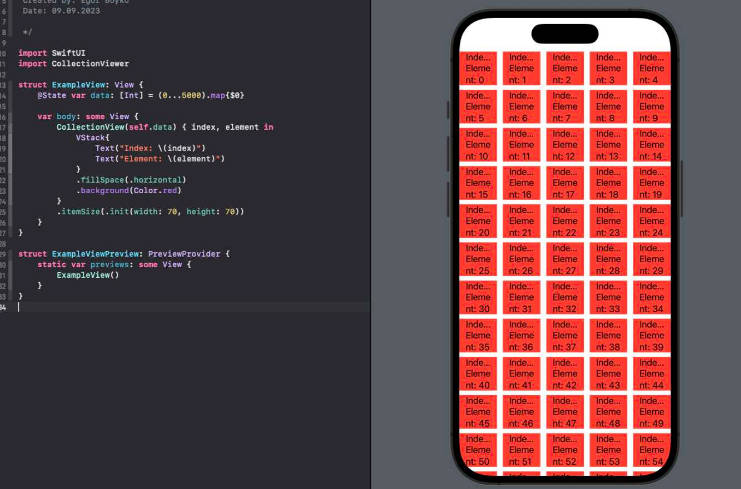
CGRect dashRect = CGRectMake((self.view.frame.size.width - 200) / 2, 50, 200, 300);
YXYColorfulDashLayer *layer1 = [YXYColorfulDashLayer layer];
layer1.colors = @[(id)[UIColor blueColor].CGColor, (id)[UIColor redColor].CGColor, (id)[UIColor greenColor].CGColor];
layer1.totalCount = 16;
layer1.dashCornerRadius = 10;
layer1.showIndexes = @[@4, @1, @2, @3, @5, @6, @7, @9, @10, @12, @13, @14, @15];
layer1.frame = dashRect;
[layer1 refresh];

YXYColorfulDashLayer *layer2 = [YXYColorfulDashLayer layer];
layer2.colors = @[(id)[UIColor yellowColor].CGColor, (id)[UIColor yellowColor].CGColor];
layer2.totalCount = 16;
layer2.dashCornerRadius = 10;
layer2.showIndexes = @[@0, @8, @11];
layer2.frame = dashRect;
[layer2 refresh];

[self.view.layer addSublayer:layer1];
[self.view.layer addSublayer:layer2];
? Example
To run the example project, clone the repo and run YXYDashLayerSample target.
? Requirement
- iOS 4.0+
- Xcode 9.0+
? Installation
CocoaPods
CocoaPods is a dependency manager for Cocoa projects. You can install it with the following command:
$ gem install cocoapods
To integrate YXYDashLayer into your Xcode project using CocoaPods, specify it in your Podfile:
source 'https://github.com/CocoaPods/Specs.git'
platform :ios, '11.0'
use_frameworks!
target 'MyApp' do
	pod 'YXYDashLayer'
end
You need replace "MyApp" with your project's name.
Then, run the following command:
$ pod install
Carthage
Carthage is a decentralized dependency manager that builds your dependencies and provides you with binary frameworks.
You can install Carthage with Homebrew using the following command:
$ brew update
$ brew install carthage
To integrate YXYDashLayer into your Xcode project using Carthage, specify it in your Cartfile:
github "yulingtianxia/YXYDashLayer"
Run carthage update to build the framework and drag the built YXYDashLayerKit.framework into your Xcode project.
Manual
Just drag the "Source" document folder into your project.
❤️ Contributed
- If you need help or you'd like to ask a general question, open an issue.
- If you found a bug, open an issue.
- If you have a feature request, open an issue.
- If you want to contribute, submit a pull request.
??? Author
yulingtianxia, [email protected]