
FlowKit
FlowKit is a new approach to create, populate and manage UITableView and UICollectionView.
With a declarative and type-safe approach you don't need to implement datasource/delegate anymore: your code is easy to read, maintain and SOLID.
Want to know more about FlowKit?
Features Highlights
- No more datasource/delegate: you don't need to implements tons of methods just to render your data. Just plain understandable methods to manage what kind of data you want to display, remove or move.
- Type-safe: register pair of model/cell types you want to render, then access to instances of them in pure Swift type-safe style.
- Auto-Layout: self-sized cells are easy to be configured, both for tables and collection views.
- Built-In Auto Animations: changes & sync between your datasource and table/collection is evaluated automatically and you can get animations for free.
- Compact Code: your code for table and collection is easy to read & maintain; changes in datasource are done declaratively via
add/moveandremovefunctions (both for sections, header/footers and single rows).
What you will get
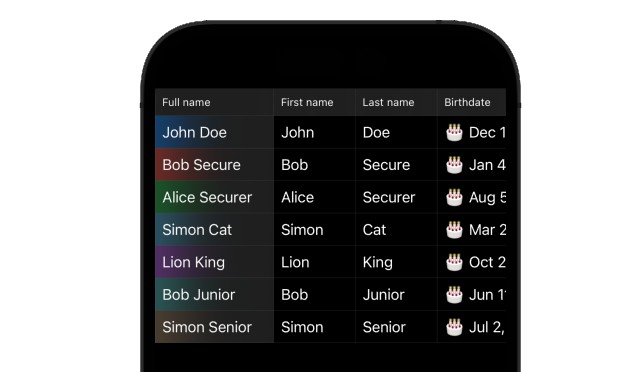
The following code is just a small example which shows how to make a simple Contacts list UITableView using FlowKit (it works similar with collection too):
// Create a director which manage the table/collection
let director = TableDirector(self.tableView)

// Declare an adapter which renders Contact Model using ContactCell
let cAdapter = TableAdapter<Contact,ContactCell>()

// Hook events you need
// ...dequeue
cAdapter.on.dequeue = { ctx in
	self.fullNameLabel.text = "\(ctx.model.firstName) \(ctx.model.lastName)"
	self.imageView.image = loadFromURL(ctx.model.avatarURL)
}
// ...tap (or all the other events you typically have for tables/collections)
cAdapter.on.tap = { ctx in
	openDetail(forContact: ctx.model)
}

// Register adapter; now the director know how to render your data
director.register(adapter: cAdapter)

// Manage your source by adding/removing/moving sections & rows
director.add(models: arrayOfContacts)
// Finally reload your table
director.reloadData()
Pretty simple uh?
No datasource, no delegate, just a declarative syntax to create & manage your data easily and in type-safe manner (both for models and cells).
Learn more about sections, header/footer & events by reading the rest of guide.
Overview
The following graph describe the infrastructure of FlowKit for Collection (the same graph is also available for Tables)).
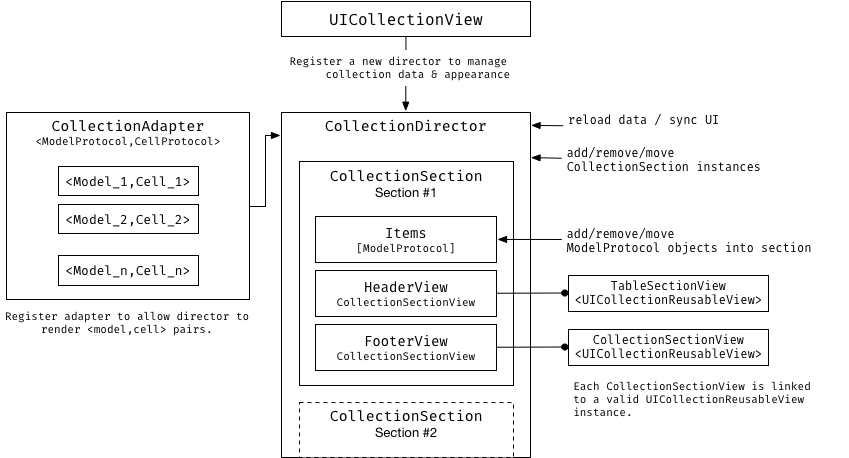
The most important class of FlowKit is the Director; this class (TableDirector for tables, CollectionDirector/FlowCollectionDirector for collections) manage the sync between the data and the UI: you can add/remove/move sections and configure the appearance and the behaviour of the list directly from this instance.
The first step to use FlowKit is to assign a director to your list: you can do it by calling list.director or just creating your own director with the list instance to manage:
let director = FlowCollectionDirector(self.collectionView)
In order to render some data FlowKit must know what kind of data you want to show into the list; data is organized as pair of <Model,View> (where Model is the object you want to add into the table and view is the cell used to represent the data).
A single model type (any class which is conform to ModelProtocol and Hashable) can be represented by one and only View (while a View can be used to represent different models).
Adapter also allows to receive events used to configure the view and the behaviour: you can intercept tap for an instance of your model and do something, or just fillup received type-safe cell instance with model instance.
So, as second step, you need to register some adapters:
let adapter = CollectionAdapter<Contact,ContactCell>()
adapter.on.tap = { ctx in
	print("User tapped on \(ctx.model.firstName)")
}
adapter.on.dequeue = { ctx in
	ctx.cell?.titleLabel?.text = ctx.model.firstName
}
Now you are ready to create sections with your models inside:
let section = TableSection(headerTitle: "Contacts", models: contactsList)
self.tableView.director.add(section: section)
Models array can be etherogenous, just remeber to make your objects conform to ModelProtocol and Hashable protocol and register the associated adapter. FlowKit will take care to call your adapter events as it needs.
Finally you can reload the data:
self.tableView.reloadData()
Et voilà! In just few lines of code you have created e managed even complex lists.
The following guide describe all the other features of the library.
Create the Director (TableDirector/CollectionDirector)
You can think about the Director has the owner/manager of the table/collection: using it you can declare what kind of data your scroller is able to show (both models and views/cells), add/remove/move both sections and items in sections.
Since you will start using FlowKit you will use the director instance to manage the content of the UI.
Keep in mind: a single director instance is able to manage only a single instance of a scroller.
You have two ways to set a director; explicitly:
public class ViewController: UIViewController {
	@IBOutlet public var tableView: UITableView?
	private var director: TableDirector?

	override func viewDidLoad() {
		super.viewDidLoad()
		self.director = TableDirector(self.tableView!)
	}
}
or using implicitly, by accessing to the director property: the first time you call it a new director instance is created and assigned with strong reference to the table/collection instance.
Note: For UICollectionView FlowCollectionDirector is created automatically; if you use another layout you must create a new one manually.
let director = self.tableView.director // create a director automatically and assign as strong reference to the table/collection
// do something with it...
Register Adapters (TableAdapter/CollectionAdapter)
Once you have a director you need to tell to it what kind of data you are about to render: you can have an etherogeneus collection of Models and View (cells) in your scroller but a single Model can be rendered to a single type of View.
Suppose you want to render two types of models:
Contactinstances usingContactCellviewContactGroupinstances usingContactGroupCellview
You will need two adapters:
let contactAdpt = TableAdapter<Contact,ContactGroup>()
let groupAdpt = TableAdapter<ContactGroup,ContactGroupCell>()
tableView.director.register(adapters: [contactAdpt, groupAdpt])
Now you are ready to present your data.
Create Data Models (ModelProtocol)
In order to render your data each object of the scroller must be conform to ModelProtocol which includes:
- Must be conform to
Hashableprotocol (this is used to perform built-in automatic animations we'll see later) - Must implement a simple
identifierproperty (used above)
This is an example implementation of Contact model:
public class Contact: ModelProtocol, Hashable {
	public var name: String
	public var GUID: String = NSUUID().uuidString

	public var identifier: Int {
		return GUID.hashValue
	}

	public static func == (lhs: Contact, rhs: Contact) -> Bool {
		return lhs.GUID == rhs.GUID
	}

	public init(_ name: String) {
		self.name = name
	}
}
Create Cells (UITableViewCell/UICollectionViewCell)
Both UITableViewCell and UICollectionViewCell and its subclasses are automatically conforms to CellProtocol.
The only constraint is about reuseIdentifier: cells must havereuseIdentifier (Identifier in Interface Builder) the name of the class itself..
If you need you can override this behaviour by overrinding the reuseIdentifier: String property of your cell and returing your own identifier.
Cell can be loaded in three ways:
- Cells from Storyboard: This is the default behaviour; you don't need to do anything, cells are registered automatically.
- Cells from XIB files: Be sure your xib files have the same name of the class (ie.
ContactCell.xib) and the cell as root item. - Cells from
initWithFrame: OverrideCellProtocol'sregisterAsClassto returntrue.
This is a small example of the ContactCell:
public class ContactCell: UITableViewCell {
	@IBOutlet public var labelName: UILabel?
	@IBOutlet public var labelSurname: UILabel?
	@IBOutlet public var icon: UIImageView?
}
Add Sections (TableSection/CollectionSection)
Each Table/Collection must have at least one section to show something.
TableSection/CollectionSection instances hold the items to show (into .models property) and optionally any header/Footer you can apply.
In order to manage sections of your table you need to use the following methods of the parent Director:
set(models:)change the section of the table/collection.section(at:)return section at index.firstSection()return first section, if any.lastSection()return last section, if any.add(section:at:)add or insert a new section.add(sections:at:)add an array of sections.add(models:)create a new section with given models inside and add it.removeAll(keepingCapacity:)remove all sections.remove(section:)remove section at given index.remove(sectionsAt:)remove sections at given indexes set.move(swappingAt:with:)swap section at given index with destination index.move(from:to)combo remove/insert of section at given index to destination index.
The following example create a new TableSection with some items inside, a String based header, then append it a the end of the table.
let section = TableSection(headerTitle: "The Strangers", items: [mrBrown,mrGreen,mrWhite])
table.director.add(section: section)
Manage Models/Items in Section
As for section the same add/remove/move function are also available for models array which describe the content (rows/items) inside each section (TableSection/CollectionSection instances).
This is the complete list:
set(models:)change models array.add(model:at:)add model at given index, if nil is append at the bottom.add(models:at:)add models starting at given index; if nil models are append at the bottom.remove(at:)remove model at given index.remove(atIndexes:)remove models at given index set.removeAll(keepingCapacity:)remove all models of the section.move(swappingAt:with:)Swap model at given index to another destination index.move(from:to:)Remove model at given index and insert at destination index.
After any change you must call the director.reloadData() function from main thread to update the UI.
This is an example of items management:
let section = self.tableView.director.firstSection()

let newItems = [Contact("Daniele","Margutti"),Contact("Fabio","Rossi")]
section.add(models: newItems) // add two new contacts
section.remove(at: 0) // remove first item

// ...
self.tableView.director.reloadData() // reload data
Setup Headers & Footers (TableSectionView/CollectionSectionView)
Simple Header/Footer
Section may have or not headers/footers; these can be simple String (as you seen above) or custom views.
Setting simple headers is pretty straightforward, just set the headerTitle/footerTitle:
section.headerTitle = "New Strangers"
section.footerTitle = "\(contacts.count) contacts")
Custom View Header/Footer
To use custom view as header/footer you need to create a custom xib file with a UITableViewHeaderFooterView (for table) or UICollectionReusableView (for collection) view subclass as root item.
The following example shows a custom header and how to set it:
// we also need of TableExampleHeaderView.xib file
// with TableExampleHeaderView view as root item
public class TableExampleHeaderView: UITableViewHeaderFooterView {
	@IBOutlet public var titleLabel: UILabel?
}

// create the header container (will receive events)
let header = TableSectionView<TableExampleHeaderView>()
// hooks any event. You need at least the `height` as below
header.on.height = { _ in
	return 150
}

// Use it
let section = TableSection(headerView: header, items: [mrBrown,mrGreen,mrWhite])
table.director.add(section: section)
Reload Data with/out Animations
Each change to the data model must be done by calling the add/remove/move function available both at sections and items levels.
After changes you need to call the director's reloadData() function to update the UI.
The following example update a table after some changes:
// do some changes
tableView.director.remove(section: 0)
tableView.director.add(section: newSection, at: 2)
...
tableView.director.firstSection().remove(at: 0)

// then reload
tableView.director.reloadData()
If you need to perform an animated reload just make your changes to the model inside the callback available into the method.
Animations are evaluated and applied for you!
tableView.director.reloadData(after: { _ in
	tableView.director.remove(section: 0)
	tableView.director.add(section: newSection, at: 2)

	return TableReloadAnimations.default()
})
For TableDirector you must provide a TableReloadAnimations configuration which defines what kind of UITableViewRowAnimation must be applied for each type of change (insert/delete/reload/move). TableReloadAnimations.default() just uses .automatic for each type.
For CollectionDirector you don't need to return anything; evaluation is made for you based upon the layout used.
Listen for Events
All events are hookable from their respective objects starting from .on property. All standard table & collections events are available from FlowKit; name of the events is similar to the their standard corrispettive in UIKit (see the official documentation for more info abou any specific event).
Sizing Cells
FlowKit support easy cell sizing using autolayout.
You can set the size of the cell by adapter or collection based. For autolayout driven cell sizing set the rowHeight (for TableDirector) or itemSize (for CollectionDirector/FlowCollectionDirector) to the autoLayout value, then provide an estimated value.
Accepted values are:
default: you must provide the height (table) or size (collection) of the cellautoLayout: uses autolayout to evaluate the height of the cell; for Collection Views you can also provide your own calculation by overridingpreferredLayoutAttributesFitting()function in cell instance.fixed: provide a fixed height for all cell types (faster if you plan to have all cell sized same)
Installation
Install via CocoaPods
CocoaPods is a dependency manager which automates and simplifies the process of using 3rd-party libraries like FlowKit in your projects. You can install it with the following command:
$ sudo gem install cocoapods
CocoaPods 1.0.1+ is required to build FlowKit.
Install via Podfile
To integrate FlowKit into your Xcode project using CocoaPods, specify it in your Podfile:
source 'https://github.com/CocoaPods/Specs.git'
platform :ios, '8.0'

target 'TargetName' do
use_frameworks!
pod 'FlowKitManager'
end
Then, run the following command:
$ pod install
Carthage
Carthage is a decentralized dependency manager that builds your dependencies and provides you with binary frameworks.
You can install Carthage with Homebrew using the following command:
$ brew update
$ brew install carthage
To integrate FlowKit into your Xcode project using Carthage, specify it in your Cartfile:
github "malcommac/FlowKitManager"
Run carthage to build the framework and drag the built FlowKit.framework into your Xcode project.
Requirements
FlowKit is compatible with Swift 4.x.
- iOS 9.0+