Quick Start
TL;DR?
SimpleSource is a library that lets you populate and update table views and collection views with ease. It gives you fully typed closures so you don't have to cast views or items, it lets you deal with model objects instead of index paths, and it handles the cell bookkeeping for incremental updates.
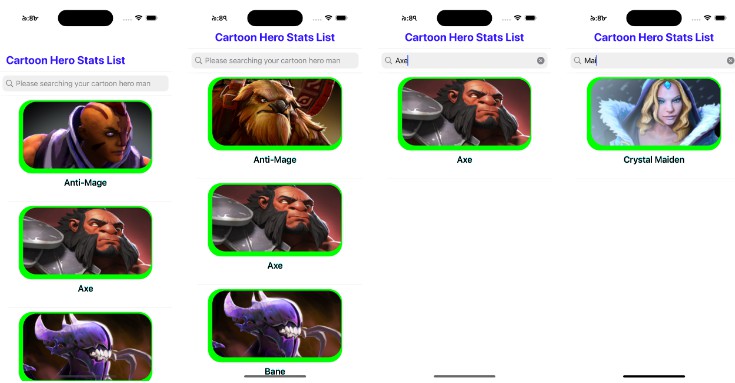
Run the example app. Navigate the UI and see how little code is in each view controller.
Then come back here to learn more.
$ cd Examples/
$ pod install
$ open SimpleSourceExample.xcworkspace
Introduction
Never implement UITableViewDataSource or UICollectionViewDataSource again.
SimpleSource is a small, focused library that lets you
- Populate and update
UITableViewandUICollectionViewviews from manually
managed arrays or Core Data. - Forget about dequeuing and type casting cells. Forget about converting an
IndexPathto a model object. SimpleSource will hand you dequeued views of the
correct type along with the right model object for the index path. You can focus
on applying your custom data to your custom view. - Forget about cell bookkeeping. Just mutate your data, and SimpleSource will update,
add, and remove items and sections in your views.
That's it?
Those are the headline features, but sure, there's more.
- Automatic diffs and animated updates. Store your items in a regular old Swift
Array.
Simply reassign or mutate the array, and the correct incremental changes will be
automatically applied to your table view or collection view – animating the corresponding
rows in and out. Same thing for Core Data. Say goodbye toreloadData(). - Cleanly separate presentation logic from model data. A SimpleSource DataSource
object is all about the model data. It knows nothing about views. Not even whether it
will be used to drive a table or collection view. Or how many views it will be delivering
data to. - Built-in or custom views? You decide. For
UITableViewyou can use any built-in
UITableViewCellStylefor the cells. And for headers and footers you can use the built-in
text-based ones, which only require you to provide a string to display. But of course you
can also use custom views for cells, headers, and footers. - Design in code or Interface Builder? You decide. You tell SimpleSource how to dequeue
your custom views. Either by directly instantiating a class, loading a NIB, using a
storyboard prototype or (for table views) using one of the built-in cell styles. - Easy reordering of collection view cells. Do you want drag-and-drop for items in your
collection view? By giving SimpleSource an optional reordering delegate you can have
drag-and-drop reordering in as little as 1 line of code. Check out the example project.
There will also be some slightly more advanced tips and tricks later in this document. Once
we have covered basic usage.
Overview
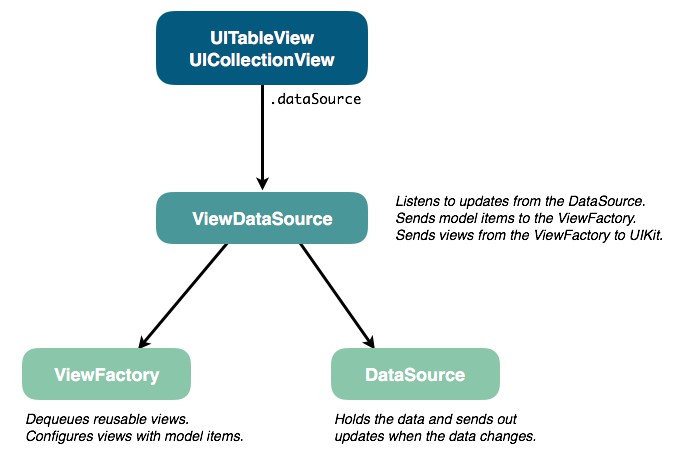
There are 3 components involved when using SimpleSource. To populate a table view or
collection view you will need exactly one of each.
- ViewDataSource – This is the part you give to UIKit. It implements either
UITableViewDataSourceorUICollectionViewDataSourcefor you. To create one of these
you need a DataSource and a ViewFactory. - DataSource – This is where your items come from. If you want to keep them organized
in arrays use aBasicDataSource. If you have them in Core Data use aCoreDataSource.
The DataSource knows absolutely nothing about views. - ViewFactory – This is responsible for creating and configuring your cells. Before
creating the ViewDataSource you teach a ViewFactory how to create and configure all
your different views from a model item. Later the ViewDataSource will find and pass
the relevant model items to the ViewFactory for dequeueing and configuration, before
finally sending the configured view to be displayed by UIKit.
In summary:
The table view or collection view asks the ViewDataSource for a view to display for a given index
path. Using this index path, the ViewDataSource gets the corresponding model object from
the DataSource and gives it to the ViewFactory. The ViewFactory then dequeues a cell,
and uses the model object to configure the view before giving it back to the ViewDataSource.
We will use the terms ViewDataSource, ViewFactory and DataSource to speak about these
components in general.

There are a few different concrete implementations of each component type, depending on where
you get your data from (arrays or Core Data) and where you want to display it
(a table or a collection view):
| Component | Class Names |
|---|---|
| ViewDataSource | TableViewDataSource / CollectionViewDataSource |
| ViewFactory | TableViewFactory / CollectionViewFactory |
| DataSource | BasicDataSource / CoreDataSource |
What SimpleSource isn't
SimpleSource is strictly a data source for your views. In particular, it doesn't want to be
your view's delegate. Anything that has to do with cell/row selection, collection view layouts,
row heights etc. is up to you and your own delegate code.
The DataSource is not meant to be or replace your app's persistence layer:
- A
CoreDataSourceis just a wrapper around anNSFetchedResultsControllerthat you
create from your own database. - A
BasicDataSourceis just a wrapper around a regular Swift array of items from anywhere
you'd like.
We have also kept the clever protocols and generics to a minimum. Table views and collection views
have certain inherent differences. We accept that, and don't try to abstract everything away
behind a single API, which matches neither. And you shouldn't have to be a type theorist to
show an array of items in a table.
What's the catch?
There shouldn't be any catch. No one wants to give up control to an opaque library.
With SimpleSource every moving part is either a closure which you provide, or an easily
replaceable component. The library is quite small, and is mostly just a
neat system for clicking different parts together into a flexible, functioning whole.
As you read further down in this document you will see how to support custom databases, disable
or adapt the animations to your liking etc.
Installation
CocoaPods
To include SimpleSource in a project using CocoaPods add the following
entry to your Podfile:
pod 'SimpleSource'
Then run the command pod install to add SimpleSource to your workspace.
Getting Started
We will build a simple example, showing a table of employees grouped by department.
The Data
Just like UITableView and UICollectionView, SimpleSource is built around the concept of
items structured into sections. So our items will be employees, and our sections will be their
department.
We will use simple value types and arrays, so the BasicDataSource is right for the job.
This will be our employee object:
struct Employee {
    var name: String
}
Now for the sections, which will be departments. A section here is anything conforming to the
SectionType protocol.
A section only has to provide an items array. But we are free to add more properties to a
section, such as a title (or anything else we need) to properly configure section headers etc.
To illustrate this, let's also add the department name to make the model a little richer.
struct Department: SectionType {
    typealias ItemType = Employee
    var name: String
    var items: [ItemType]
}
Now we can build our data set:
// Employees
let alice = Employee(name: "Alice")
let bob = Employee(name: "Bob")
...

// Departments
let engineering = Department(name: "Engineering", items: [alice, christine, diana])
let sales = Department(name: "Sales", items: [bob, eliza, frank])
...

// Collect all departments
let departments = [engineering, sales, ...]
The DataSource
Once we have the data, creating a BasicDataSource is easy:
let dataSource = BasicDataSource(sections: departments)
Note that dataSource.sections is a mutable array of Department. And for each section
section.items is a mutable array of Employee.
Once everything is up and running we can modify these arrays, and the table view will update
automatically with the proper animations.
The ViewFactory
The next step on the way to a working table is to create a view factory. This will be
responsible for creating and configuring the cells.
A ViewFactory is created with a closure, which is called every time a new cell is about to be
dequeued. It returns the reuse identifier for the cell.
let viewFactory = TableViewFactory<Employee> { item, view in
    return "Cell"
}
Tip: If you have more than one cell type in your view, look at the
itempassed to the
closure (in our case,itemwill be of typeEmployee). Then decide which kind of cell to
use and return the relevant reuse identifier.
Now we must teach the view factory what cells to dequeue for the "Cell" reuse identifier
and how to configure them. This is done through configuration closures.
In this simple case we use vanilla UITableViewCells, so that is what the closure gets. But if
you have custom cell subclasses then that is what SimpleSource will send to your closure. No
need for type casting.
let configureCell = { (cell: UITableViewCell, employee: Employee, indexPath: IndexPath) -> Void in
    cell.textLabel?.text = employee.name
}

viewFactory.registerCell(
    method: .style(.default),
    reuseIdentifier: "Cell",
    in: tableView,
    configuration: configureCell
)
Tips:
If you are using a custom cell class it can be convenient to store the configuration closure
as a static class variable on the cell. Then pass (for example)EmployeeCell.configureCell
toregisterCell. You can also store the reuse identifier this way. As, let's say,
EmployeeCell.defaultReuseIdentifier.If you use trailing closure syntax you can do the configuration as part of the
registerCellcall.If your cell configuration closures require additional data not passed in by SimpleSource you can
capture those dependencies when you create the closures. You will see an example of this next
as we add the section header text to our table view.
For good measure, let's also tell the viewFactory to add a text header for each department
with the department name:
viewFactory.registerHeaderText(in: tableView) { section in
    return dataSource.sections[section].name
}
Notice how the configuration closure captures the data source here and uses it to get the name of
the department for every section header. This is fine, since the data source does not hold a strong
reference to anything but the model objects. But to avoid retain cycles you should be careful not
to capture something which eventually retains the view factory. Use [weak ...] annotations on
your configuration closures to break any retain cycles.
The ViewDataSource
Now we are ready to create the UITableViewDataSource for our table view. This is going to be
an instance of TableViewDataSource.
let tableViewDataSource = TableViewDataSource(
    dataSource: dataSource,
    viewFactory: viewFactory,
    viewUpdate: tableView.defaultViewUpdate()
)
This is where we connect the dataSource and the viewFactory.
Note: See the section on live view updates for an explanation
of theviewUpdateparameter.
Connect the Data Source
The only thing we need to do now is connect the tableViewDataSource to our table view:
tableView.dataSource = tableViewDataSource
And our table is ready:

Live View Updates
We haven't mentioned how changes made to a DataSource end up in the view.
The ViewDataSource listens to the DataSource for data updates. These updates can either
come from the NSFetchedResultsController given to a CoreDataSource or from a diff
calculated by SimpleSource when you reassign the sections or item arrays in a BasicDataSource
These changes then have to be applied to the view.
When creating a ViewDataSource you also pass in a viewUpdate closure, which is responsible
for incorporating incremental changes into the view.
Most often you probably want to use one of the built-in row animations for table views, and
use performBatchUpdates for collection views.
For table views, SimpleSource defines UITableView.defaultViewUpdate() which does this
animated update for you. If you prefer an unanimated update you can use
UITableView.unanimatedViewUpdate. Or you can create your own. It's just a closure. You can
also pass your favorite UITableViewRowAnimation to defaultViewUpdate() to customize it.
For collection views, the built-in view updaters are called
UICollectionView.defaultViewUpdate and UICollectionView.unanimatedViewUpdate. Any
animations are provided by the collection view layout. See the UIKit documentation for
initialLayoutAttributesForAppearingItem(at:) and friends.
Examples
There is a playground and an example project in the Examples/ directory.
To try it out, run the following commands:
$ cd Examples/
$ pod install
$ open SimpleSourceExamples.xcworkspace
In this project you will see how to use both basic arrays and Core Data, how to create custom
headers and footers, how the views update automatically when you mutate the data source, how to
do drag-and-drop collection view reordering and more.
Note: If you want to try the playground, make sure you open it via the
.xcworkspacefile. This will allow it to locate and build the necessary frameworks so
it can import SimpleSource.
Beyond the Basics
Collection View Reordering
With SimpleSource, adding support for collection view cell reordering can be done in as
little as one line of code.
The first step is to make sure that the correct gesture handling is in place for your
collection view. This is outside the scope for SimpleSource, but see the documentation for the
property installsStandardGestureForInteractiveMovement on UICollectionView. Either set this
property to true or install your own custom gestures.
The CollectionViewDataSource class has an optional reorderingDelegate property which can be
set to indicate that cell reordering should be enabled.
This reordering delegate is defined by the CollectionViewReorderingDelegate protocol and is
responsible for making the necessary modifications in the DataSource when reordering
completes.
Implementing it for a BasicDataSource only requires one line of actual code:
func reordering(collectionView: UICollectionView, moveItemAt sourceIndexPath: IndexPath, to destinationIndexPath: IndexPath) {
    dataSource.moveItem(at: sourceIndexPath, to: destinationIndexPath)
}
Implementing CollectionViewReorderingDelegate when using a CoreDataSource requires you to
make modifications to your data that cause the object at sourceIndexPath to move to
destinationIndexPath. How to do that depends on both the Core Data model and the sort
criteria on the NSFetchedResultsController that the CoreDataSource was created from.
See the example app for a demo of cell reordering.
More Tips
- Do you like MVVM? So do we! The view model is a great place to put your
DataSource.
Then keep theViewFactoryandViewDataSourcein the view layer. Either in your view
controller or a helper class. - Bring your own database. Out of the box, SimpleSource delivers support for items stored
in manually managed arrays as well as Core Data (usingNSFetchedResultsController). If you
are using a different database, it is easy to write your own data source by conforming to the
DataSourceTypeprotocol. The rest of SimpleSource – cell dequeuing, view updates, cell
configuration etc. – is designed to be modular, and will work just fine with your custom data
source. - One data source. Multiple views. Because a DataSource does not know anything about
views, a single data source can be used to drive multiple views if necessary. - Custom animations. If you have particular needs for how data updates are incorporated
into your views you can write your ownviewUpdateclosure and pass it to the
ViewDataSource. - Use multiple cell types. If you have to display more than one cell type in your view,
look at theitempassed to the ViewFactory closure. Then decide which kind of cell to use
and return the relevant reuse identifier. Each cell can then be configured using a type-safe
closure, which gets an instance of that specific cell type and the item with which to
configure it. - Use multiple item types. If you want to use multiple cell types, chances are good that
the items in your data source should also have multiple types. They might not share a common
base class or protocol. In this case a good solution can be to wrap them in a Swiftenum.
Make each item/cell type acasein yourenum, and store the items as associated values on
theenumentries.
Example: Imagine a typical settings screen in an app with support for different types of
preferences. We need many different cell and item types, so we define each type of preference
as acasein anenum Preference. Say the ViewFactory closure gets an item and sees that
it isPreference.boolean(name: String, value: Bool). It knows to return
SwitchCell.reuseIdentifier. An instance ofSwitchCellis now dequeued, and can be
configured using the associatednameandvalueto set up the title label and on/off
switch for the preference.