FlowStacks
Coordinator pattern in SwiftUI
FlowStacks allow you to manage complex SwiftUI navigation and presentation flows with a single piece of state. This makes it easy to hoist that state into a high-level coordinator view. Using this pattern, you can write isolated views that have zero knowledge of their context within the navigation flow of an app.
Usage
To begin, create an enum encompassing each of the screens your navigation stack might contain, e.g.:
enum Screen {
    case home
    case numberList
    case numberDetail(Int)
}
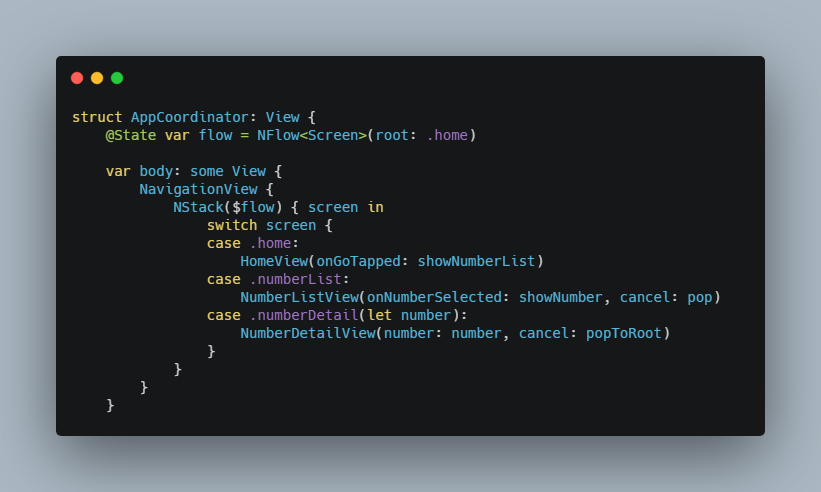
You can then add a flow representing a stack of these screens (NFlow for navigation, or PFlow for presentation) as a single property in a coordinator view. In the body of the coordinator view, initialize an NStack (or PStack for presentation) with a binding to the flow, and a ViewBuilder closure. The closure builds a view for a given screen, e.g.:
struct AppCoordinator: View {
    @State var flow = NFlow<Screen>(root: .home)

    var body: some View {
        NavigationView {
            NStack($flow) { screen in
                switch screen {
                case .home:
                    HomeView(onGoTapped: showNumberList)
                case .numberList:
                    NumberListView(onNumberSelected: showNumber, cancel: pop)
                case .numberDetail(let number):
                    NumberDetailView(number: number, cancel: popToRoot)
                }
            }
        }
    }

    private func showNumberList() {
        flow.push(.numberList)
    }

    private func showNumber(_ number: Int) {
        flow.push(.number(number))
    }

    private func pop() {
        flow.pop()
    }

    private func popToRoot() {
        flow.popToRoot()
    }
}
As you can see, pushing a new view is as easy as flow.push(...) and popping can be achieved with flow.pop(). There are convenience methods for popping to the root (flow.popToRoot()) and popping to a specific screen in the flow (flow.popTo(.home)).
If the user taps the back button, the flow will be automatically updated to reflect its new state. Navigating back with an edge swipe gesture or long-press gesture on the back button will also update the flow.
Coordinators are just views, so they can be presented, added to a TabView or a WindowGroup, and can be configured in all the normal ways views can.
Child coordinators
As coordinator views are just views, they can even be pushed onto a parent coordinator's navigation stack. When doing so, it is best that the child coordinator is always at the top of the parent's flow, as it will take over responsibility for pushing new views.
In order to allow coordinators to be nested in this way, the child coordinator should not include its own NavigationView. In fact, it's a good idea to add the NavigationView as high in the view hierarchy as you can - e.g. at the top-level of the app, when presenting a new coordinator, or when adding one to a TabView.
Using View Models
Using NStacks in the coordinator pattern also works well when using View Models. In these cases, the navigation state can live in the coordinator's own view model, and the Screen enum can include each screen's view model. With view models, the example above can be re-written:
enum Screen {
    case home(HomeViewModel)
    case numberList(NumberListViewModel)
    case numberDetail(NumberDetailViewModel)
}

class AppCoordinatorViewModel: ObservableObject {
    @Published var flow = NFlow<Screen>()

    init() {
        flow.push(.home(.init(onGoTapped: showNumberList)))
    }

    func showNumberList() {
        flow.push(.numberList(.init(onNumberSelected: showNumber, cancel: pop)))
    }

    func showNumber(_ number: Int) {
        flow.push(.numberDetail(.init(number: number, cancel: popToRoot)))
    }

    func pop() {
        flow.pop()
    }

    func popToRoot() {
        flow.popToRoot()
    }
}

struct AppCoordinator: View {
    @ObservedObject var viewModel: AppCoordinatorViewModel

    var body: some View {
        NavigationView {
            NStack($viewModel.flow) { screen in
                switch screen {
                case .home(let viewModel):
                    HomeView(viewModel: viewModel)
                case .numberList(let viewModel):
                    NumberListView(viewModel: viewModel)
                case .number(let viewModel):
                    NumberView(viewModel: viewModel)
                }
            }
        }
    }
}
Presentation
In order to use presentation instead of navigation for showing and unshowing screens, the examples above can be re-written using a PStack instead of an NStack, and a PFlow instead of an NFlow. The push methods become present and the pop methods become dismiss. The present method allows you to customize the presentation style and add a callback on dismissal:
flow.present(detailView, style: .fullScreenCover) {
    print("Detail dismissed")
}
How does it work?
This blog post outlines how NStack translates the stack of screens into a hierarchy of views and NavigationLinks. PStack uses a similar approach.
Limitations
SwiftUI does not allow more than one screen to be pushed, presented or dismissed in one update, though it is possible to pop any number of views in one update. NFlow and PFlow only expose methods to make updates that are supported in SwiftUI.