Moya
You're a smart developer. You probably use Alamofire to abstract away access to URLSession and all those nasty details you don't really care about. But then, like lots of smart developers, you write ad hoc network abstraction layers. They are probably called "APIManager" or "NetworkModel", and they always end in tears.
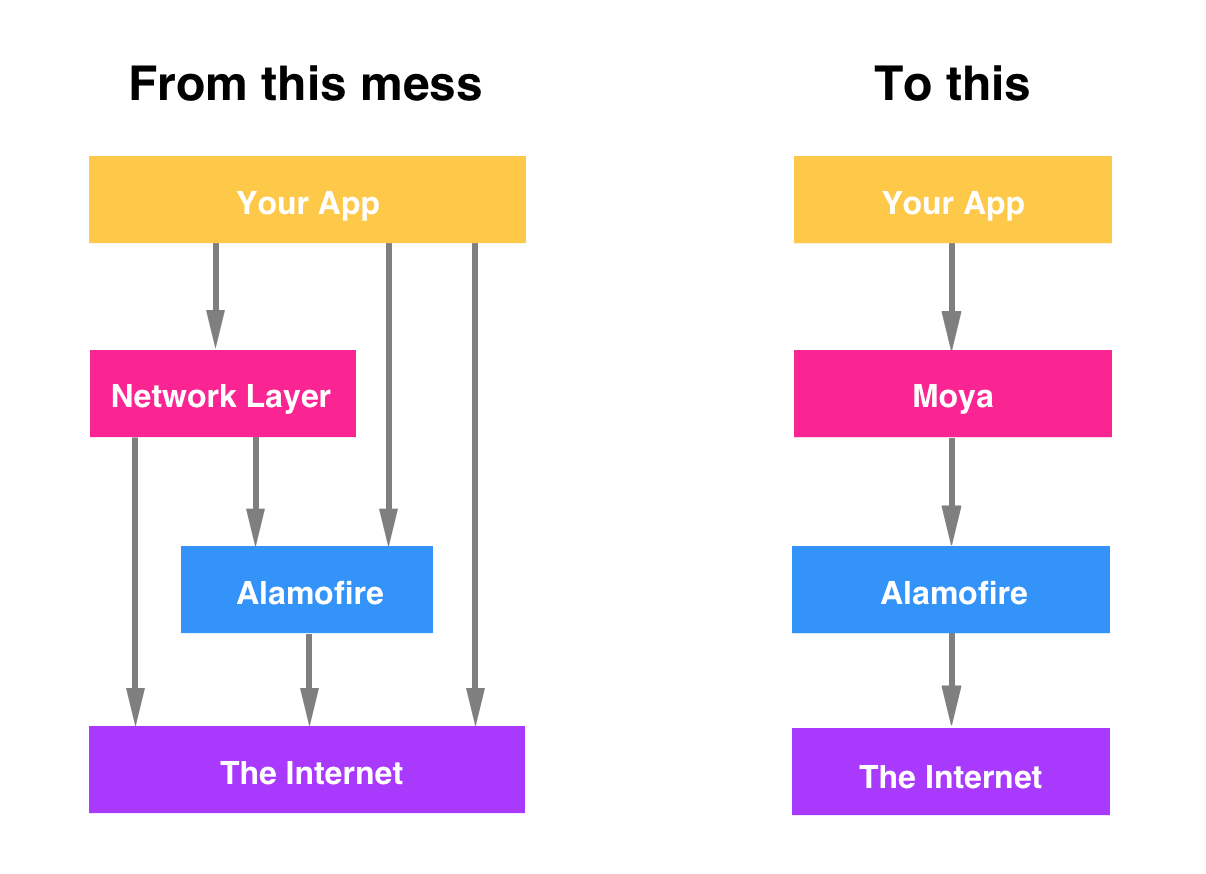
Ad hoc network layers are common in iOS apps. They're bad for a few reasons:
- Makes it hard to write new apps ("where do I begin?")
- Makes it hard to maintain existing apps ("oh my god, this mess...")
- Makes it hard to write unit tests ("how do I do this again?")
So the basic idea of Moya is that we want some network abstraction layer that
sufficiently encapsulates actually calling Alamofire directly. It should be simple
enough that common things are easy, but comprehensive enough that complicated things
are also easy.
If you use Alamofire to abstract away
URLSession, why not use something
to abstract away the nitty gritty of URLs, parameters, etc?
Some awesome features of Moya:
- Compile-time checking for correct API endpoint accesses.
- Lets you define a clear usage of different endpoints with associated enum values.
- Treats test stubs as first-class citizens so unit testing is super-easy.
You can check out more about the project direction in the vision document.
Sample Projects
We have provided two sample projects in the repository. To use it download the repo, run carthage update to download the required libraries and open Moya.xcodeproj. You'll see two schemes: Basic and Multi-Target - select one and then build & run! Source files for these are in the Examples directory in project navigator. Have fun!
Project Status
This project is actively under development, and is being used in Artsy's
new auction app. We consider it
ready for production use.
Installation
Moya version vs Swift version.
Below is a table that shows which version of Moya you should use for
your Swift version.
| Swift | Moya | RxMoya | ReactiveMoya |
|---|---|---|---|
| 4.X | >= 9.0 | >= 10.0 | >= 9.0 |
| 3.X | 8.0.0 - 8.0.5 | 8.0.0 - 8.0.5 | 8.0.0 - 8.0.5 |
| 2.3 | 7.0.2 - 7.0.4 | 7.0.2 - 7.0.4 | 7.0.2 - 7.0.4 |
| 2.2 | <= 7.0.1 | <= 7.0.1 | <= 7.0.1 |
Upgrading to a new major version of Moya? Check out our migration guides.
Swift Package Manager
To integrate using Apple's Swift package manager, add the following as a dependency to your Package.swift:
.package(url: "https://github.com/Moya/Moya.git", .upToNextMajor(from: "11.0.0"))
and then specify "Moya" as a dependency of the Target in which you wish to use Moya.
If you want to use reactive extensions, add also "ReactiveMoya" or "RxMoya" as your Target dependency respectively.
Here's an example PackageDescription:
// swift-tools-version:4.0
import PackageDescription

let package = Package(
    name: "MyPackage",
    products: [
        .library(
            name: "MyPackage",
            targets: ["MyPackage"]),
    ],
    dependencies: [
        .package(url: "https://github.com/Moya/Moya.git", .upToNextMajor(from: "11.0.0"))
    ],
    targets: [
        .target(
            name: "MyPackage",
            dependencies: ["ReactiveMoya"])
    ]
)
Note that as of Moya 10, SPM only works with Swift 4 toolchain and greater.
CocoaPods
For Moya, use the following entry in your Podfile:
pod 'Moya', '~> 11.0'

# or

pod 'Moya/RxSwift', '~> 11.0'

# or

pod 'Moya/ReactiveSwift', '~> 11.0'
Then run pod install.
In any file you'd like to use Moya in, don't forget to
import the framework with import Moya.
Carthage
Carthage users can point to this repository and use whichever
generated framework they'd like, Moya, RxMoya, or ReactiveMoya.
Make the following entry in your Cartfile:
github "Moya/Moya"
Then run carthage update.
If this is your first time using Carthage in the project, you'll need to go through some additional steps as explained over at Carthage.
NOTE: At this time, Carthage does not provide a way to build only specific repository submodules. All submodules and their dependencies will be built with the above command. However, you don't need to copy frameworks you aren't using into your project. For instance, if you aren't using
ReactiveSwift, feel free to delete that framework along withReactiveMoyafrom the Carthage Build directory aftercarthage updatecompletes. Or if you are usingReactiveSwiftbut notRxSwift, thenRxMoya,RxTest,RxCocoa, etc. can safely be deleted.
Manually
- Open up Terminal,
cdinto your top-level project directory, and run the following command if your project is not initialized as a git repository:
$ git init
- Add Alamofire, Result & Moya as a git submodule by running the following commands:
$ git submodule add https://github.com/Alamofire/Alamofire.git
$ git submodule add https://github.com/antitypical/Result.git
$ git submodule add https://github.com/Moya/Moya.git
- Open the new
Alamofirefolder, and drag theAlamofire.xcodeprojinto the Project Navigator of your application's Xcode project. Do the same with theResult.xcodeprojin theResultfolder andMoya.xcodeprojin theMoyafolder.
They should appear nested underneath your application's blue project icon. Whether it is above or below all the other Xcode groups does not matter.
- Verify that the deployment targets of the
xcodeprojs match that of your application target in the Project Navigator. - Next, select your application project in the Project Navigator (blue project icon) to navigate to the target configuration window and select the application target under the "Targets" heading in the sidebar.
- In the tab bar at the top of that window, open the "General" panel.
- Click on the
+button under the "Embedded Binaries" section. - You will see two different
Alamofire.xcodeprojfolders each with two different versions of theAlamofire.frameworknested inside aProductsfolder.
It does not matter which
Productsfolder you choose from, but it does matter whether you choose the top or bottomAlamofire.framework.
- Select the top
Alamofire.frameworkfor iOS and the bottom one for OS X.
You can verify which one you selected by inspecting the build log for your project. The build target for
Alamofirewill be listed as eitherAlamofire iOS,Alamofire macOS,Alamofire tvOSorAlamofire watchOS.
-
Click on the
+button under "Embedded Binaries" again and add the build target you need forResult. -
Click on the
+button again and add the correct build target forMoya. -
And that's it!
The three frameworks are automagically added as a target dependency, linked framework and embedded framework in a copy files build phase which is all you need to build on the simulator and a device.
Usage
After some setup, using Moya is really simple. You can access an API like this:
provider = MoyaProvider<GitHub>()
provider.request(.zen) { result in
    switch result {
    case let .success(moyaResponse):
        let data = moyaResponse.data
        let statusCode = moyaResponse.statusCode
        // do something with the response data or statusCode
    case let .failure(error):
        // this means there was a network failure - either the request
        // wasn't sent (connectivity), or no response was received (server
        // timed out).  If the server responds with a 4xx or 5xx error, that
        // will be sent as a ".success"-ful response.
    }
}
That's a basic example. Many API requests need parameters. Moya encodes these
into the enum you use to access the endpoint, like this:
provider = MoyaProvider<GitHub>()
provider.request(.userProfile("ashfurrow")) { result in
    // do something with the result
}
No more typos in URLs. No more missing parameter values. No more messing with
parameter encoding.
For more examples, see the documentation.
Reactive Extensions
Even cooler are the reactive extensions. Moya provides reactive extensions for
ReactiveSwift and
RxSwift.
ReactiveSwift
ReactiveSwift extension provides both reactive.request(:callbackQueue:) and
reactive.requestWithProgress(:callbackQueue:) methods that immediately return
SignalProducers that you can start, bind, map, or whatever you want to do.
To handle errors, for instance, we could do the following:
provider = MoyaProvider<GitHub>()
provider.reactive.request(.userProfile("ashfurrow")).start { event in
    switch event {
    case let .value(response):
        image = UIImage(data: response.data)
    case let .failed(error):
        print(error)
    default:
        break
    }
}
RxSwift
RxSwift extension also provide both rx.request(:callbackQueue:) and
rx.requestWithProgress(:callbackQueue:) methods, but return type is
different for both. In case of a normal rx.request(:callbackQueue), the
return type is Single<Response> which emits either single element or an
error. In case of a rx.requestWithProgress(:callbackQueue:), the return
type is Observable<ProgressResponse>, since we may get multiple events
from progress and one last event which is a response.
To handle errors, for instance, we could do the following:
provider = MoyaProvider<GitHub>()
provider.rx.request(.userProfile("ashfurrow")).subscribe { event in
    switch event {
    case let .success(response):
        image = UIImage(data: response.data)
    case let .error(error):
        print(error)
    }
}
In addition to the option of using signals instead of callback blocks, there are
also a series of signal operators for RxSwift and ReactiveSwift that will attempt
to map the data received from the network response into either an image, some JSON,
or a string, with mapImage(), mapJSON(), and mapString(), respectively. If the mapping is unsuccessful, you'll get an error on the signal. You also get handy methods
for filtering out certain status codes. This means that you can place your code for
handling API errors like 400's in the same places as code for handling invalid
responses.