!TrueDepth camera can only be accessed on iPhone X or later.
TODO
-
Get the RGB-D files (This repository)
-
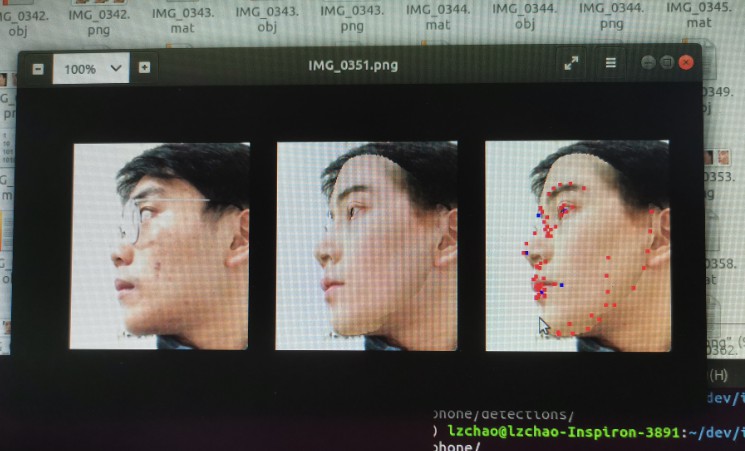
Generate 3D face mesh with landmark detector and 3DMM

- Refine the mesh with depth jsons
- Deploy AI model to iPhone (CoreML/ARKit/ARCore/MediaPipe)
Reference
This repository is modified on the sample code offered by Apple.
Below is the original README.md content:
Streaming Depth Data from the TrueDepth Camera
Visualize depth data in 2D and 3D from the TrueDepth camera.
Overview
The TrueDepth camera provides depth data in real time that allows you to determine the distance of a pixel from the front-facing camera. This sample demonstrates how to use the AVFoundation framework’s capture API to read data from the TrueDepth camera, and how to display it in an intuitive fashion onscreen.
The sample shows two different views: a 2D view that distinguishes depth values by mapping depth to color, and a 3D view that renders data as a point cloud.
To see this sample app in action, build and run the project in Xcode on an iOS device running iOS 11 or later. Because Xcode doesn’t have access to the TrueDepth camera, this sample will not build or run in the Xcode simulator.
Set Up a Capture Session
Set up an
AVCaptureSessionon a separate thread via the session queue. Initialize this session queue before configuring the camera for capture, like so:private let sessionQueue = DispatchQueue(label: "session queue", attributes: [], autoreleaseFrequency: .workItem)The
startRunningmethod is a blocking call that may take time to execute. Dispatch session setup to the session queue so the main queue isn’t blocked, allowing the app’s UI to stay responsive:sessionQueue.async { self.configureSession() }Setting up the camera for video capture follows many of the same steps as normal video capture. See Setting Up a Capture Session for details on configuring streaming setup.
On top of normal setup, request depth data by declaring a separate output:
private let depthDataOutput = AVCaptureDepthDataOutput()Explicitly add this output type to your capture session:
session.addOutput(depthDataOutput)
depthDataOutput.isFilteringEnabled = false
if let connection = depthDataOutput.connection(with: .depthData) {
 connection.isEnabled = true
} else {
 print("No AVCaptureConnection")
}
Search for the highest resolution available with floating-point depth values, and lock the configuration to the format.
let depthFormats = videoDevice.activeFormat.supportedDepthDataFormats
let filtered = depthFormats.filter({
 CMFormatDescriptionGetMediaSubType($0.formatDescription) == kCVPixelFormatType_DepthFloat16
})
let selectedFormat = filtered.max(by: {
 first, second in CMVideoFormatDescriptionGetDimensions(first.formatDescription).width < CMVideoFormatDescriptionGetDimensions(second.formatDescription).width
})

do {
 try videoDevice.lockForConfiguration()
 videoDevice.activeDepthDataFormat = selectedFormat
 videoDevice.unlockForConfiguration()
} catch {
 print("Could not lock device for configuration: \(error)")
 setupResult = .configurationFailed
 session.commitConfiguration()
 return
}
Synchronize the normal RGB video data with depth data output. The first output in the
dataOutputsarray is the master output.outputSynchronizer = AVCaptureDataOutputSynchronizer(dataOutputs: [videoDataOutput, depthDataOutput]) outputSynchronizer!.setDelegate(self, queue: dataOutputQueue)The
CameraViewControllerimplementation creates and manages this session to interface with the camera. It also contains UI to toggle between the two viewing modes, 2D and 3D.Visualize Depth Data in 2D
The sample uses JET color coding to distinguish depth values, ranging from red (close) to blue (far). A slider controls the blending of the color code and the actual color values. Touching a pixel displays its depth value.
DepthToJETConverterperforms the conversion. It separates the color spectrum into histogram bins, colors a Metal texture from depth values obtained in the image buffer, and renders that texture into the preview.var cvTextureOut: CVMetalTexture? CVMetalTextureCacheCreateTextureFromImage(kCFAllocatorDefault, textureCache, pixelBuffer, nil, textureFormat, width, height, 0, &cvTextureOut) guard let cvTexture = cvTextureOut, let texture = CVMetalTextureGetTexture(cvTexture) else { print("Depth converter failed to create preview texture") CVMetalTextureCacheFlush(textureCache, 0) return nil }Visualize Depth Data in 3D
The sample’s 3D viewer renders data as a point cloud. Control the camera with the following gestures:
- Pinch to zoom.
- Pan to move the camera around the center.
- Rotate with two fingers to turn the camera angle.
- Double-tap the screen to reset the initial position.
The sample implements a 3D point cloud as a
PointCloudMetalView. It uses a Metal vertex shader to control geometry and a Metal fragment shader to color individual vertices, keeping the depth texture and color texture separate:CVMetalTextureCacheRef _depthTextureCache; CVMetalTextureCacheRef _colorTextureCache;The depth frame’s depth map provides the basis for the Metal view’s depth texture:
CVPixelBufferRef depthFrame = depthData.depthDataMap;
CVMetalTextureRef cvDepthTexture = nullptr;
if (kCVReturnSuccess != CVMetalTextureCacheCreateTextureFromImage(kCFAllocatorDefault,
                        _depthTextureCache,
                        depthFrame,
                        nil,
                        MTLPixelFormatR16Float,
                        CVPixelBufferGetWidth(depthFrame),
                        CVPixelBufferGetHeight(depthFrame),
                        0,
                        &cvDepthTexture)) {
    NSLog(@"Failed to create depth texture");
    CVPixelBufferRelease(colorFrame);
    return;
}

id<MTLTexture> depthTexture = CVMetalTextureGetTexture(cvDepthTexture);
The RGB image provides the basis for the Metal view’s color texture:
CVMetalTextureRef cvColorTexture = nullptr;
if (kCVReturnSuccess != CVMetalTextureCacheCreateTextureFromImage(kCFAllocatorDefault,
                        _colorTextureCache,
                        colorFrame,
                        nil,
                        MTLPixelFormatBGRA8Unorm,
                        CVPixelBufferGetWidth(colorFrame),
                        CVPixelBufferGetHeight(colorFrame),
                        0,
                        &cvColorTexture)) {
    NSLog(@"Failed to create color texture");
    CVPixelBufferRelease(colorFrame);
    return;
}

id<MTLTexture> colorTexture = CVMetalTextureGetTexture(cvColorTexture);
Track Thermal State
Processing depth data from a live stream may cause the device to heat up. Keep tabs on the thermal state so you can alert the user if it exceeds a dangerous threshold.
@objc
func thermalStateChanged(notification: NSNotification) {
    if let processInfo = notification.object as? ProcessInfo {
        showThermalState(state: processInfo.thermalState)
    }
}

func showThermalState(state: ProcessInfo.ThermalState) {
    DispatchQueue.main.async {
        var thermalStateString = "UNKNOWN"
        if state == .nominal {
            thermalStateString = "NOMINAL"
        } else if state == .fair {
            thermalStateString = "FAIR"
        } else if state == .serious {
            thermalStateString = "SERIOUS"
        } else if state == .critical {
            thermalStateString = "CRITICAL"
        }

        let message = NSLocalizedString("Thermal state: \(thermalStateString)", comment: "Alert message when thermal state has changed")
        let alertController = UIAlertController(title: "TrueDepthStreamer", message: message, preferredStyle: .alert)
        alertController.addAction(UIAlertAction(title: NSLocalizedString("OK", comment: "Alert OK button"), style: .cancel, handler: nil))
        self.present(alertController, animated: true, completion: nil)
    }
}