AWS Solution Clickstream Analytics SDK for Swift
Introduction
Clickstream Swift SDK can help you easily report in-app events on iOS. After the event is reported, statistics and analysis of specific scenario data can be completed on AWS Clickstream solution.
The SDK relies on the Amplify for Swift Core Library and is developed according to the Amplify Swift SDK plug-in specification. In addition to this, we’ve added commonly used preset event statistics to make it easier to use.
Platform Support
The Clickstream SDK supports iOS 13+.
Integrate SDK
Clickstream requires Xcode 13.4 or higher to build.
1.Add Package
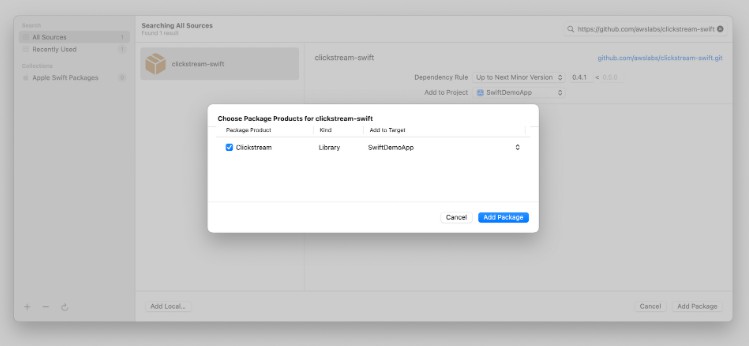
We use Swift Package Manager to distribute Clickstream Swift SDK, open your project in Xcode and select File > Add Pckages.

Enter the Clickstream Library for Swift GitHub repo URL (https://github.com/awslabs/clickstream-swift) into the search bar, You’ll see the Clickstream Library for Swift repository rules for which version of Clickstream you want Swift Package Manager to install. Choose Up to Next Major Version, then click Add Package, make the Clickstream product checked as default, and click Add Package again.

2.Parameter configuration
Downlod your amplifyconfiguration.json file from your Clickstream solution control plane, and paste it to your project root folder:

the json file will be as follows:
{
  "analytics": {
    "plugins": {
      "awsClickstreamPlugin ": {
        "appId": "appId",
        "endpoint": "https://example.com/collect",
        "isCompressEvents": true,
        "autoFlushEventsInterval": 10000,
        "isTrackAppExceptionEvents": false
      }
    }
  }
}
Your appId and endpoint are already set up in it, here’s an explanation of each property:
- appId: the app id of your project in control plane.
- endpoint: the endpoint url you will upload the event to AWS server.
- isCompressEvents: whether to compress event content when uploading events, default is
true - autoFlushEventsInterval: event sending interval, the default is
10s - isTrackAppExceptionEvents: whether auto track exception event in app, default is
false
3.Initialize the SDK
Once you have configured the parameters, you need to initialize it in AppDelegate’s didFinishLaunchingWithOptions lifecycle method to use the SDK.
import Clickstream
...
func application(_ application: UIApplication, didFinishLaunchingWithOptions launchOptions: [UIApplication.LaunchOptionsKey: Any]?) -> Bool {
    // Override point for customization after application launch.
    do {
        try ClickstreamAnalytics.initSDK()
    } catch {
        assertionFailure("Fail to initialize ClickstreamAnalytics: \(error)")
    }
    return true
}
4.Config the SDK
import Clickstream

// config the sdk after initialize.
do {
    var configuration = try ClickstreamAnalytics.getClickstreamConfiguration()
    configuration.appId = "appId"
    configuration.endpoint = "https://example.com/collect"
    configuration.authCookie = "your authentication cookie"
    configuration.sessionTimeoutDuration = 1800000
    configuration.isTrackAppExceptionEvents = false
    configuration.isLogEvents = true
    configuration.isCompressEvents = true
    configuration.isLogEvents = true
} catch {
    print("Failed to config ClickstreamAnalytics: \(error)")
}
note: this configuation will override the default configuation in
amplifyconfiguration.jsonfile
Start using
Recored event.
Add the following code where you need to complete the event report.
import Clickstream

let attributes: ClickstreamAttribute = [
    "channel": "apple",
    "uccessful": true,
    "ProcessDuration": 12.33,
    "UserAge": 20,
]
ClickstreamAnalytics.recordEvent(eventName: "testEvent", attributes: attributes)

// for record an event directly
ClickstreamAnalytics.recordEvent(eventName: "button_click")
Add global attribute
import Clickstream

let globalAttribute: ClickstreamAttribute = [
    "channel": "apple",
    "class": 6,
    "level": 5.1,
    "isOpenNotification": true,
]
ClickstreamAnalytics.addGlobalAttributes(attributes: globalAttribute)

// for delete an global attribute
ClickstreamAnalytics.deleteGlobalAttributes(attributes: "level")
Login and logout
import Clickstream

// when user login usccess.
ClickstreamAnalytics.setUserId(userId: "userId")

// when user logout
ClickstreamAnalytics.setUserId(userId: nil)
When we log into another user, we will clear the before user’s user attributes, after setUserId() you need to add new user’s attribute.
Add user attribute
import Clickstream

let userAttributes : ClickstreamAttribute=[
    "_user_age": 21,
    "_user_name": "carl"
]
ClickstreamAnalytics.addUserAttributes(attributes: userAttributes)
Current login user‘s attributes will be cached in disk, so the next time app launch you don’t need to set all user’s attribute again, of course you can update the current user’s attribute when it changes.
Log the event json in debug mode
import Clickstream

// log the event in debug mode.
do {
    var configuration = try ClickstreamAnalytics.getClickstreamConfiguration()
    configuration.isLogEvents = true
} catch {
    print("Failed to config ClickstreamAnalytics: \(error)")
}
After config configuration.isLogEvents = true and when you record an event, you can see the event json at your Xcode log pannel by filter EventRecorder.
Send event immediately
import Clickstream
// for send event immediately.
ClickstreamAnalytics.flushEvents()
How to build&test locally
Config your code format
Install swiftformat plugin in your Xcode, and config shortcut for code format.
Config your code lint
Install swiftlint, and execute the below command at the project root folder:
swiftlint
Build
Open an termial window, at the root project folder to execute:
swift build
Test
swift test
Security
See CONTRIBUTING for more information.
License
This library is licensed under Apache 2.0 License.