SyntaxKit
SyntaxKit makes TextMate-style syntax highlighting easy. It works on iOS, watchOS, and OS X.
Building
SyntaxKit is written in Swift 2 so Xcode 7 is required. There aren't any dependencies besides system frameworks.
Installation
Carthage is the recommended way to install SyntaxKit. Add the following to your Cartfile:
github "soffes/SyntaxKit"
You can also install with CocoaPods:
pod 'SyntaxKit'
For manual installation, I recommend adding the project as a subproject to your project or workspace and adding the appropriate framework as a target dependency.
Usage
SyntaxKit uses tmLanguage and tmTheme files to highlight source code. None are provided with SyntaxKit. Thankfully, there are tons available at TextMate's GitHub org.
Basic Parsing
Once you have a language, you can get started:
import SyntaxKit

let path = "path to your .tmLanguage file"
let plist = NSDictionary(contentsOfFile: path)! as [NSObject: AnyObject]
let yaml = Language(dictionary: plist)

let parser = Parser(language: yaml)
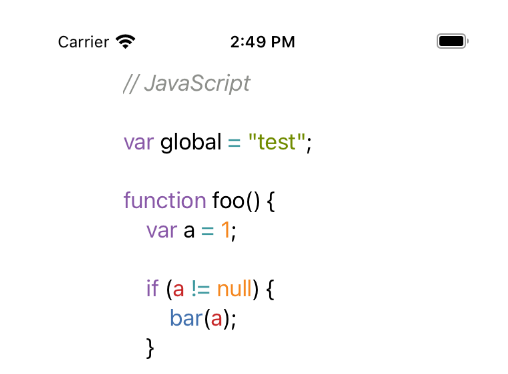
Parser is a very simple class that just calls a block when it finds something the language file knows about. Let's print all of the elements in this string:
let input = "title: \"Hello World\"\n"
parser.parse(input) { scope, range in
    print("\(scope) - \(range)")
}
scope is the name of an element. This is something like "string" or "constant.numeric". range is an NSRange struct representing where the scope falls in the input string.
Working with Attributed Strings
SyntaxKit also comes with AttributedParser. This is a simple subclass of Parser that knows how to work with themes.
let tomorrow = Theme(dictionary: themePlist)
let attributedParser = AttributedParser(language: yaml, theme: tomorrow)

attributedParser.parse(input) { scope, range, attributes in
    print("\(scope) - \(range) - \(attributes)")
}
Notice that attributes is the third paramenter to the block now. This is a dictionary of attributes you can give to NSAttributedString. Other values may be included here that don't work with NSAttributedString. You can do your own inspection and do something custom if you want.
AttributedParser includes a convenience method for turning a String of source code into an NSAttributedString:
let attributedString = attributedParser.attributedStringForString(input)
Easy as that. This method takes an optional baseAttributes parameter to customize how the string is created. This is great if you want to specify a font, etc.