NicePhotoApp – Development Diary
May 4 – 12:17
I read the Take-home exercise to understand what needs to be done. As part 1 is the most important, the focus will be on the frontend, so I’ll start researching layout references. The sites that will be used for searching will be https://dribbble.com/shots/ and https://mobbin.design/browse/ios/screens
May 4 – 12:35
The onboarding screens will be based on the mockup: https://dribbble.com/shots/16540320-Onboarding-Screens. There will be three screens explaining how the dismiss and favorite process works in the app.
May 4 – 13:10
After the research, the decision was made to make the main screen of the app in using a List, as it is necessary to use the swipe gesture feature to favorite and dismiss the photos. Using a Grid (more common for apps that display photos) it is not possible to use this feature.
May 4 – 13:10
In order to make the onbording screens work, it will be necessary to use UserDefaults so that it is shown only once. A service will be created to avoid the need to work with strings and encapsulate its use.
May 4 – 13:33
We are going to localize the app to work in English and any other language that makes sense using a Localizable.strings file with a String Extension to make it easy to call localize property into a string value.
May 4 – 16:33
The onboarding screens are complete. The SwiftUI TabView component was used to navigate by gestures and also buttons at the bottom of the screen to ensure navigation by buttons. Now before implementing the main view of the app, I will work on the Login View to allow the user to enter with a Google Account or without any account. Here’s what the onboarding screens look like:

May 5 – 19:10
I will not use third party libraries to facilitate the use of Google APIs. I’ll use the oficial GoogleSignIn Framework to control oAuth flow and make calls to the Google Photos API using HTTP Request without libraries, just using URLSession and Combine. I’m more cautious when it comes to using third-party libraries, as it creates a dependency that other people need to maintain the library code to keep my product working. In this project the only exception is going to be related to the perceptual hash algorithm. Due the time limit and the complexity, I’ll use a library to implement that.
May 5 – 18:25
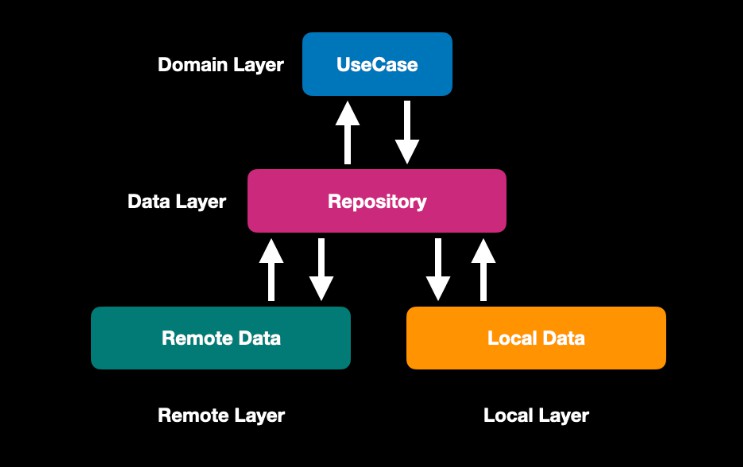
The architecture requested in the take-home exercise was MVVM, a simple architecture pattern that fits very well with SwiftUI. It does not rule out the fact that layers below the View Model can have a well-defined structure. One of the most used currently on the market is Clean Architecture, which will be used in this challenge.
The Clean Architecture is based on Use Cases that are unique actions the user takes on the system. For example the authentication, get photos from gallery or from google. they all should be unique classes responsible for a single action.
It also has the Repository layer that is responsible for choosing where to bring the data from (Remote Layer or Local Layer), so the base data structure will be like this:

All layers communicate through Combine Framework and use protocols to maintain the inverse dependency injection. This makes easier to maintain the code in case you need to change an entire layer, and it also makes easier to make mocks for unit tests.Since the app has the MMVVM Layer, it will be placed in the presentation folder. So the folder structure will be like this:

May 5 – 22:20
The Login feature is finished, now, it is possible for the user to log into the app using their google account, or use it without any account. The ViewModel is responsible for using the necessary UseCases to bring the data of the google user if the chosen option is to login via Google. To keep the code clean, the LocalData layer is responsible for bringing the google user data if it is in Cache, otherwise the RemoteData layer will use oAuth to do the authentication process. Here it is how it looks like to login using Google:

May 5 – 23:00
The Remote Data layer returns data from API's therefore it is dependent on the Codable Protocol, and the Local Data layer returns local data from the gallery therefore it is dependent on the Photos Framework. To avoid any kind of dependency to make it easy the mocking to use SwiftUI previews and to facilitate future unit tests, the Repository Layer returns a unique model specific to the app, without dependence on any local or remote framework.
May 6 – 12:15
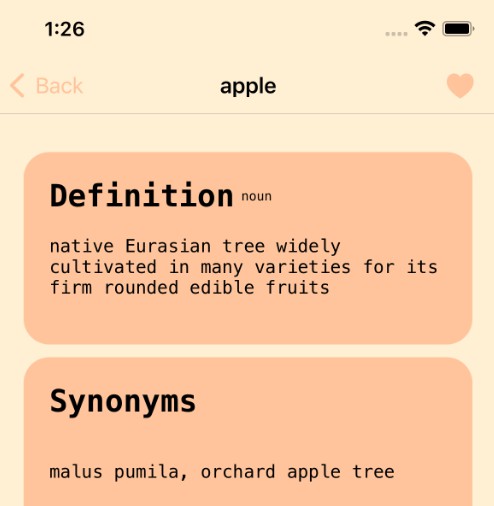
The PhotoListView feature will contain a view called UserView that will show the user’s image and name if they are logged in with Google, or show a placeholder image and a name “Visitor” if they are not logged in. The list items will have the original file name and file creation date in a simple and straightforward layout.
A View called DynamicImageView will be responsible for loading the image remotely if it comes from google photos or locally if it comes from the gallery. To decide between image types, an Enum called PhotoType was created.
To get the data correctly, the ViewModel will choose where to bring the data from according to NicePhotoUser. If it exists, it means that the user has logged in with Google, in this case the use case that will be used will be GetGooglePhotosUseCase. Otherwise the data must come from the gallery, so the use case used will be GetGalleryPhotosUseCase. As all layers communicate through combine, it is easy to map errors and models to other objects.
May 7 – 10:22
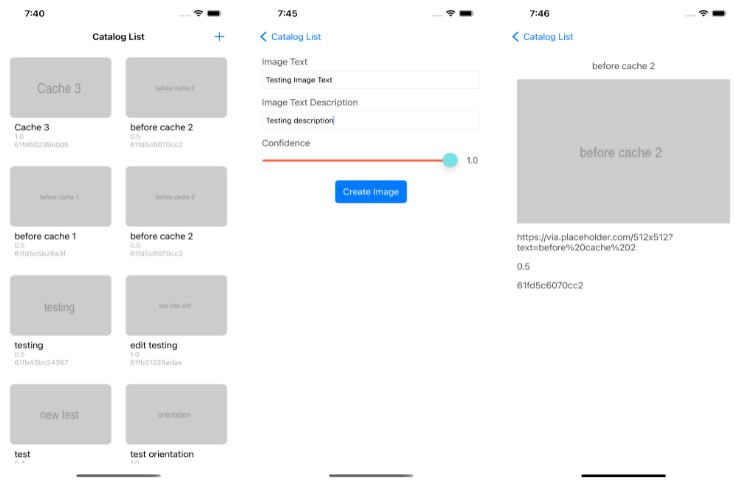
The data flow for downloading images from google and saving it as favorite will be the follow:
- First we download the image using the URL retrived from google’s web service. Since it will be returned from backend, the
RemoteDatalayer will be used. - Then we use the
perceptual hash algorithmfromCocoaImageHashinglibrary to check if we already have a similar image in user’s gallery. Since the photos to compare is in the gallery, theLocalDatalayer will be used. - If so, we show an error, if not, we save it into the gallery and favorite it using
Photo Framework.
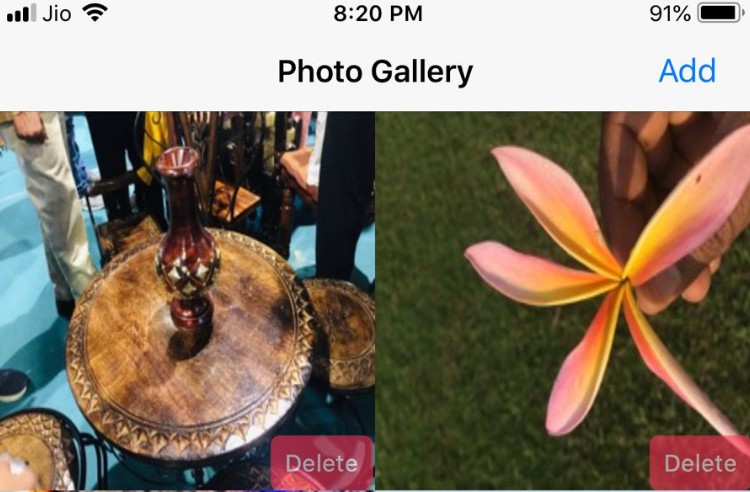
Here’s what the error flow and message looks like:

May 7 – 12:10
In order to avoid loading images that have already been processed as favorites or dismissed, the UserDefaults was used to save the ID’s that have already passed through the process. Of course, a more refined database system would be better, but for simplicity and time, UserDefaults will be used.
While the app is loading its data, a LoadingView with a nice animation will be shown. If there is no photos in the Gallery or in Google Photos or in Favorites Tab View, a BoxEmptyView will be shown.
If we process an image (Delete or Favorite), it will be a simple remove animation from ListView to remove the item from the list.

May 9 – 19:00
I did some refactors, create some missing components and test the flow one more time. This readme file gives me headache because it does not load the gif files properly, so I changed the host website.
Here I have some improvments that can be made with more time:
1 – Unit Tests: They are extremely important to maintain code quality and avoid future bugs.
2 – Improve Error Handling: To save time, I just created some basic error enums, without any important information. This can be improved to give to the user a better information about what’s going wrong in his app.
3 – Animations: I didn’t have much time to create animations, just a simple animation in the photo list. For a better user experience, SwiftUI can be used to create view animations or even some framework like Lottie.
4 – Perceptual Hash Algorithm: Even with the CocoaImageHashing algorithm working, I don’t like to rely on a third party library for such important code for the app. So with more time I would like to write my own algorithm and have total control about what’s going on under the hood.
5 – Use Cases: The way that they were designed, it should validate all input data before moving on to the next layer, validations such as invalid ID’s, invalid tokens and so on should be made there.