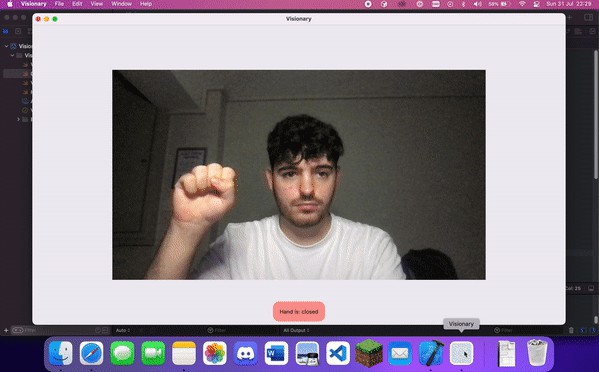
Visionary

This app is a small app that allows you to launch mission control using hand gestures. It is mainly a demo app so that you can do a similar thing. Code is documented in detailed comments where necessary and a rough over of each class is below, as well as a guide on taking this to iOS.
Any feedback/pull requests/etc very welcome.
The Apple demo app for hand gesture recognition
A Quick Comment on Smoothness
I have chosen not to make this app smooth, because it’s a bit of a task and this is just a demo. If you look at the example app Apple have provided for gesture recognition, you will see that they use a buffer to keep track of states, and only register a state change when they are sure that there has been one. (a state has been the same for a certain number of frames)
This is a much better way to do it and provides a better user experience:
func processPointsPair(_ pointsPair: PointsPair) {
    lastProcessedPointsPair = pointsPair
    let distance = pointsPair.indexTip.distance(from: pointsPair.thumbTip)

    // If the hand looks like it is pinching,
    // set the evidence count for 'apart' to zero,
    // and add one to the evidence for 'pinch'
    // set state to .possiblePinch until we have enough evidence
    // (here it is 3 observations without a change)
    if distance < pinchMaxDistance {
        pinchEvidenceCounter += 1
        apartEvidenceCounter = 0
        state = (pinchEvidenceCounter >= 3) ? .pinched : .possiblePinch

    // the same but opposite
    } else {
        apartEvidenceCounter += 1
        pinchEvidenceCounter = 0
        state = (apartEvidenceCounter >= 3) ? .apart : .possibleApart
    }
}
Structs and Classes
VisionaryApp
The entry point for a SwiftUI app. Sets the window frame size for macOS
CameraView
A view dedicated to showing off the video feed, and state of the hand that is being detected
VisionaryViewModel
The main view model for this app. Handles new frames. The SwiftUI CameraView will rerender itself whenever one of the @Published variables change.
This class also has it’s own instance of HandHandler() and CameraFeed.
I would appreciate any advice on how the video handling is done, as I’m not certain that this is the most efficient way to view camera videos in SwiftUI.
CameraFeed
This is a class thats primary purpose is to set up the camera.
HandHandler
This struct is designed to take in a frame, and do Vision processing on it. Vision is the framework from Apple which lets you apply computer vision to images, i.e. hand pose deteciton, body detection, object detection etc.
HandGestureRecogniser
This struct simply contains static methods for HandHandler to use. It could be a private member of HandHandler even, but I wanted to keep each individual file short (although could be added through an extension maybe?)
Converting to iOS
There are two ways to do this, I’m just not sure if the easy one works.
Easy (I’m not sure if this works, I’ve heard cgImage isn’t full image data but worth a shot):
Try to replace NSImage with CGImage, do this in VisionaryViewModel as well
Longer, but not too much harder, experience in cross platform is useful:
- Create a file targetting iOS and another targetting macOS
- Create a struct that handles conversion from CIImage -> NSImage Place this in the macOS file
- Create a struct with the same name that handles conversion from CIImage -> UIImage Place this in the iOS file
- Use this struct in VisionaryViewModel.captureOutput, to convert from the ciimage to a device compatible image
- Create a typealias ImageType == NSImage (in the macOS file) and ImageType == UIImage (in the iOS file)
- Set VisionaryViewModel.frame to type ImageType? (instead of NSImage?)
- Make an NativeImageView struct: View, one in the macOS file and one in the iOS file
- They should have the same constructor, NativeImageView.init(imageData: ImageType)
- var body: some View { Image(ciImage: imageData) }.resizeable() for iOS, and the same with Image(nsImage) for macOS
- Use that NativeImageView instead of Image below.