ScrollingContentViewController
ScrollingContentViewController makes it easy to create a view controller with a single scrolling content view, or to convert an existing static view controller into one that scrolls. Most importantly, it takes care of several tricky undocumented edge cases involving the keyboard, navigation controllers, and device rotations.
Background
A common UIKit Auto Layout task involves creating a view controller with a fixed layout that is too large to fit older, smaller devices, or devices in landscape orientation, or the area of the screen that remains visible when the keyboard is presented. The problem is compounded when Dynamic Type is used to support large font sizes.
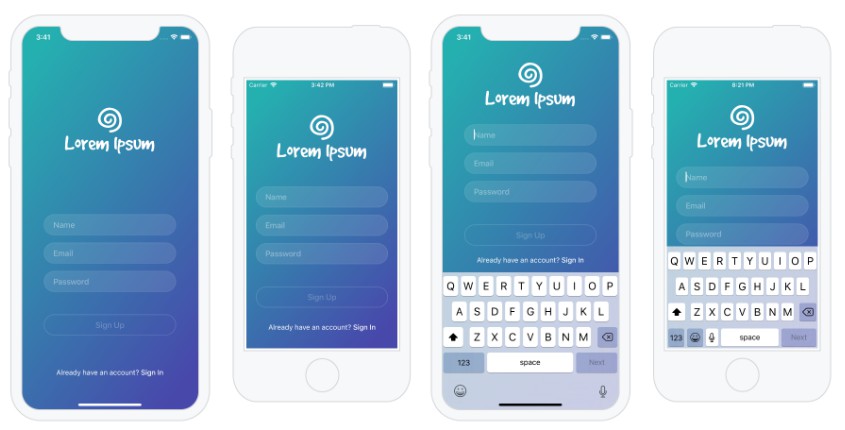
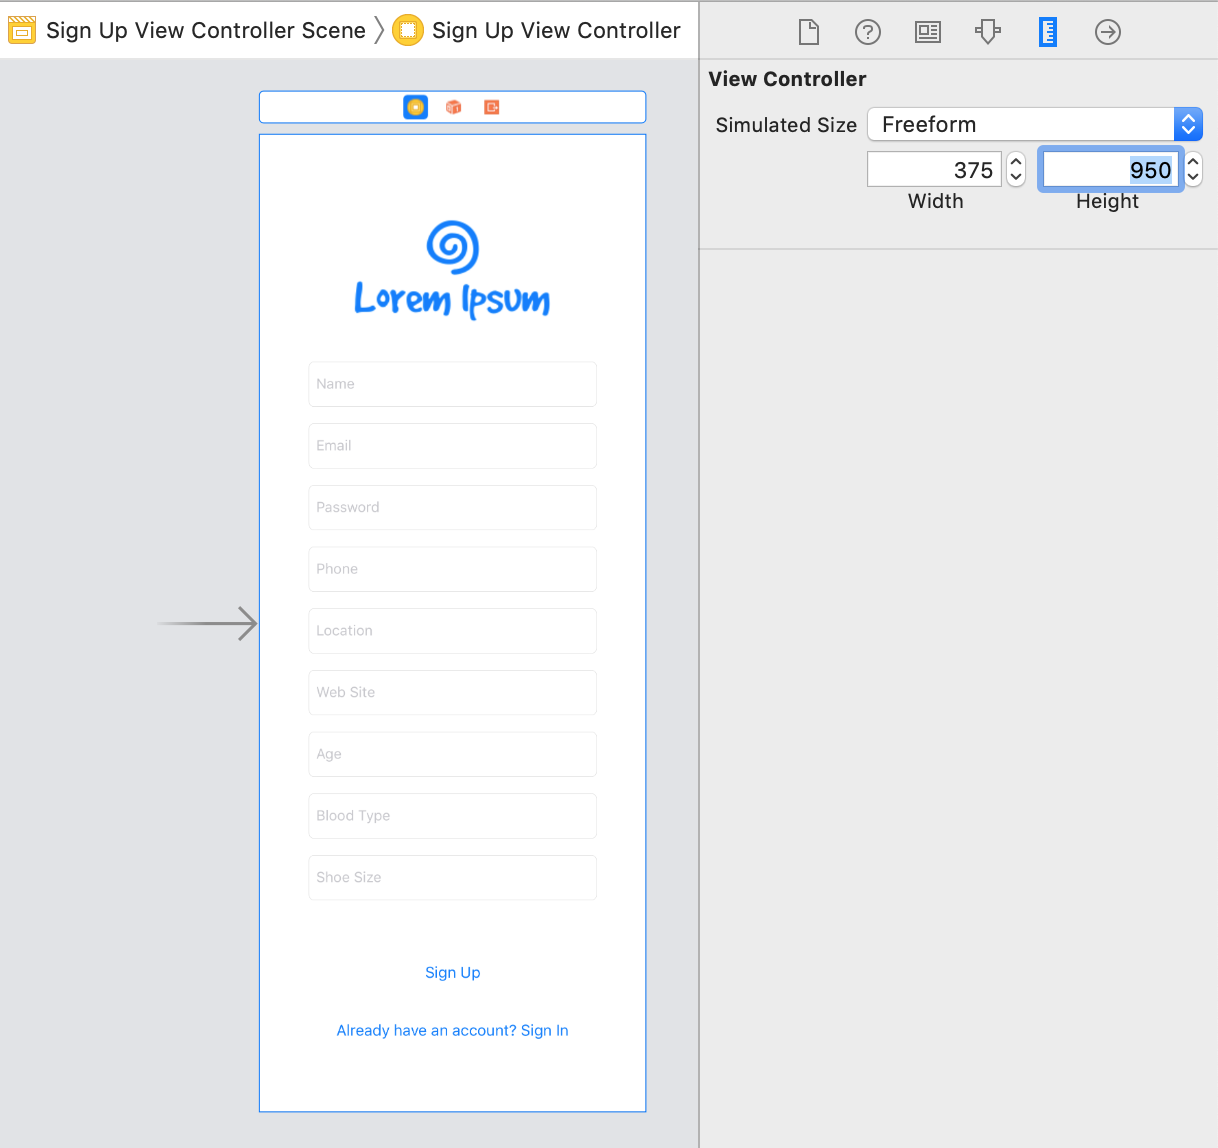
For example, consider this sign up screen, which fits iPhone Xs, but not iPhone SE with a keyboard:

This case can be handled by nesting the view inside a scroll view. You could do this manually in Interface Builder, as described by Apple's Working with Scroll Views documentation, but many steps are required. If your view contains text fields, you'll have to write code to adjust the view to compensate for the presented keyboard, as described in Managing the Keyboard. However, handling the keyboard robustly is surprisingly complicated, especially if your app presents a sequence of screens with keyboards in the context of a navigation controller, or when device orientation support is required.
To simplify this task, ScrollingContentViewController inserts the scroll view into the view hierarchy for you at run time, along with all necessary Auto Layout constraints.
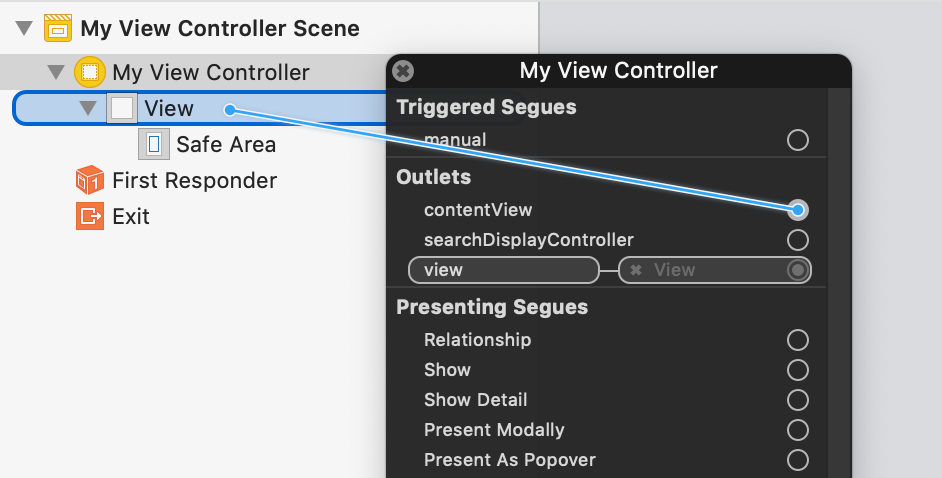
When used in a storyboard, ScrollingContentViewController exposes an outlet called contentView that you connect to the view that you'd like to make scrollable. This may be the view controller's root view or an arbitrary subview. Everything else is taken care of automatically, including responding to keyboard presentation and device orientation changes.
ScrollingContentViewController can be configured using storyboards or entirely in code. The easiest way to use it is by subclassing the ScrollingContentViewController class instead of UIViewController. However, when this is not an option, a helper class called ScrollingContentViewManager can be composed with your existing view controller class instead.
Installation
ScrollingContentViewController may be added as a Swift Package dependency in Xcode.
To install ScrollingContentViewController using CocoaPods, add this line to your Podfile:
pod 'ScrollingContentViewController'
To install using Carthage, add this to your Cartfile:
github "drewolbrich/ScrollingContentViewController"
Usage
Subclasses of ScrollingContentViewController may be configured using storyboards or in code.
This library may also be used without subclassing, by composing the helper class ScrollingContentViewManager instead. Refer to Usage Without Subclassing.
Storyboards
To configure ScrollingContentViewController in a storyboard:
-
Create a subclass of
ScrollingContentViewControllerand add a new view controller with that class in Interface Builder. Or, if you have an existing view controller that subclassesUIViewController, modify your view controller to subclassScrollingContentViewControllerinstead.import ScrollingContentViewController class MyViewController: ScrollingContentViewController { // ... } -
In Interface Builder's outline view, control-click your view controller and connect its
contentViewoutlet to your view controller's root view or any other subview that you want to make scrollable.
-
If your view controller defines a
viewDidLoadmethod, callsuper.viewDidLoadif you aren't already doing so.override func viewDidLoad() { super.viewDidLoad() // ... } -
At run time, the
ScrollingContentViewControllerpropertycontentViewwill now reference the superview of the controls that you laid out in Interface Builder. This superview will no longer be referenced by theviewproperty, which will instead reference an empty root view behind the scrolling content view. If necessary, revise your code to reflect this change.
Your content view will now scroll, provided that you ensure that the content view's Auto Layout constraints sufficiently define its size, and that this size is larger than the safe area.
Code
To integrate ScrollingContentViewController programmatically:
-
Subclass
ScrollingContentViewControllerinstead ofUIViewController.import ScrollingContentViewController class MyViewController: ScrollingContentViewController { // ... } -
In your view controller's
viewDidLoadmethod, assign a new view to thecontentViewproperty. Add all of your controls to this view instead of referencing theviewproperty so they can scroll freely. The view controller's root view referenced by itsviewproperty now acts as a background view behind the scrolling content view.override func viewDidLoad() { super.viewDidLoad() contentView = UIView() // Add all controls to contentView instead of view. // ... }
You may also assign contentView to a subview of your view controller's root view, in which case only that subview will be made scrollable.
Caveats
Auto Layout Considerations
For ScrollingContentViewController to determine the height of the scroll view's content, the content view must contain an unbroken chain of constraints and views stretching from the content view’s top edge to its bottom edge. This is also true for the content view's width. This is consistent with the approach described by Apple's Working with Scroll Views documentation.
If you don't define sufficient Auto Layout constraints, ScrollingContentViewController won't be able to determine the size of your content view, and it will not scroll as expected.
If you'd like your content view to stretch to take advantage of the full visible area of the scroll view, relax your constraints to allow for this. For example, in Interface Builder, change the Relation property of one of your height constraints to Greater Than or Equal.
To determine the size of the scroll view's content size, ScrollingContentViewController creates width and height constraints with a relation greater than or equal to the width and height of the scroll view's safe area. The priority of these constraints is 500. Consequently, if you create an unbroken chain of constraints with priority defaultHigh (750) or required (1000), they will take precedence over ScrollingContentViewController's internal minimum width and height constraints, and your content view will not stretch to fill the scroll view's safe area.
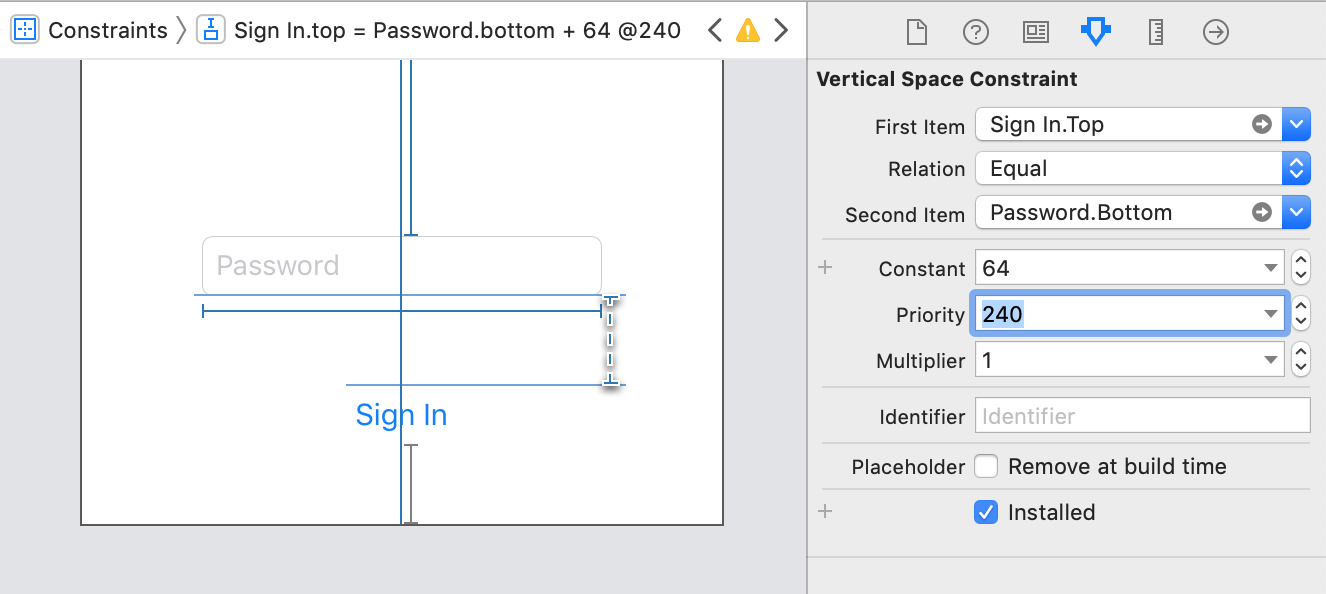
If the size of your view controller is intentionally highly constrained (e.g. consisting exclusively of constraints with required priority and lacking greaterThanOrEqual relation constraints), you may see Auto Layout constraint errors in Interface Builder if the constraints don't match the simulated size of the view, for example, when you switch between simulated device sizes. The easiest way to resolve this issue is to reduce the priority of one of your constraints. The value 240 is a good choice because it is lower than the default content hugging priority (250) and consequently, it will help avoid the undesirable behavior where text fields and labels without height constraints stretch vertically.
Intrinsic Content Size
If you'd prefer not to use Auto Layout, the content view's size may be specified using intrinsicContentSize instead of constraints.
The default UIView content hugging priority is defaultLow, and consequently, the content view's intrinisic content size will normally be overridden by the minimum size constraints that ScrollingContentViewController assigns. If you'd like intrinsicContentSize to take precedence over these constraints, set the content view's content hugging priority to required.
Changing the Background Color
The content view is positioned within the scroll view's safe area. Consequently, the content view's background color won't extend underneath the status bar, home indicator, navigation bar, or toolbar.
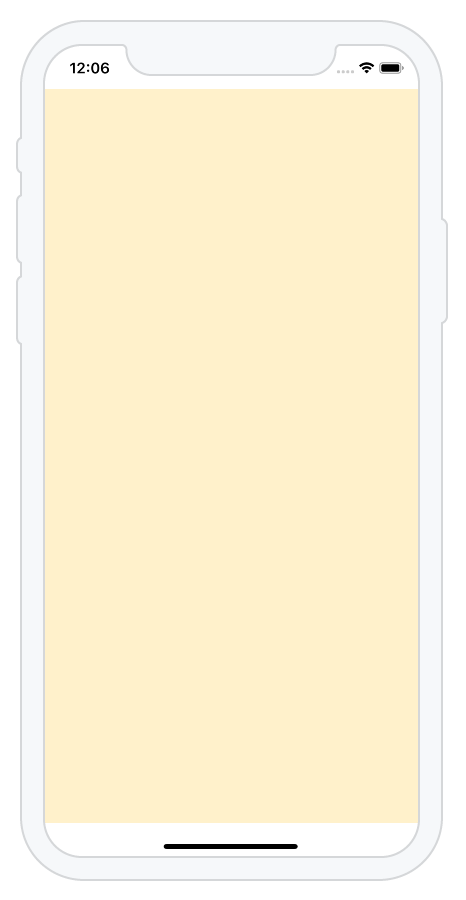
To specify a background color that extends to the edges of the screen:
-
Set the background color of the view controller's root view to the desired color. This view will be visible behind the scroll view, which is transparent.
-
Set the content view's background color to
nilso it is also transparent.
For example:
view.backgroundColor = UIColor(red: 1, green: 0.949, blue: 0.788, alpha: 1)
contentView.backgroundColor = nil
Resizing the Content View
If you make changes to your content view that modify its size, you must call the scroll view's setNeedsLayout method, or otherwise the scroll view's content size won't be updated to reflect the size change, and your view may not scroll correctly.
For example, after updating the view's NSLayoutConstraint.constant properties, you may animate the changes like this:
UIView.animate(withDuration: 0.5, delay: 0, usingSpringWithDamping: 1, initialSpringVelocity: 0,
        options: [], animations: {
    self.scrollView.setNeedsLayout()
    self.scrollView.layoutIfNeeded()
}, completion: nil)
Oversized View Controllers
In Interface Builder, it's possible to design a view controller that is intentionally larger than the height of the screen. To do this, change the view controller's simulated size to Freeform and adjust its height. When used with ScrollingContentViewController, the view controller's oversized content view will scroll freely, assuming its constraints require it to be larger than the screen.
Usage Without Subclassing
When subclassing ScrollingContentViewController is not an option, the helper class ScrollingContentViewManager can be composed with your view controller instead:
import ScrollingContentViewController

class MyViewController: UIViewController {

    lazy var scrollingContentViewManager = ScrollingContentViewManager(hostViewController: self)

    @IBOutlet weak var contentView: UIView!

    override func loadView() {
        // Load all controls and connect all outlets defined by Interface Builder.
        super.loadView()

        scrollingContentViewManager.loadView(forContentView: contentView)
    }

    override func viewDidLoad() {
        super.viewDidLoad()

        // When ScrollingContentViewManager.contentView is first assigned, this has the
        // side effect of adding a scroll view to the content view's superview, and
        // adding the content view to the scroll view.
        scrollingContentViewManager.contentView = contentView

        // Set the content view's background color to transparent so the root view is
        // visible behind it.
        contentView.backgroundColor = nil
    }

    // Note: This method is not strictly required, but logs a warning if the content
    // view's size is undefined.
    override func viewWillAppear(_ animated: Bool) {
        super.viewWillAppear(animated)

        scrollingContentViewManager.viewWillAppear(animated)
    }

    // Note: This is only required in apps that support device orientation changes.
    override func viewWillTransition(to size: CGSize,
            with coordinator: UIViewControllerTransitionCoordinator) {
        super.viewWillTransition(to: size, with: coordinator)

        scrollingContentViewManager.viewWillTransition(to: size, with: coordinator)
    }

    // Note: This is only required in apps with navigation controllers that are used to
    // push sequences of view controllers with text fields that become the first
    // responder in `viewWillAppear`.
    override func viewSafeAreaInsetsDidChange() {
        super.viewSafeAreaInsetsDidChange()

        scrollingContentViewManager.viewSafeAreaInsetsDidChange()
    }

}
The ScrollingContentViewManager class supports all of the same properties and methods as ScrollingContentViewController.
ScrollingContentViewManager can also be used to create a scrolling view controller programatically:
import ScrollingContentViewController

class MyViewController: UIViewController {

    lazy var scrollingContentViewManager = ScrollingContentViewManager(hostViewController: self)

    let contentView = UIView()

    override func viewDidLoad() {
        super.viewDidLoad()

        // Populate your content view here.
        // ...

        // When ScrollingContentViewManager.contentView is first assigned, this has the
        // side effect of adding a scroll view to the view controller's root view, and
        // adding the content view to the scroll view.
        scrollingContentViewManager.contentView = contentView
    }

    // Note: This method is not strictly required, but logs a warning if the content
    // view's size is undefined.
    override func viewWillAppear(_ animated: Bool) {
        super.viewWillAppear(animated)

        scrollingContentViewManager.viewWillAppear(animated)
    }

    // Note: This is only required in apps that support device orientation changes.
    override func viewWillTransition(to size: CGSize,
            with coordinator: UIViewControllerTransitionCoordinator) {
        super.viewWillTransition(to: size, with: coordinator)

        scrollingContentViewManager.viewWillTransition(to: size, with: coordinator)
    }

    // Note: This is only required in apps with navigation controllers that are used to
    // push sequences of view controllers with text fields that become the first
    // responder in `viewWillAppear`.
    override func viewSafeAreaInsetsDidChange() {
        super.viewSafeAreaInsetsDidChange()

        scrollingContentViewManager.viewSafeAreaInsetsDidChange()
    }

}
GitHub
https://github.com/drewolbrich/ScrollingContentViewController