Slick
A SwiftUI View for displaying a soft, backlit background around images (like an oil slick).
Usage
Import Slick into the file for your SwiftUI View which will use the Slick view:
import Slick
Create a SlickView, passing the NSImage you want to display as the first parameter. SlickView takes
a trailing closure which you should use to render the image as you see fit.
For example, to display an image named "astronaut" in your app bundle:
SlickView(NSImage(named: "astronaut")) { nsImage in
  Image(nsImage: nsImage)
    .resizable()
    .aspectRatio(contentMode: .fit)
}
Which will render:

Debug View
Slick allows you to render a debug view to show which parts of your image are being sampled and the colours which are being sampled from each section. To render the debug view, simply add a SlickDebugView and wrap both in a SlickDebugContainerView, for example:
SlickDebugContainerView {
  HStack(alignment: .top) {
    SlickView(NSImage(named: "astronaut")) { nsImage in
      Image(nsImage: nsImage)
        .resizable()
        .aspectRatio(contentMode: .fit)
    }
    SlickDebugView()
  }
}
SlickDebugContainerView is required to connect the SlickView and SlickDebugView together.
Setup
[Preferred] Swift Package Manager
Slick is best installed using the Swift Package Manager. Add the following to your target’s dependencies in Package.swift:
dependencies: [
    ...,
    .package(url: "https://github.com/alexrozanski/Slick.git", .upToNextMajor(from: "1.0.0"))
]
Or add it as a dependency by specifying https://github.com/alexrozanski/Slick.git through Xcode’s Package Dependencies UI.
Manual
- Clone the Slick repository:
git clone https://github.com/alexrozanski/Slick.git # or [email protected]:alexrozanski/Slick.git with SSH
- Open
Slick.xcodeprojin Xcode and build theSlicktarget in Debug or Release mode (depending on how you will be using the framework). - Open the products folder from Xcode using Product > Show Build Folder in Finder from the Xcode menu.
- Find
Slick.frameworkin either theDebugorReleasefolder (depending on how you built the framework). - Drag
Slick.frameworkto the Project Navigator (sidebar) of your Xcode project, checking ‘Copy items if needed’ and checking the correct target that you want the framework to be added to.
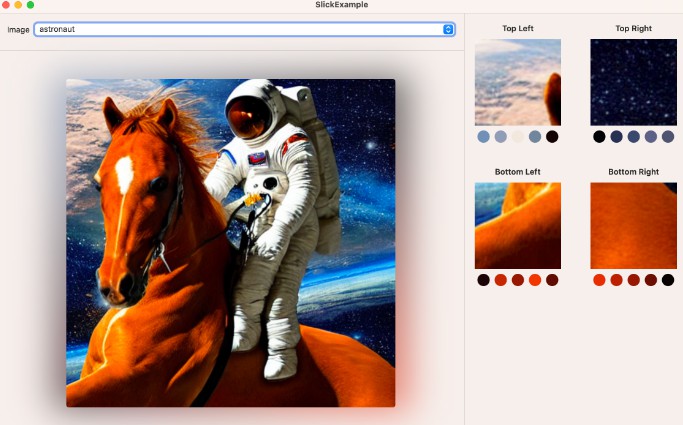
Sample App
The SlickExample app shows an example of Slick in action, with some sample images and info showing which sections of the image and which colours were sampled.

Credits
- Atomic Object’s blog post on extracting colours from images was very helpful in implementing the image colour extraction logic in Slick.
- Sample images generated using Apple’s runner of Stable Diffusion on Apple Silicon.
License
Slick is released under the MIT license. See LICENSE for more details.