 Phoenix Game Launcher
Phoenix is an open-source game launcher for MacOS, created by Shock9616, written in SwiftUI. This launcher was inspired by projects like Playnite and Lutris, and supports any game which can be launched from the command line. (So basically all of them!) It was designed to be small, fast, and not overly complicated. Phoenix is available on GitHub under the [MIT license](License.txt)

Compatibility
Phoenix is compatible with just about any game that can be run on MacOS as games are launched by running a terminal command in the background. For example, to launch Hollow Knight through Steam, it would run open steam://run/367520. This approach means that this launcher can launch games installed through the App Store, Steam (and other similar stores) CrossOver, Parallels, and even emulated games! This makes Phoenix the perfect hub for all the games you have on your Mac
Usage
To run this launcher, your Mac must be on at least MacOS 13.0 (Ventura). I did my best to make it compatible with Monterey, but with my very limited knowledge of Swift/SwiftUI I wasn’t able to make it work without code that only works on MacOS 13. This may change in the future though as the launcher matures so if you aren’t able to/haven’t upgraded yet, not all hope is lost!
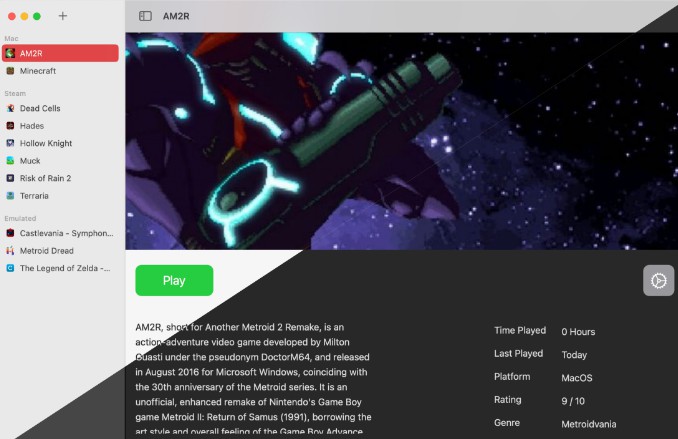
Download the latest release from the releases page and install the app like you would with any other. The first time you open the app, you will get an alert saying that your Mac can’t check the app for Malicious software. This is because I’m a broke university student who can’t afford an Apple Developer Program membership. I promise it’s safe. Close the alert, right click the app in Finder, and select “open” from the menu. You’ll get the same alert, but this time there will be an option to open anyways. When you open the app, it will look like this:

You can add a game by clicking the ‘+’ button in the toolbar. Fill in as much information as you can. To run the game, you need at the VERY least a name and a launcher command. All the other things are for making the launcher look nicer. (The above screenshot doesn’t look very nice does it? ?) Once you’ve added a game you can delete the placeholder game by right-clicking and selecting ‘Delete Game’. You can edit a game you’ve already added by clicking the gear button on the right hand side of the window. When editing, leave everything at its default value except for the information you intend to change.
IMPORTANT NOTE: There is currently a bug that causes the detail view to go blank after editing a game. If you try to edit the game again while it is in this state, the app will crash. To work around it for now (I am working on a fix as we speak), just select a different game and then go back to the one you just edited. Your changes will be shown and you won’t have to worry about the crash
Once you have a game and it’s launcher command is configured, you can hit the play button and it will open up!
Launcher commands:
I know that not everyone has used the terminal before, so here are some templates for some common places to find games:
App Store/Regular Mac games:
open /Applications/<App Name Here>.app
or
open ~/Applications/<App Name Here>.app
Steam games:
open steam://run/<steam app id here>
You can find your game’s id by going to SteamDB and searching for your game. The app id will be in the leftmost column.
GOG/Epic Games/Other stores
I don’t have any games from these stores, so unfortunately I can’t test what commands work for them. If anyone figures out a good template that works, let me know and I will update this section to include it!
Parallels
If you didn’t know, Applications installed in Parallels have Mac apps that act as launchers in ~/Applications (Parallels)/<VM Name> Applications/, so any Windows game you play via Parallels can be launched like this (Using my VM called ‘Windows 11’ as an example):
open ~/Applications\ (Parallels)/Windows\ 11\ Applications/<game name>.exe.app
Crossover
Crossover apps are installed to ~/Applications/CrossOver so they can be launched like this:
open ~/Applications/CrossOver/<game name>.app
Emulated games:
There isn’t a set formula for emulated games, since the games are all run by different apps. That said, most (not all) will work with one of these options:
open /path/to/rom/file

For example, this command opens Metroid Prime Hunters in DeSuME for me:

open ~/Documents/Gaming/ROMs/NDS/Metroid\ Prime\ Hunters.nds
or
open /Applications/<emulator name here>.app/Contents/MacOS/<emulator name> /path/to/rom/file

For example, this command opens Metroid Dread in Ryujinx for me:

open /Applications/Ryujinx.app/Contents/MacOS/Ryujinx ~/Documents/Gaming/ROMs/Switch/Metroid\ Dread.nsp
Building
If you want to build this app for yourself, just download this repository
git clone [email protected]:Shock9616/Phoenix.git
then open Phoenix.xcodeproj in Xcode. You can create a .app file by going to Product > Archive in the menu bar, clicking Distribute App, selecting Copy App and then saving the folder somewhere easy to find like your desktop. The app will be inside the folder and you can copy it into your applications folder and begin using it!
Updates
If you want to be notified when new updates are released here, make sure you “watch” this repository at the top of the page. You can be notified of only new releases by clicking the arrow next to the button, selecting “Custom”, and then selecting “Releases” and then “Apply”
Contact
For now, if you need to contact me for anything, you can email me at [email protected]. If this project really takes off I will make a Discord server and update this section of the readme ?
Credits
-
App Icon was generated by DALL·E 2 (I’m not an artist ?)
-
As much as I’m embarassed to say it, there is code in this project written by ChatGPT. (I said I don’t know much Swift ?♂️?)