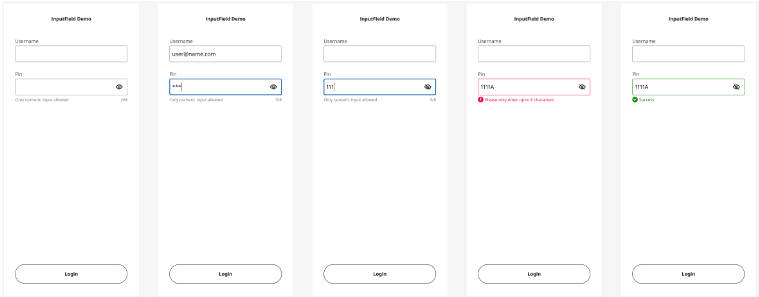
FloatingLabelTextFieldSwiftUI
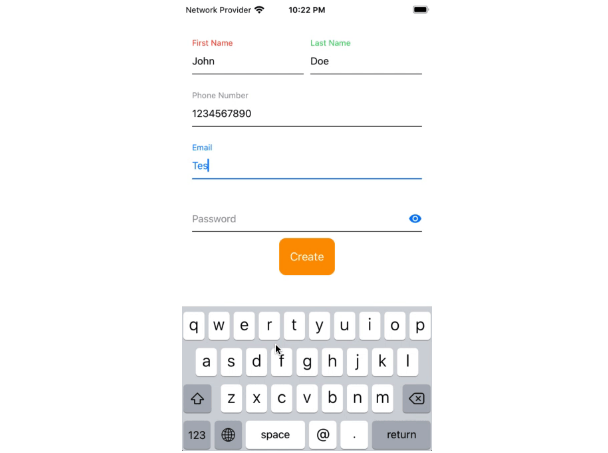
FloatingLabelTextFieldSwiftUI is a small and lightweight SwiftUI framework written in completely swiftUI (not using UIViewRepresentable) that allows to create beautiful and customisable floating label textfield! This library support RTL text (eg. Arabic) and easy to add left view and right view to your text field and customizable.
If you like the project, please do not forget to star ★ this repository and follow me on GitHub.
? Requirements
- iOS 13.0+
- Xcode 11.2+
- Swift 5.0
? Usage
To start using the component add it to your project using CocoaPods or Swift Package. First of all import FloatingLabelTextFieldSwiftUI
import FloatingLabelTextFieldSwiftUI
struct ContentView: View {

    @State private var firstName: String = ""

    var body: some View {

        FloatingLabelTextField($firstName, placeholder: "First Name", editingChanged: { (isChanged) in

        }) {

        }.frame(height: 70)
    }
}
FloatingLabelTextFieldStyle and Colors:
You can customize the colors of the textfield by using FloatingLabelTextFieldStyle property or create your own style and set a few properties.
Property
struct ContentView: View {

    @State private var firstName: String = ""

    var body: some View {

        FloatingLabelTextField($firstName, placeholder: "First Name", editingChanged: { (isChanged) in

        }) {

        }
        .titleColor(.green)
        .selectedLineColor(.blue)
        .selectedTextColor(.blue)
        .selectedTitleColor(.blue)
        .frame(height: 70)
    }
}
FloatingLabelTextFieldStyle
Just two step for create and add style to FloatingLabelTextField.
- Create your own theme style. Set property as per your theme.
struct ThemeTextFieldStyle: FloatingLabelTextFieldStyle {
    func body(content: FloatingLabelTextField) -> FloatingLabelTextField {
        content
            .spaceBetweenTitleText(15) // Sets the space between title and text.
            .textAlignment(.leading) // Sets the alignment for text.
            .lineHeight(1) // Sets the line height.
            .selectedLineHeight(1.5) // Sets the selected line height.
            .lineColor(.gray) // Sets the line color.
            .selectedLineColor(.blue) // Sets the selected line color.
            .titleColor(.gray) // Sets the title color.
            .selectedTitleColor(.blue) // Sets the selected title color.
            .titleFont(.system(size: 12)) // Sets the title font.
            .textColor(.black) // Sets the text color.
            .selectedTextColor(.blue) // Sets the selected text color.
            .textFont(.system(size: 15)) // Sets the text font.
            .placeholderColor(.gray) // Sets the placeholder color.
            .placeholderFont(.system(size: 15)) // Sets the placeholder font.
    }
}
- Add style to FloatingLabelTextField.
struct ContentView: View {

    @State private var firstName: String = ""

    var body: some View {
        FloatingLabelTextField($firstName, placeholder: "First Name", editingChanged: { (isChanged) in

        }) {

        }
        .floatingStyle(ThemeTextFieldStyle())
        .frame(height: 70)
    }
}
Secure Text Entry
To enable Secure Text Entry use .isSecureTextEntry(true) property.
struct ContentView: View {

    @State private var password: String = ""

    var body: some View {
        HStack(spacing: 20) {
            FloatingLabelTextField($password, placeholder: "Password", editingChanged: { (isChanged) in

            }) {

            }
            .isSecureTextEntry(true)
            .frame(height: 70)
        }
    }
}
Left - Right View
Yes, you can easily add your own views, buttons or image to left view or right view of the FloatingLabelTextField.

struct ContentView: View {

    @State private var password: String = ""
    @State private var isPasswordShow: Bool = false

    var body: some View {
        FloatingLabelTextField($password, placeholder: "Password", editingChanged: { (isChanged) in

        }) {

        }
        .isSecureTextEntry(!self.isPasswordShow)
            .leftView({ // Add left view.
                Image("password")
            })
            .rightView({ // Add right view.
                Button(action: {
                    withAnimation {
                        self.isPasswordShow.toggle()
                    }

                }) {
                    Image(self.isPasswordShow ? "eye_close" : "eye_show")
                }
            })
            .frame(height: 70)
            .padding()
    }
}
? Coming soon
- Error Message and Validation
? Examples
To run the example project, clone the repo, and run pod install from the Example directory first.
? Installation
CocoaPods:
FloatingLabelTextFieldSwiftUI is available through CocoaPods. To install
it, simply add the following line to your Podfile:
pod 'FloatingLabelTextFieldSwiftUI'
Swift Package Manager
The Swift Package Manager is a tool for managing the distribution of Swift code. It’s integrated with the Swift build system to automate the process of downloading, compiling, and linking dependencies.
To integrate FloatingLabelTextFieldSwiftUI into your Xcode project using Xcode 11+, specify it in File > Swift Packages > Add:
https://github.com/kishanraja/FloatingLabelTextFieldSwiftUI.git
Manual
You can download the latest files from our Releases page. After doing so, copy the files in the Sources folder to your project.
Author
kishanraja, [email protected]