SwiftUICoreImage
Help for using Core Image within the context of SwiftUI. Also useful even without SwiftUI.
Introduction
Core Image is a wonderful image-processsing toolkit in macOS and iOS, but it’s a bit clunky to use. Even after Apple added Swift APIs to many of the filters (CoreImage.CIFilterBuiltins), it’s still pretty tedious to chain filters to images.
The purpose of this package is to provide an easier way to chain multiple filters to CIImage instances and then render them into SwiftUI (or any other context — SwiftUI is not needed).
    Image(ciImage: CIImage("Bernie.jpeg")
        .sepiaTone(intensity: sepia)
        .recropping { image in
            image
                .clampedToExtent(active: clamped)
                .gaussianBlur(radius: gaussianBlurRadius)
        }
    )
        .resizable()
        .aspectRatio(contentMode: .fit)
Manifest
Included in this package is:
- CIImage-Filters.swift
- 208 modifiers on
CIImagethat return a new modifiedCIImage(or the original if unmodified) - 20 static functions that return a newly generated
CIImage
- 208 modifiers on
- CIImage-Extensions.swift
- Convenience initializers for
CIImagefrom a resource name and from anNSImage/UIImage - Modifiers for
CIImageto return cropped, scaled, etc. to be easier to work with SwiftUI - Overloads of several built-in
CIImagemodifier functions that take anactiveboolean parameter
- Convenience initializers for
- Image-Extensions.swift
- Convenience initializer to create a SwiftUI
Imagefrom aCIImage
- Convenience initializer to create a SwiftUI
How This Works
Similarly to how SwiftUI view modifiers each return a modified View instance, these modifiers on CIImage take care of the core image chaining by creating a corresponding CIFilter, hooking up the inputImage for you, and returning the resulting outputImage.
When creating SwiftUI code, I think it’s important that you can use Inert Modifiers in which you pass in some parameter that causes the modifier to have no effect. (For instance, specifying opacity of 1.0 or padding of 0.0 to a view.)
In this code, I’ve made sure that each of our image modifiers come with inert modifiers: in some cases it’s passing in a parameter that clearly has no effect (e.g. zero intensity, zero radius); or it’s a nil background image when combining with another image; or a boolean active parameter. If the parameter(s) specified would cause no change in the image, then the identity (self) is returned forthwith.
The contents of CIImage-Filters.swift are generated source code, using code that I’ve included in this repository (CIImage-Generation.swift, not included in the package import). This loops through the core image metadata that Apple provides (CIFilter.filterNames(inCategories: nil)). Unfortunately this list is somewhat out of date and contains a number of inconsistencies that I’ve done my best to overcome. There are some JSON files that provide additional metadata such as a list of the functions that actually do have online documentation — 56 functions aren’t documented so some guesswork is needed — or repairs to missing or obsolete documentation. You probably won’t need to run this code unless you have some special requirements or the list has been updated in a future (post-Ventura, post iOS-16) OS release.
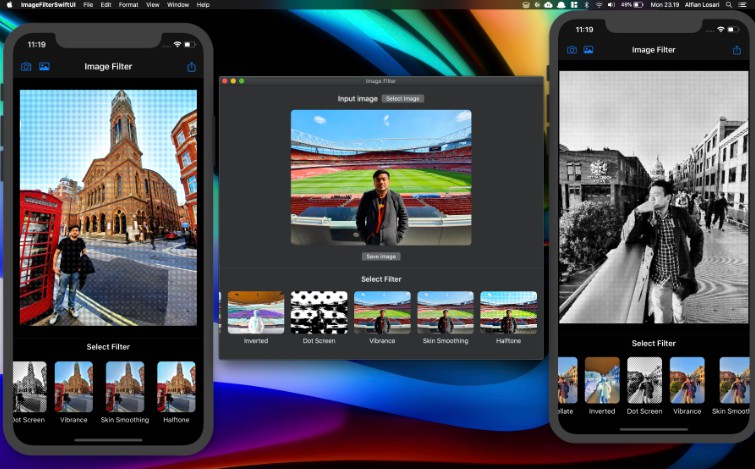
Using With SwiftUI
Remember that Core Image operations are really just a “recipe” for the processing steps; the actual work is not performed until the image needs to be rendered to a bitmap.
Instead of creating a SwiftUI Image using a built-in initializer from a resource name or other image type (CGImage, NSImage, UIImage), this code provides a new initializer to create an Image from a CIImage. When SwiftUI needs to render the image, the Core Image is rendered to the screen.
Your typical approach, then, will be to create an Image, passing in a CIImage created using one of the built-in initializers or the convenience methods included here to create from a resource name or another image type.
Then, just chain modifiers to that CIImage to indicate what to modify.
Many modifiers are simple. For instance:
    Image(ciImage: CIImage("Halloween.jpeg")
        .xRay()
    )
If you wish to toggle whether the filter is applied, use the active parameter (default value of true):
    Image(ciImage: CIImage("Halloween.jpeg")
        .xRay(active: isMachineOn)
    )
Chain any number of modifiers found in CIImage-Filters.swift to construct the desired result.
Image Scaling
Many Core Image filters use pixel values for parameters. Therefore, it may be needed to get an image scaled to an appropriate size before applying operations. For example, applying a 10-pixel-radius blur to a 6000⨉4000 image that is then scaled down to 300⨉200 might not yield what you want; perhaps you want to first scale the image to 300⨉200 and then apply the 10-pixel-radius blur.
Core Image provides a scaling operation (CILanczosScaleTransform and lanczosScaleTransform()) but this package also includes more convenient alternatives: scaledToFill() and scaledToFit() where you pass in the dimensions you want.
A typical use of this works well in conjunction with GeometryReader. For example:
    GeometryReader { geo in
        let geoSize: CGSize = geo.frame(in: .local).integral.size
        // Resize image to double the frame size, assuming we are on a retina display
        let newSize: CGSize = CGSize(width: geoSize.width * 2,
                                    height: geoSize.height * 2)

        Image(ciImage: CIImage("M83.jpeg")
            .scaledToFit(newSize)
            .sharpenLuminance(sharpness: 1.0, radius: 5)
        )
            .resizable()    // Make sure retina image is scaled to fit
            .aspectRatio(contentMode: .fit)
    }

Using Without SwiftUI
SwiftUI is not needed at all. Just create a CIImage and perform operations. Then, render to a bitmap.
    let tiledImage: CIImage = CIImage("HeyGoodMorning.png").
        .triangleTile(center: .zero, angle: 0.356, width: 2.0)

    imageView.image = UIImage(CIImage: tiledImage)
Other Notes
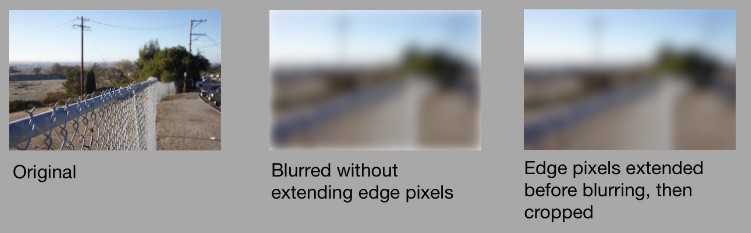
If you’ve used Core Image, you’ll know that sometimes you need to play with the extent of an image, e.g. clamping an image to have infinite edges before applying a gaussian blur, then re-cropping to the image’s original extent. To accomplish this, you can use the recropping modifier which is followed by a closure. The operation saves the extent of the image, applies whatever is in the closure, and then re-crops to that extent. In the example below, the image in ciImage is converted into an image with the pixel colors along its edges extend infinitely in all directions, then it is blurred, and then upon exit from the closure, the returned image is re-cropped.
    ciImage
        .recropping { image in
            image
                .clampedToExtent()
                .gaussianBlur(radius: 10)
        }

The recropping modifier is also useful if you find that a filter (e.g. comicEffect() has grown your image’s extent slightly and you want to clamp it to its original size.
Another useful operation is replacing. Much like recropping except that it does not mess with the extent of the image. You pass in a closure, which starts with the image you were working with; your closure returns a new image. This can be useful when working with the compositing operations in Core Image, which require a background image to be passed in. What if your chain of operations is on the background image, and you want to overlay something on top? Just wrap your operation in .replacing and return the composited image.
    ciImage
        .replacing { backgroundImage in
            ciImage2
                .sourceAtopCompositing(backgroundImage: backgroundImage)
        }
In this case, the image in ciImage2 is the foreground image, placed atop the backgroundImage, then returned to the chain of operations.
Using Package
In Xcode, Choose File > Add Packages… then enter the URL of this repository into the search bar, and continue from there.
In your code:
import SwiftUICoreImage
That’s it!
Please file an issue or pull request if you can think of an improvement to the code or documentation of the generated filters, or find any other helpful utilities for manipulating Core Images in this toolkit!