RResultBuilders
RResultBuilder is DSL library based on Result Builder
Features
- Supports
- DSL way defining attributed string
- Building attributed strings is type safe
- DSL way of constructing ActionSheet, AlertController
- Swift 5.4 compatible
- Supports control statements(including optional checking) within DSL body builder
- Reduces boilerplate code
- Fully tested code
- Distribution with Swift Package Manager and CocoaPods
Requirements
- iOS 11.0+
- macOS 10.11+
- watchOS 4.0+
- Xcode 12.5+
Installation
CocoaPods
You can use CocoaPods to install RResultBuilders by adding it to your Podfile:
platform :ios, '11.0'
use_frameworks!
pod 'RResultBuilders', '1.0.0'
Swift Package Manager
Just add this dependency in Package.swift
Open your project in Xcode 11, navigate to Menu -> Swift Packages -> Add Package Dependency and enter
.package('https://github.com/rakutentech/ios-rresultbuilders', from: 1.0.0)
NSAttributedString
Following components that helps in building attributed string in easy way
- RText: This component used to construct attributed text from given string
- RLink: This component used to construct link in attributed text
- RImageAttachment: This component used to construct image attachment in attributed text
- Miscelleneaous
- REmpty: Just empty component
- RSpace: This component used to insert space and default is one space
- RLineBreak: This component used to insert new line and default is one line break
Regular
import RResultBuilders
NSAttributedString {
    RText("I love swift and SwiftUI ???")
        .stroke(width: 2, color: .red)
}
.font(.systemFont(ofSize: 50))
Control statements
If..else
import RResultBuilders

let optionalText: String? = "iPhone12 Pro Max"
NSAttributedString {
    if let text = optionalText {
        RText(text)
            .font(.systemFont(ofSize: 20))
            .foregroundColor(.red)
    } else {
        RText("Optional else Text")
    }
}
.font(.boldSystemFont(ofSize: 40))
switch..case
enum Apple { case iPhone, mac, airpod }
let appleDevice = Apple.iPhone
NSAttributedString {
    switch appleDevice {
    case .iPhone:
        RText("This is iPhone")
            .foregroundColor(.blue)
    default:
        RText("Apple future device")
    }
}
.font(.boldSystemFont(ofSize: 40))
for..in loop
let appleDevices = [<.....>]
NSAttributedString {
    for device in appleDevices {
        RText(device.rawValue)
            .foregroundColor(device.color)
            .font(device.font)
        RSpace()
    }
}
.font(.boldSystemFont(ofSize: 40))
UIAlertController
There are dedicated actions those can be used to construct alert or action sheet
- DefaultAction: This action is default type with
UIAlertAction.Styleas default - CancelAction: This action is cancel type with
UIAlertAction.Styleas cancel - DestructiveAction: This action is destructive type with
UIAlertAction.Styleas destructive
Regular
import RResultBuilders
UIAlertController(
    title: "Delete all data?",
    message: "All your data will be deleted!") {
    DestructiveAction("Yes, Delete it All") {
        print("Deleting all data")
    }
    DefaultAction("Show More Options") {
        print("showing more options")
    }
    CancelAction("No, Don't Delete Anything")
}
With control statements
If..else
import RResultBuilders

let optionalText: String? = "Show More optionals"
UIAlertController(
    title: "Delete all data?",
    message: "All your data will be deleted!") {

    // Optional unwrapping
    if let text = optionalText {
        DefaultAction(text) {
            print("showing more optionals")
        }
    }
    CancelAction("No, Don't Delete Anything")
}
switch..case
let appleDevice = Apple.iPhone
UIAlertController(
    title: "Delete all data?",
    message: "All your data will be deleted!") {
    // Switch case
    switch appleDevice {
    case .iPhone:
        DefaultAction("Show More iPhone") {
            print("showing more iPhone")
        }
    default:
        DefaultAction("Show More appleDevice") {
            print("showing more appleDevice")
        }
    }
    CancelAction("No, Don't Delete Anything")
}
for..in loop
let actions = [<.....>]
UIAlertController(
    title: "Delete all data?",
    message: "All your data will be deleted!") {
    for action in actions {
        action
    }
}
Request
Making API call in declarative is fairly simple
DSL
Request<Type> {
    URL("https://jsonplaceholder.typicode.com/todo")
}
.onObject { object in
    ...
}
.resume()
Data Request
To get raw data as response
Request<Type> {
    URL("https://jsonplaceholder.typicode.com/todo")
}
.onData { data in
    ...
}
.onError { err in
    ...
}
.resume()
Callback handler
You can attach all possible handlers to Request but they are completely optional execept resume
Request<[Todo]> {
    URL(string: "https://jsonplaceholder.typicode.com/todos")!
}
.onRawResponse { (data, response, error) in
    ...
}
.onData { data in
    ...
}
.onObject { todos in
    ...
}
.onError { err in
    ...
}
.resume()
Request Components
URL
URL can also be build in DSL way
URL {
    Scheme(.https)
    Host("jsonplaceholder.typicode.com")
    Path("todo")
}
Header
Supports standard HTTP headers
Header.Accept(.json)
Header.Authorization(.basic(username: "username", password: "password"))
Header.CacheControl(.noCache)
Header.ContentLength(16)
Header.ContentType(.json)
Header.Host(jsonplaceholder.typicode.com", port: "8000")
Header.UserAgent("user-agent")
Header.Custom("custom", value: "customvVal")
It also supports building Headers in DSL
Headers {
    Header.Accept(.json)
    Header.Authorization(.basic(username: "test", password: "rest"))
    Header.CacheControl(.noCache)
}
HTTP Body
Custom Encodable Object
Request<Type> {
    RequestBody(sampleTodo)
}
.resume()
Raw Data
Request<Type> {
    RequestBody(data)
}
.resume()
HTTP Method
Method.GET
Method.POST
Method.HEAD
Method.PUT
Method.DELETE
Timeout
Timeout(30) // seconds
Decoding
You can even specify custom decoder
Request<[Todo]> {
    URL(string: "https://jsonplaceholder.typicode.com/todos")!
}
.onObject(using: JSONDecoder()) { todos in
    ...
}
.resume()
Also raw data can be decoded
DataRequest {
    URL(string: "https://jsonplaceholder.typicode.com/todos")!
}
..onData { data in
    data?.decoded()
    // Custom decoder
    // data?.decoded(using: JSONDecoder())
}
.resume()
URLRequest
It also generates raw URLRequest
DataRequest {
    URL(string: "https://jsonplaceholder.typicode.com/todos")!
    Method.GET
    CachePolicy(.reloadIgnoringLocalCacheData)
    Headers {
        Header.Accept(.json)
        Header.Authorization(.basic(username: "test", password: "rest"))
        Header.CacheControl(.noCache)
    }
}.asURLRequest()
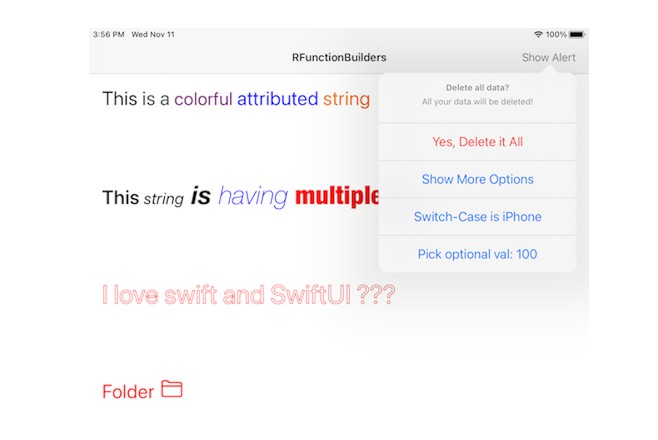
Screenshot
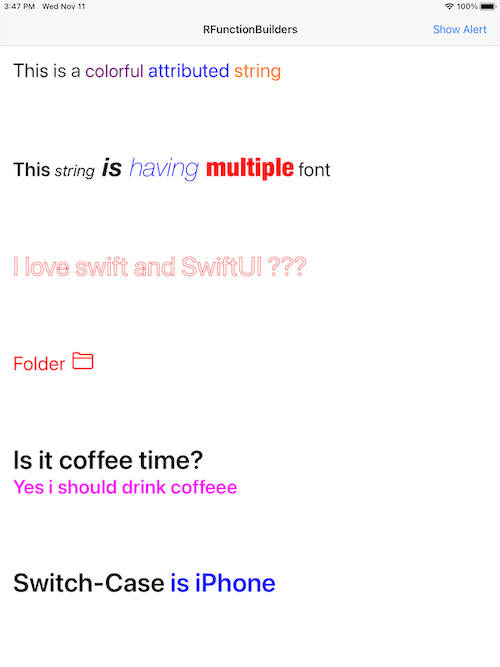
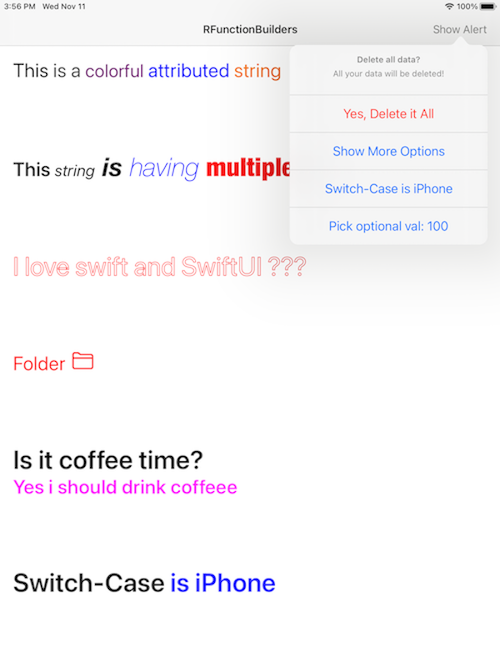
Example
- Open and Run the project inside Example folder and find various use cases
Contribute
We welcome you for the contribution to RResultBuilders, check the CONTRIBUTING.
If you find any issues or want to suggest your brilliant ideas please feel free to create pull request.
Meta
Distributed under the MIT license. See LICENSE for more information.