EasierPath ⚡️


EasierPath is a library to make UIBezierPath easier to use. More specifically, you can write more intuitive and concise code when you draw a straight line or a curve.
Why use EasierPath? ?
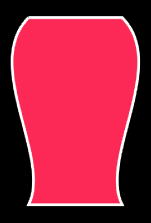
If you draw the shape of a jar using UIBezierPath, you will write the code as below.
1. Create a UIBezierPath instance and draw a line and connect it.
let bezierPath:UIBezierPath = UIBezierPath()
bezierPath.move(to: CGPoint(x: 100, y: 100))
bezierPath.addLine(to: CGPoint(x: 200, y: 100))
bezierPath.addCurve(to: CGPoint(x: 200, y: 300), controlPoint1: CGPoint(x: 250, y: 150), controlPoint2: CGPoint(x: 175, y: 250))
bezierPath.addLine(to: CGPoint(x:100,y:300))
bezierPath.addCurve(to: CGPoint(x: 100, y: 100), controlPoint1: CGPoint(x: 125, y: 250), controlPoint2: CGPoint(x: 50, y: 150))
bezierPath.close()
2. Apply the path of CAShapeLayer as UIBezierPath’s cgPath and apply the desired style.
let caShapeLayer:CAShapeLayer = CAShapeLayer()
caShapeLayer.path = bezierPath.cgPath
caShapeLayer.strokeColor = UIColor.white.cgColor
caShapeLayer.fillColor = UIColor.systemPink.cgColor
caShapeLayer.lineWidth = 3
3. Add it to the subLayer of the view.
view.layer.addSublayer(caShapeLayer)
UIBezierPath had several disadvantages in writing the above code. ??
1. Remember the end point when adding lines in your head. ??
Before drawing a line or curve, I had to remember where it ended and set the point accordingly.
The more we drew this, the more we had to remember, and it was so unclear to check through the code.
2. If the starting point changes, all points must be modified. ?
Each line or the curved point is drawn based on the starting point, so if the starting point changed, you had to change the points of all the lines.
If you didn’t want to do that, you could have used a certain variable to put the value and then designated it, but this was also a hassle.
3. Create CAShapeLayer or UIView. ?
In order to display UIBezierPath in View, there was a hassle of applying the path created by creating CAShapeLayer, or creating a UIView and drawing it directly into the draw() method.
Let’s write a code using EasierPath to make the same shape of the jar below. ?
1. Create and draw an instance of EasierPath.
let easierPath = EasierPath(100,100)
            .right(100)
            .curve(to: .down(200), .bezier(.rightDown(50,50), .leftDown(25,150)))
            .left(100)
            .curve(to:.up(200), .bezier(.rightUp(25,50), .leftUp(50,150)))
2. Make layers for the style you want.
let layer = easierPath.makeLayer(lineWidth:3,lineColor: .white,fillColor:.systemPink)
3. Add it to the subLayer of the view.
view.layer.addSublayer(layer)
EasierPath can compensate for all of these shortcomings.?
1. You don’t have to remember the end point when adding a line. ?
Using the above EasierPath, you don’t have to remember where it ended before, just specify which direction to draw the line.
2. Even if the starting point changes, the code remains the same. ?
Even if the starting point changes, you do not need to change each point because it is drawn in a direction based on that point.
3. Create a layer using the makeLayer method. ?
You don’t have to create a CAShapeLayer or UIView, but you can create a layer if you specify a style using the makeLayer method in EasierPath.
Example
To run the example project, clone the repo, and run pod install from the Example directory first.
Requirements
- iOS 13.0+
- Swift 5.0+
Installation
EasierPath is available through CocoaPods. To install it, simply add the following line to your Podfile:
pod 'EasierPath'
Test Coverage
100%
Author
Fomagran, [email protected]
License
EasierPath is available under the MIT license. See the LICENSE file for more info.