CoreMLHelpers
This is a collection of types and functions that make it a little easier to work with Core ML in Swift.
Some of the things CoreMLHelpers has to offer:
- convert images to
CVPixelBufferobjects and back MLMultiArrayto image conversion- a more Swift-friendly version of
MLMultiArray - handy Array functions to get top-5 predictions, argmax, and so on
- non-maximum suppression for bounding boxes
Let me know if there's anything else you'd like to see added to this library!
How to use CoreMLHelpers
Simply add the source files from the CoreMLHelpers folder to your project.
[TODO: package up using CocoaPods / Carthage / Swift Package Manager if people are interested in this]
Images and CVPixelBuffers
If your model takes an image as input, Core ML expects it to be in the form of a CVPixelBuffer (also known as CVImageBuffer). The pixel buffer must also have the correct width and height.
So if you've got a UIImage, CGImage, CIImage, or CMSampleBuffer (or something else), you first have to convert -- and resize -- the image before Core ML can use it.
Tip: use Vision
When working with images, it's a good idea to use the Vision framework to drive Core ML. Vision will automatically convert your image to the format and size that the Core ML model expects.
First, you create a VNCoreMLRequest object. This is where you provide the completion handler that gets called when Vision and Core ML have made a prediction. You do this just once and keep track of this VNCoreMLRequest instance in a property.
// Add this as a property:
var request: VNCoreMLRequest?

// Do this just once:
if let visionModel = try? VNCoreMLModel(for: yourCoreMLModel.model) else {
  request = VNCoreMLRequest(model: visionModel) { request, error in
    if let observations = request.results as? [VNClassificationObservation] {
      print(observations)
    }
  }
}

// Specify additional options:
request.imageCropAndScaleOption = .centerCrop
request.regionOfInterest = ...
To make a prediction, you create a VNImageRequestHandler using a CGImage, CIImage, or CVPixelBuffer and run it:
let handler = VNImageRequestHandler(cgImage: ...)
try? handler.perform([request])
When not using Vision
In the case where you can't or don't want to use Vision, you'll need to convert your images to CVPixelBuffer objects by hand. CoreMLHelpers has a few useful methods to help with this.
To convert and resize a UIImage (or CGImage):
let image = UIImage(...)

// Convert the image
if let pixelBuffer = image.pixelBuffer(width: 224, height: 224) {

  // Make the prediction with Core ML
  if let prediction = try? model.prediction(input: pixelBuffer) {
    print(prediction)
  }
}
To get a grayscale pixel buffer, use image.pixelBufferGray(...).
When you're using AVFoundation to read video frames from the camera, this will give CMSampleBuffer objects. You can convert these to a CVPixelBuffer using:
let pixelBuffer = CMSampleBufferGetImageBuffer(sampleBuffer)
This pixel buffer will have the width and height of the camera, which are likely too big for your model. To resize the pixel buffer you can use a CoreMLHelpers function:
if let resizedPixelBuffer = resizePixelBuffer(pixelBuffer, width: 200, height: 300) {
  // use resizedPixelBuffer
}
As an alternative, you can use a version that uses Core Image to do the resizing. You'll need to create a CIContext and CVPixelBuffer just once and then reuse them.
// Declare these as properties:
let ciContext = CIContext()
var resizedPixelBuffer: CVPixelBuffer?

// Allocate this pixel buffer just once and keep reusing it:
resizedPixelBuffer = createPixelBuffer(width: 200, height: 300)

// To resize your CVPixelBuffer:
if let resizedPixelBuffer = resizedPixelBuffer {
  resizePixelBuffer(pixelBuffer, width: 200, height: 300,
                    output: resizedPixelBuffer, context: ciContext)

  // use resizedPixelBuffer
}
To convert the CVPixelBuffer back to a UIImage (useful for debugging), do:
if let image = UIImage(pixelBuffer: resizedPixelBuffer) {
  // do something with image
}
or using Core Image:
if let image = UIImage(pixelBuffer: resizedPixelBuffer, context: ciContext) {
  // do something with image
}
MLMultiArray
Any data that is not images is treated by Core ML as an MLMultiArray, a type that can represent arrays with multiple dimensions. Like most Apple frameworks Core ML is written in Objective-C and unfortunately this makes MLMultiArray a little awkward to use from Swift. For example, to read from the array you must write:
let value = multiArray[[z, y, x] as [NSNumber]].floatValue
Yech! It's ugly and it's slow since everything gets converted to and from NSNumber instances.
CoreMLHelpers has a more Swift-friendly version called just MultiArray that lets you do the same as:
let value = multiArray[z, y, x]
To create a multi-array, write:
var m = MultiArray<Float>(shape: [3, 4, 2])
This makes a 3×4×2 array containing floats.
Internally, the data is stored in an MLMultiArray, so it's easy to pass the array to Core ML:
let coreMLArray: MLMultiArray = m.array
// do stuff with coreMLArray
You can also create a new multi-array object if you already have an MLMultiArray:
let coreMLArray = try! MLMultiArray(shape: [3, 4, 2], dataType: .double)
var m = MultiArray<Double>(coreMLArray)
Note that MultiArray uses Swift generics to specify the datatype of the array elements. You can use Double, Float, and Int32.
Warning: A new MLMultiArray may have junk values in it. If you're going to create an MLMultiArray from scratch, then set its values to 0 manually. (A new MultiArray from CoreMLHelpers does always contain zeros.)
Once you have a multi-array, you can access its elements like so:
let value = m[1, 2, 0]
You can also pass in an array containing the indices:
let indices = [1, 2, 0]
let value = m[indices]
And, of course, you can also modify the array this way:
m[1, 2, 0] = 3.14
Note: MultiArray is a struct. It's cheap to copy since the underlying data in the MLMultiArray is not copied. If you make a copy of a MultiArray object, then both instances refer to the same MLMultiArray. Modifying the one will also update the other.
To see the contents of the array (for debugging), just print it:
print(m)

[[[ 0.0, 0.0 ],
  [ 0.0, 0.0 ],
  [ 0.0, 0.0 ],
  [ 0.0, 0.0 ]],
 [[ 0.0, 0.0 ],
  [ 0.0, 0.0 ],
  [ 3.14, 0.0 ],
  [ 0.0, 0.0 ]],
 [[ 0.0, 0.0 ],
  [ 0.0, 0.0 ],
  [ 0.0, 0.0 ],
  [ 0.0, 0.0 ]]]
(You probably don't want to do this with really big arrays.)
Indeed the element at index (1, 2, 0) is set to 3.14. This is the first column (0) of the third row (2) in the second matrix (1). Notice how the indices appear backward: (matrix, row, column).
Subscripting MultiArray is pretty fast since it uses a pointer to the MLMultiArray's internal storage. If you want, you can also use this pointer yourself:
let ptr = m.pointer
ptr[0] = 2.71828
Core ML might give you an MLMultiArray that has a shape such as 3×100×150. Maybe you'd like to treat it as 100×150×3 instead. To do this, you can transpose the array:
let coreMLArray: MLMultiArray = ...  // 3×100×150

var m = MultiArray<Double>(coreMLArray).transposed([1, 2, 0])
print(m.shape)                       // 100×150×3
The list [1, 2, 0] tells the multi-array to rearrange the dimensions so that the first dimension (0) now becomes the last dimension.
Note: Transposing does not change the underlying data in the MLMultiArray, only how it is interpreted by MultiArray (i.e. only the "strides" change). So if you transpose the array and then pass m.array to Core ML, nothing will actually have changed. Therefore transposing is mostly useful for when you take the result of Core ML and then want to interpret it elsewhere in your app.
You can also change the number of dimensions of the array altogether:
let reshaped = m.reshaped([900, 50])
print(reshaped.shape)
This works because 900 × 50 = 3 × 100 × 150, so the number of elements remains the same, but it completely changes how MultiArray interprets the array. (Just as with transposing, the underlying MLMultiArray does not actually change.)
NOTE:
MultiArrayis still in early stages of development. Over time I want to add more functionality, like you'd find in numpy. Let me know if there is anything in particular you'd like to see added toMultiArray.
MLMultiArray to image conversion
If the Core ML model outputs an MLMultiArray that is really an image, it's easy to convert it into a UIImage:
let multiArray: MLMultiArray = ...
let image: UIImage = multiArray.image(offset: 0, scale: 255)
The multi-array must have the shape (3, height, width) for color images, or (height, width) for grayscale images. Any other shapes are not supported at the moment.
If your MLMultiArray does not have the shape (3, height, width) or (height, width) but for example something like (1, 1, height, width, 3) then you can use MultiArray instead to reshape and transpose the array:
let coreMLArray: MLMultiArray = ...
let reshapedArray = MultiArray<Double>(coreMLArray).reshaped([height, width, 3])
                                                   .transposed([2, 0, 1])
let image = reshapedArray.image(offset: 0, scale: 255)
The offset and scale parameters are used to put the values from the multi-array into the range [0, 255]. The offset is added first, then the result is multiplied by the scale.
For example:
- if the range of the data is [0, 1), use
offset: 0andscale: 255 - if the range is [-1, 1], use
offset: 1andscale: 127.5 - if the range is [0, 255], use
offset: 0andscale: 1
Predictions
When using Vision you will receive the model's predictions as an array of VNClassificationObservation or VNCoreMLFeatureValueObservation objects.
To get the top-5 classification predictions, do:
if let observations = request.results as? [VNClassificationObservation] {
  let top5 = top(5, observations)
  print(top5)
}
If you're using Core ML directly, then classifications are given as a [String: Double] dictionary. To get the top 5:
if let prediction = try? model.prediction(data: pixelBuffer) {
  let top5 = top(5, prediction.classLabelProbs)
  print(top5)
}
where classLabelProbs is the name of the model's output with the dictionary (this may be different depending on the model).
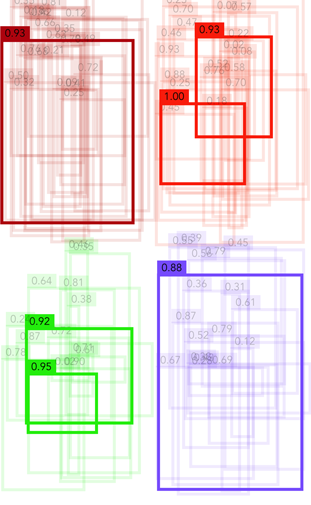
Non-maximum suppression (NMS)
For object detection models, you'll often end up with many bounding box predictions (hundreds or thousands) but not all of these are useful. Non-maximum suppression is used to only keep the best bounding boxes.

Each bounding box prediction consists of a rectangle, the predicted class for the object inside the rectangle, and a confidence score.
typealias NMSPrediction = (classIndex: Int, score: Float, rect: CGRect)
To perform NMS, put your bounding boxes into an array of NMSPrediction objects and call nonMaxSuppression():
var predictions: [NMSPrediction] = ...

let selected = nonMaxSuppression(predictions: predictions, iouThreshold: 0.5, maxBoxes: 10)
This gives you an array with the indices of the best bounding boxes.
Tip: If you have many bounding boxes, you first want to remove predictions with low scores before calling NMS. This will save on processing time.
let filteredIndices = predictions.indices.filter { predictions[$0].score > scoreThreshold }

let selected = nonMaxSuppression(predictions: predictions,
                                 indices: filteredIndices,
                                 iouThreshold: 0.5,
                                 maxBoxes: 10)
There is also a multi-class version of NMS. The difference is that the multi-class version first tries to find the best bounding boxes for each class, and then makes its final selection from those (whereas "regular" NMS does not care about the class of the bounding boxes at all). With the multi-class method you can usually expect to see at least one bounding box for each class (unless all the bounding boxes for a class score really badly).
let selected = nonMaxSuppressionMultiClass(numClasses: ...,
                                           predictions: predictions,
                                           scoreThreshold: 0.01,
                                           iouThreshold: 0.5,
                                           maxPerClass: ...,
                                           maxTotal: ...)
Multi-class NMS is slower than the class-independent version since it needs to look at each class individually. Tuning the thresholds and the maxPerClass and maxTotal values is essential for getting good accuracy and speed.
Other features
New Array functions:
argmax(): returns the largest element in the array, as well as its indexargsort(): returns the indices of the array's elements in sorted ordergather(): creates a new array containing the elements at the specified indices
Read more about Core ML
TODO
- proper unit tests
- add more numpy-like functionality to
MultiArray - machine learning math functions such as softmax