DCFrame
DCFrame is a Model-driven UI framework, it can be easily achieved:
- Assemble and manage complex UI modules;
- Reuse and migrate UI modules at no cost;
- Communication between UI modules without coupling.
Requirements
- Xcode 10.2+
- iOS 9.0+
- Swift 5.0+
Installation
Cocoapods
pod 'DCFrame'
Getting Started
Demo
For those who are already familiar with the IGListKit to quickly get started with DCFrame, we provided the same example set as IGListKit for reference. Simply pull the repo and run pod install under the 'Example' folder to run the Demo.
DCFrame has advantages in the following areas when compared with IGListKit by Instagram:
- Less-weigted: only 3K lines of code
- Allowing composite models: managing and arranging complex views individually
- Zero coupling in communications: provided a complete event sending and data sharing mechanism to achieve communication between view components with zero coupling.
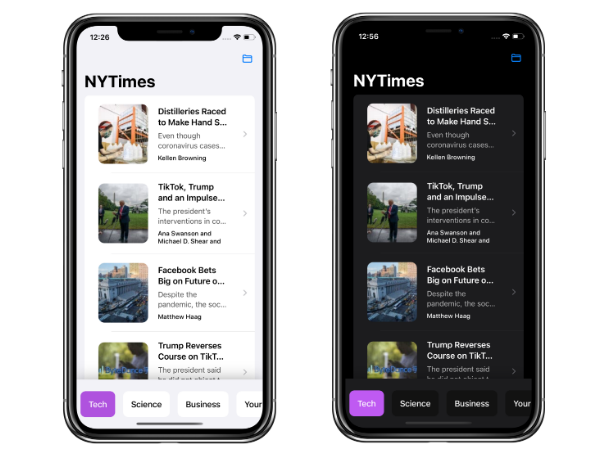
Creating a simple list
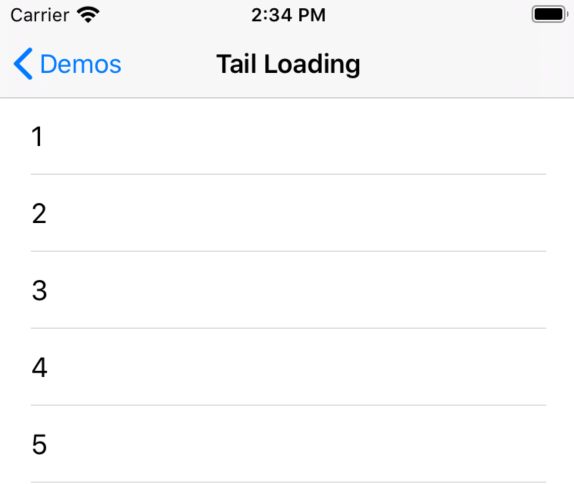
With DCFrame, you can easily create a list in three steps:
- Create a CellModel
- Create a DCCell
- Load a set of CellModel with the ContainerView
1. Create a CellModel
The list above is only displaying a single Label, so we can nave the CellModel here as LabelModel. This CellModel inherits from the DCCellModel class. The CellModel not only contains the data and data analyzing logics the view requires, it's also required to set the cellClass and the height of the Cell cellHeight.
- If the Cell implements Xib,
isXibCell = truehas to be included ininit() - If the Cell implements auto-layout constraints, cellHeight doesn't have to be initialized, in which DCFrame would adapt the cellHeight automatically
class LabelModel: DCCellModel {
    var text: String = ""

    required init() {
        super.init()
        cellHeight = 50
        cellClass = LabelCell.self
        isXibCell = true
    }
}
2. Creating a Cell
Here we use Xib to create a Cell with a UILabel. We name the Cell as LabelCell and make it inherit from DCCell. We also have to specify the CellModel generic type required by this cell, which is LabelModel in this case. Overriding the cellModelDidUpdate() function to update the text of the label when the CellModel updates its text variable.
- DCFrame is written based on
UITableView, therefore thecellModelDidUpdateis triggerred by thetableView(_ tableView: UITableView, cellForRowAt indexPath: IndexPath) -> UITableViewCellfunction - To avoid causing errors in the data of the view when reusing
UITableViewCell, reloading data incellModelDidUpate()is required
class LabelCell: DCCell<LabelModel> {
    @IBOutlet weak var label: UILabel!

    override func cellModelDidUpdate() {
        super.cellModelDidUpdate()

        label.text = cellModel.text
    }
}
3. Loading CellModel
We can tell that each CellModel can represent a list Cell, but displaying the Cell properly needs these two more steps:
- Create a
DCContainerModel, and add a set of CellModel into theDCContainerModel - Create a
DCContainerTableView, then call theloadCM(_ cm: DCContainerModel)method inDCContainerTableViewto load the CellModel
DCContainerModel can be considered as a "folder" used to put the CellModels together, while DCContainerTableView is a container that loads each of the DCContainerModel
If you put this in the context of the original UITableView:
DCFrameintroduces two View components:DCCellandDCContainerTableViewDCCellinherits fromUITableViewCelland represents the actual elements in the listDCContainerTableViewinherits fromUITableViewand is the container forDCCell
DCFrameintroduces two Model components as well:DCCellModelandDCContainerModelDCCellModelprovides data and data analyzing logic forDCCell- *
DCContainerModelis the container forDCCellModel*
class MyListViewController: UIViewController {
    public let dcTableView = DCContainerTableView()

    override func viewDidLoad() {
        super.viewDidLoad()

        view.addSubview(dcTableView)

        loadData()
    }

  	private func loadData() {
      	let listCM = DCContainerModel()
      	for num in 1..<100 {
          	let model = LabelModel()
          	model.text = "\(num)"
          	listCM.addSubmodel(model)
        }
      	dcTableView.loadCM(listCM)
    }

  	override func viewDidLayoutSubviews() {
        super.viewDidLayoutSubviews()

    		dcTableView.frame = view.frame
        dcTableView.contentInset = UIEdgeInsets(top: navbarHeight(), left: 0, bottom: safeBottomMargin(), right: 0)
        dcTableView.contentOffset = CGPoint(x: 0, y: -navbarHeight())
    }
}
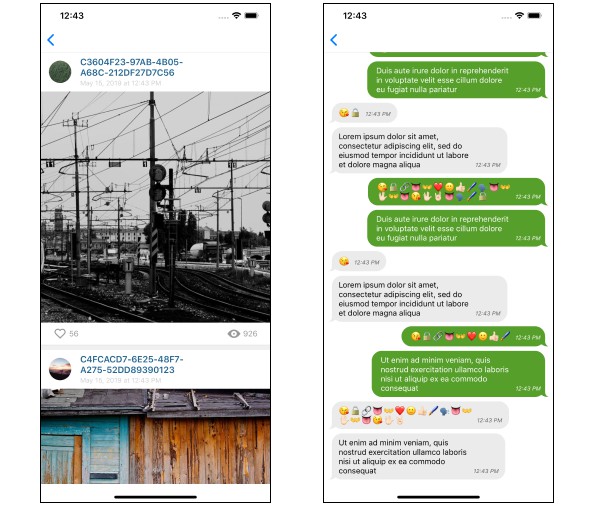
Creating a Complex List
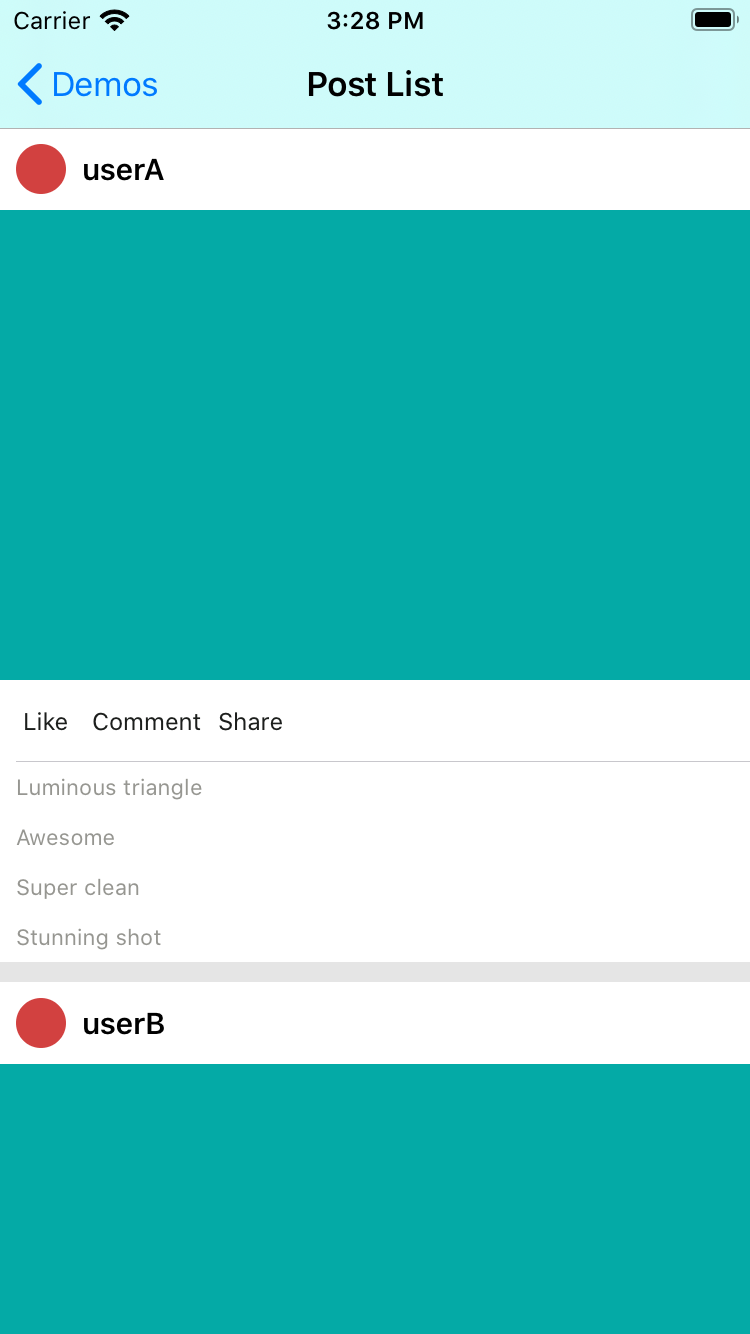
1. Create Cell and CellModel
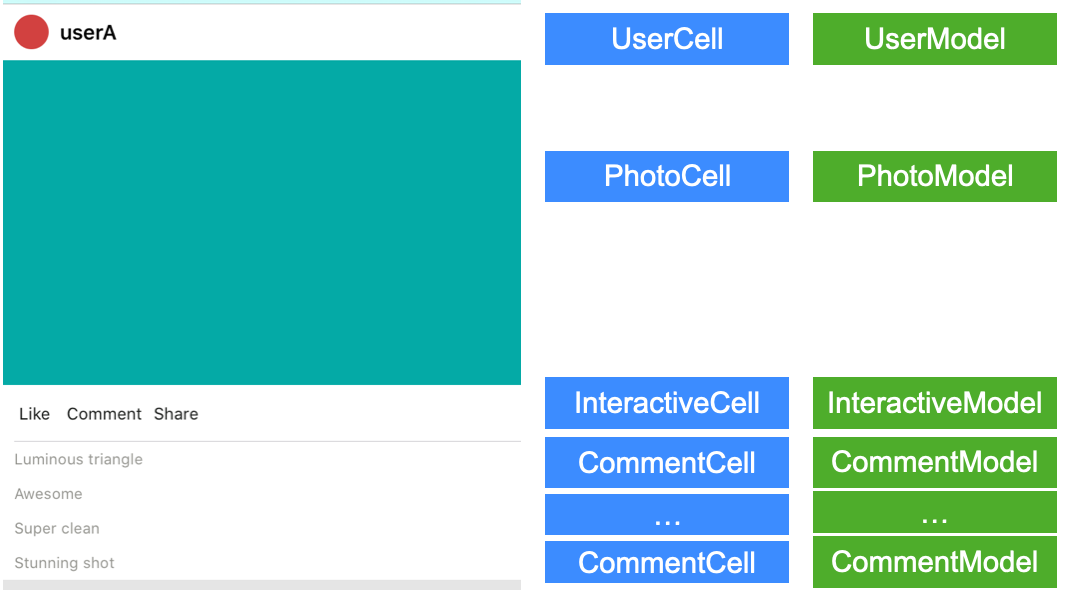
Same as creating a simple list, creating a complex list requires different Cell elements. We can tell from the complex list view above that there are four types of Cells in this complex list. For each Cell there's a corresponding CellModel that it gets data from. This can be illustrated by the following image:
2. Combining CellModels
After we created the Cell and CellModel, we can then put them together with the DCContainerModel. To construct the complex list above, we can manage the CellModel using the following structure:

CommentCM: contains multipleCommentModel
/// CommentCM
class CommentCM: DCContainerModel {
    func update(with comments: [String]) {
        removeAllSubmodels()
        for comment in comments {
            let model = CommentModel(comment: comment)
            addSubmodel(model)
        }
    }
}
PostItemCM: assemblesUserModel,PhotoModel,InteractiveModel, andCommentCM
/// PostItemCM
class PostItemCM: DCContainerModel {
    func update(with post: PostData) {
        removeAllSubmodels()

        let userModel = UserModel(name: post.username)
        let photoModel = PhotoModel()
        let interactiveModel = InteractiveModel()
        let commentCM = CommentCM()
        commentCM.update(with: post.comments)

        addSubmodels([userModel, photoModel, interactiveModel, commentCM])
    }
}
PostListCM:contains multiplePostItemCMto achieve displaying information from multiple users
/// PostListCM
class PostListCM: DCContainerModel {
    private let mockData = [
        PostData(username: "userA", comments: [
            "Luminous triangle",
            "Awesome",
            "Super clean",
            "Stunning shot",
        ]),
        PostData(username: "userB", comments: [
            "The simplicity here is superb",
            "thanks!",
            "That's always so kind of you!",
            "I think you might like this",
        ]),
        PostData(username: "userC", comments: [
            "So good",
        ]),
        PostData(username: "userD", comments: [
            "hope she might like it.",
            "I love it."
        ]),
    ]

    override func cmDidLoad() {
        super.cmDidLoad()

        for data in mockData {
            let itemCM = PostItemCM()
            itemCM.update(with: data)
            itemCM.bottomSeparator = DCSeparatorModel(color: .clear, height: 10)
            addSubmodel(infoCM)
        }
    }
}
We can tell that DCContainerModel not only contains DCCellModel, it can contain another DCContainerModel class as well. Similar to a "folder", we can easily manage complex views with the DCFrame structure.
Event Handling and Data Sharing
In the complex list above, InteractiveCell includes the "Like Comment Share" buttons that trigger the change in background color and label text in the PhotoCell. In DCFrame, the update and display of the Cell is achieved through CellModel, so different Cell components can't communicate directly with each other. To achieve the communication between diffrent Cells, there are three steps to follow:
1. Define an Event in InteractiveCell
In DCFrame, Cells are only in charge of triggering the Event, but doesn't care what the Event actually does. For instance, in the example above, clicking the buttons in InterativeCell changes the background color of the PhotoCell is what the Event actually does, but the "clicking" action is the only thing that the Cell cares and provides.
The transfer of Events is achieved by defining a DCEventID in Cell. DCEventID is a data type in DCFrame which includes a unique Int64 integer for each Event defined.
Typically we would define an Event as static type since the DCEventID can be considered as the unique name of that Event which belongs to the InteractiveCell class itself. When a button is clicked, the Event is sent using the sendEvent() method.
class InteractiveCell: DCCell<InteractiveCellModel> {
  	// Define an Event
    static let likeTouch = DCEventID()
    static let commentTouch = DCEventID()
    static let shareTouch = DCEventID()

    @objc func touch(sender: UIButton) {
        switch sender {
        case likeButton:
            sendEvent(Self.likeTouch, data: sender.titleLabel?.text)
        case commentButton:
            sendEvent(Self.commentTouch, data: sender.titleLabel?.text)
        case shareButton:
            sendEvent(Self.shareTouch, data: sender.titleLabel?.text)
        default: break
        }
    }
}
2. Define shared data in PhotoCell
For a PhotoCell, the update in the UI is triggered by the change of data in PhotoModel. Therefore, updating the UI can be achieved by subscribing to the change of data in PhotoModel.
Here, DCSharedDataID() is a unique Int64 integer data, same as DCEventID(), used to represent the unique name of the shared data. However, there are several things to be emphasized:
- You can subscribe to data not only in
DCCellModel, but also inDCCell. In this case, since thePhotoCellmay be reused, it's more reasonable to subsricbe the data inDCCellModel. - In this example, since the
PhotoModelis directly owned byPostItemCM, we can also assign values to variables inPhotoCellafter thePostItemCMreceives the "clicking" Event then reloading the UI withneedReloadCellData()
class PhotoModel: DCCellModel {
    static let data = DCSharedDataID()

    var text = ""
    var color: UIColor = UIColor(red: 4/255.0, green: 170/255.0, blue: 166/255.0, alpha: 1.0)

    required init() {
        super.init()

        cellClass = PhotoCell.self
        cellHeight = 375
    }

    override func cellModelDidLoad() {
        super.cellModelDidLoad()

        // Subscribe to shared data
        subscribeData(Self.data) { [weak self] (text: String, color: UIColor) in
            self?.text = text
            self?.color = color
            self?.needReloadCellData()
        }
    }
}
3. Interactions Between Components In CM
In addition to arranging CellModels and CMs like a "folder", a CM can also play the role of the mediator in the interaction between components. The interaction logic between different components are often placed in their common parent CM.
In this example, the closest common parent CM of InteractiveModel and PhotoModel is PostItemCM, so the interaction logic between these two components can be handled in PostItemCM as follows:
class PostItemCM: DCContainerModel {
    override func cmDidLoad() {
        super.cmDidLoad()

      	// Respond to Events and share data
        subscribeEvent(InteractiveCell.likeTouch) { [weak self] (text: String) in
            self?.shareData((text, UIColor.red), to: PhotoModel.data)
        }.and(InteractiveCell.commentTouch) { [weak self] (text: String) in
            self?.shareData((text, UIColor.yellow), to: PhotoCellModel.data)
        }.and(InteractiveCell.shareTouch) { [weak self] (text: String) in
            self?.shareData((text, UIColor.blue), to: PhotoCellModel.data)
        }
    }
}
Rules in Sending Events and Sharing Data
There are two rules in the event sending and data sharing process in DCFrame:
- Events are passed upwards: in the CM tree, any node can produce and send an Event. The Event would then be passed upwards from the current CM node until it reaches the root CM. Any of the CM node on that path can respond to that Event and still pass it upwards.
- Data is shared downwards: Any CM node can share data. The data would be passed downwards through a preorder traversal to its child nodes. Any child node would then be able to subscribe to the data shared by this CM (In the example above, data is direcly sent to PhotoModel.data. However, other Models can also subsribe to the data, but usually don't do this).
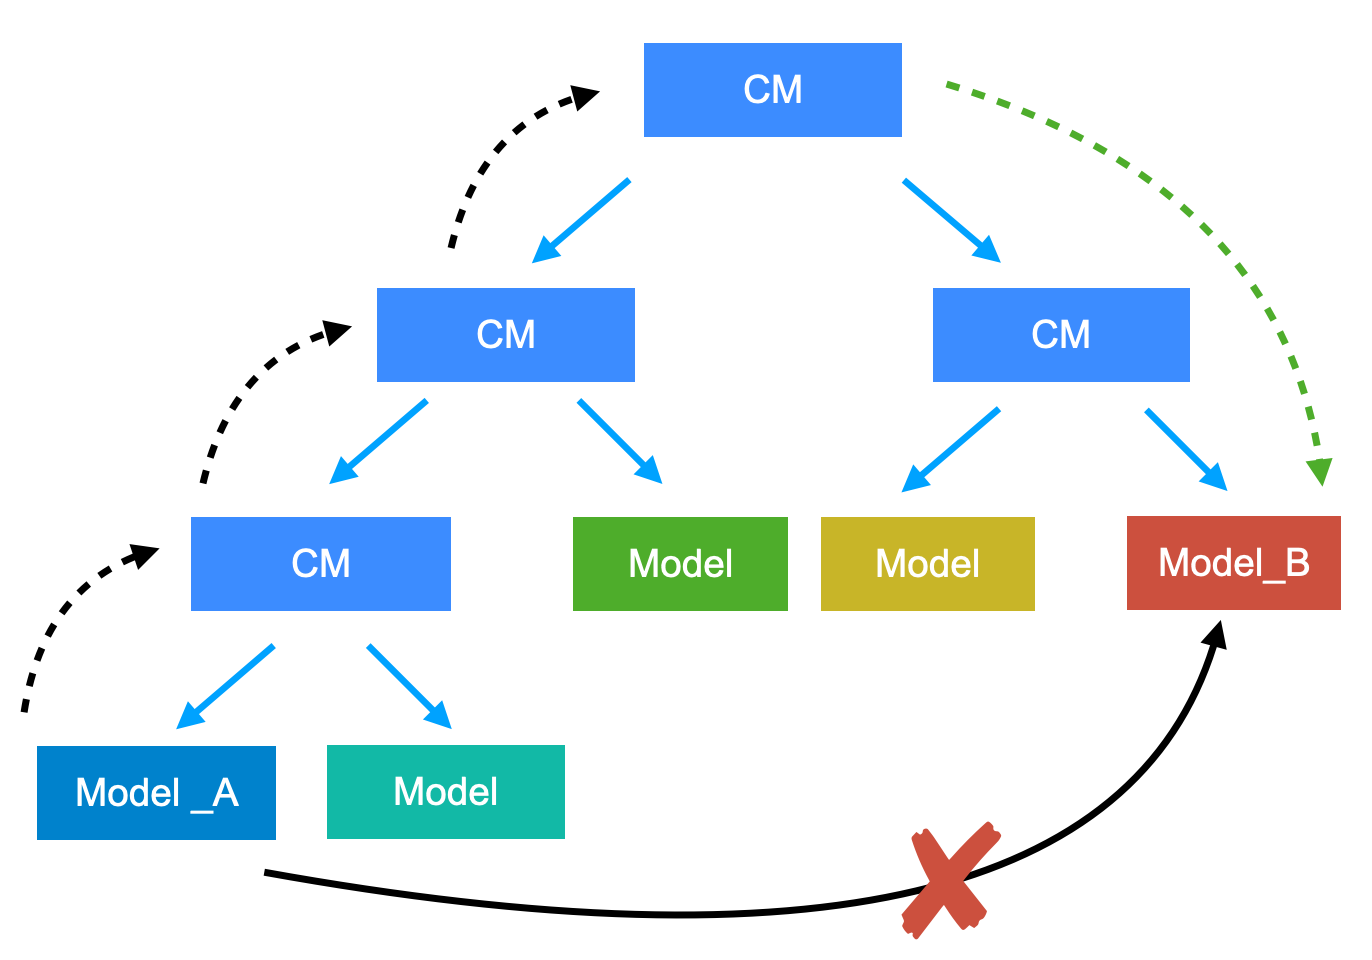
In DCFrame, the views are driven by arranging CellModels, so different views are independent from each other. To achieve the communication between Model_A and Model_B, the interaction has to be handled through their common CM node:
- When Model_A sends an Event, the Event would be passed upwards through the CM tree until it reaches the root node
- The root CM then responds to the Event by following the interaction logic to share the related data to Model_B in order to trigger the change in the view of Model_B