An Essential Guide to Unit Test in iOS Application
If you’re working as a programmer, Unit Test may sounds familiar to you or even you have working with it. As iOS developer sometimes we think “What’s benefit of using Unit Test? our job only to serving good UI tho”, if you think or ask the same question, raise your hand ✋?
If you raise your hand or you want learn more about Unit Test, this guide is for you! The guide will include 4 stages from very beginning to the common usage Unit Test in iOS development world. Don’t forget to clone the repository first before you jump to the section.
This repository contains 2 folders which Starter and Finished. You can start from Starter folder and follow the step-by-step from this tutorial, or you can open Finished to look at the final tutorial.
Stage 2 – Leverage With Design Pattern
Stage 1 – Basic Unit Test
Final Result

| Problem |
|---|
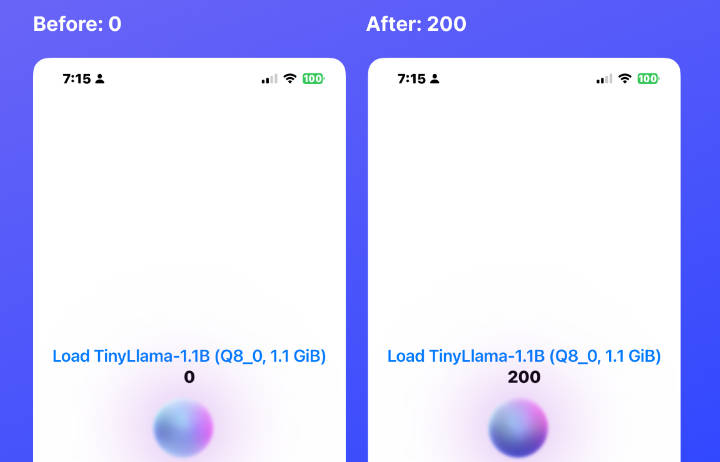
We need an application to detect the odd or even number and format the input number to readable format. We need to start it in FirstBasicViewController.swift and achieve the goal |
Challenge Time
Please stop, before we continuing the stage, we have a challenge for you:
- Create a function that return boolean true if the number is even and false if the number is odd.
- Create a function that return String of number formatted. Input: 100000 – Output: “100.000”.
Odd or Even Function Spoiler
func isEven(number: Int) -> Bool {
    if number % 2 == 0 {
        return true
    } else {
        return false
    }
}
- Function is receive number as input and boolean as output
- Return true if the inputted number mod 2 is equals zero
Number Formatter Function Spoiler
func numberFormatter(number: Int, separator: String = ".", currency: String = "Rp") -> String {
    guard number > 0 else {
        return "\(currency) \(number)"
    }

    var copyNumber = number
    var result: [String] = []
    while copyNumber > 0 {
        let lastNumber = copyNumber % 1000
        copyNumber = copyNumber / 1000

        if lastNumber == 0 {
            result.insert("000", at: 0)
        } else if lastNumber < 10 && copyNumber > 0 {
            result.insert("00\(lastNumber)", at: 0)
        } else if lastNumber < 100 && copyNumber > 0 {
            result.insert("0\(lastNumber)", at: 0)
        } else {
            result.insert("\(lastNumber)", at: 0)
        }

        if copyNumber > 0 {
            result.insert(separator, at: 0)
        }
    }

    return "\(currency) \(result.joined())"
}
- Function is receive number, separator, and current as parameter and will return String
- Return currency with number if the number equals zero
- Loop per 3 last digit and insert it to the Array of String
- Add separator every loop and if the number still more than 0
- Join the array to become a String and return the function
If you have done create both function without looking at the spoiler, congratulation! if you still stuck you can copy the function above. Now some questions, how do you testing the function? Have you make sure the function covered all use cases like negative case and positive case?
Unit Test is tool to make sure you as a developer testing all use cases of function or business logic in your software, Pretty simple right?
Test Your Code
Before we put or bind the function to our UI, put the unit testing is always a good way, now open 1-Basic-WithoutPattern.swift file.
Initialize the class we want to test:
import XCTest
@testable import TPWorkshopUnitTest

class __Basic_WithoutPattern: XCTestCase {
    var vc: FirstBasicViewController!

    override func setUp() {
        vc = FirstBasicViewController(nibName: "FirstBasicViewController", bundle: nil)
        vc.loadViewIfNeeded()
    }

    override func tearDown() {
        vc = nil
    }
}
Describe the use case
| Function | Input | Output |
|---|---|---|
| isEven | 2 | isEven true |
| isEven | 3 | isEven false |
| numberFormatter | input: 10 | should return String of Rp 10 |
| numberFormatter | input: 100 | should return String of Rp 100 |
| numberFormatter | input: 1000 | should return String of Rp 1.000 |
| numberFormatter | input: 10000 | should return String of Rp 10.000 |
| numberFormatter | input: 100000 | should return String of Rp 100.000 |
| numberFormatter | input: 1000000 | should return String of Rp 1.000.000 |
| numberFormatter | input: 1000 currency: $ | should return String of $ 1.000 |
You can add more use cases, in Unit Test more you cover the use cases it can prove your function is good enough.
Add Unit Test
    func test_isEven_odd() {
        let isOdd = vc.isEven(number: 3)
        XCTAssertFalse(isOdd, "found even number")
    }

    func test_isEven_even() {
        let isEven = vc.isEven(number: 2)
        XCTAssertTrue(isEven, "found odd number")
    }

    func test_numberFormatter_tens_withZero() {
        let numberFormatted = vc.numberFormatter(number: 10)
        XCTAssertEqual(numberFormatted, "Rp 10")
    }

    // put another use case
- XCTAssertFalse – Expect the value should be false, test will failing when function returning true. When test failing, you will got message “found even number”.
- XCTAssertTrue – Expect the value should be true, test will failing when function returning false. When test failing, you will got message “found odd number”.
- XCTAssertEqual – Expect the value should be equal with the expected value.
Try run cmd + u and see the result, if all-green then congrats your test all-passed ?
try to change the logic of your function and run cmd + u and see what happen
Bind to UI
Our test passed all use cases and ready to use on our UI, it’s time to bind it to our UI
Bind button action to isEven function
   @IBAction func didTapFindOddEven(_ sender: Any) {
        guard let oddEvenText = oddEvenTextField.text, !oddEvenText.isEmpty, let number = Int(oddEvenText) else {
            oddEvenResultLabel.text = "Not number"
            return
        }

        if isEven(number: number) {
            oddEvenResultLabel.text = "Genap"
        } else {
            oddEvenResultLabel.text = "Ganjil"
        }
    }
Bind text selection to numberFormatting function
extension FirstBasicViewController: UITextFieldDelegate {
    func textFieldDidChangeSelection(_ textField: UITextField) {
        guard let numberFormatterText = textField.text, !numberFormatterText.isEmpty, let number = Int(numberFormatterText) else {
            numberFormatterResultLabel.text = "Not number"
            return
        }

        numberFormatterResultLabel.text = numberFormatter(number: number)
    }
}
That’s it, run the application and see the resut. As your logic wrapped with high quality of unit test, your quality of apps is increase without you need to test it manually.
Stage 2 – Leverage with Design Pattern
| Problem |
|---|
We need an application to detect the odd or even number and format the input number to readable format. We need to start it in SecondBasicViewController.swift and achieve the goal. But, the company need us to make the code scalable and easy to maintain so it easier to code when we’re having alot of feature in the future. |
If you reach this stage, first I wanna say congratulation! I hope you get a better understanding of basic unit test. Did you found the problem from the first stage? because I do, if we’re looking at the code base, imagine we will have another business logic there, our code will messy because we’re not separate business logic and the view. So, how to solve it so we can solve the problem in this stage too?
The wise man said: SEPARATE THE CODE
Okay, I heard you wise man, so our job now is separate business logic and view to different class. We know alot of design pattern like MVC, MVVM, VIPER, or TCA and every design pattern always said easier to testing beside the separation of the code surely. In this stage we will use MVVM (Model View ViewModel) let’s start.
Create the ViewModel Class
struct SecondBasicViewModel { }
Define the Output
    // MARK: Output
    var resultOddEven: ((String) -> Void)?
    var resultNumberFormatter: ((String) -> Void)?
Define the Input
func isEven(text: String?) { }
func numberFormatter(text: String?, separator: String = ".", currency: String = "Rp") { }
Put previous logic to the input
   func isEven(text: String?) {
        guard let numberString = text, !numberString.isEmpty, let number = Int(numberString) else {
            resultOddEven?("Please put number")
            return
        }

        if number % 2 == 0 {
            resultOddEven?("Genap")
        } else {
            resultOddEven?("Ganjil")
        }
    }

    func numberFormatter(text: String?, separator: String = ".", currency: String = "Rp") {
        guard let numberString = text, !numberString.isEmpty, let number = Int(numberString) else {
            resultNumberFormatter?("Please put number")
            return
        }

        guard number > 0 else {
            resultNumberFormatter?("\(currency) \(number)")
            return
        }

        var copyNumber = number
        var result: [String] = []
        while copyNumber > 0 {
            let lastNumber = copyNumber % 1000
            copyNumber = copyNumber / 1000

            if lastNumber == 0 {
                result.insert("000", at: 0)
            } else if lastNumber < 10 && copyNumber > 0 {
                result.insert("00\(lastNumber)", at: 0)
            } else if lastNumber < 100 && copyNumber > 0 {
                result.insert("0\(lastNumber)", at: 0)
            } else {
                result.insert("\(lastNumber)", at: 0)
            }

            if copyNumber > 0 {
                result.insert(separator, at: 0)
            }
        }

        resultNumberFormatter?("\(currency) \(result.joined())")
    }
- Instead of returning the result, we pass the result to the output which is we’re using closure on here.
- We change the parameter to receive the optional string, so we can centralize the logic in the business logic.
That’s all, we have moved the business logic to the own class. It’s time to test it!
Test Your Code
Just like previous stage, jump to 2-Basic-WithPattern.swift and add our Unit Test there, don’t forget to describe the use case first!
Define the ViewModel Class
    var viewModel: SecondBasicViewModel!
    override func setUp() {
        viewModel = SecondBasicViewModel()
    }
Test isEven Input
    func test_isEven_odd() {
        let expect = expectation(description: "check if isEven returning Ganjil")
        viewModel.resultOddEven = { result in
            XCTAssertEqual(result, "Ganjil")
            expect.fulfill()
        }

        viewModel.isEven(text: "33")
        waitForExpectations(timeout: 1, handler: nil)
    }

    func test_isEven_even() {
        let expect = expectation(description: "check if isEven returning Genap")
        viewModel.resultOddEven = { result in
            XCTAssertEqual(result, "Genap")
            expect.fulfill()
        }

        viewModel.isEven(text: "32")
        waitForExpectations(timeout: 1, handler: nil)
    }
- expectation is use when your logic have async jobs, the UT will wait up to 1 sec before it goes failed. Don’t forget to put
fulfillwhen you got the result.
Test numberFormatter Input
    func test_numberFormatter_tens_withZero() {
        let expect = expectation(description: "number formatter return tens with zero")
        viewModel.resultNumberFormatter = { result in
            XCTAssertEqual(result, "Rp 10")
            expect.fulfill()
        }

        viewModel.numberFormatter(text: "10")
        waitForExpectations(timeout: 1, handler: nil)
    }
That’s it, you can add more use case and don’t forget to cmd + u and make sure everything is passed!
Bind to UI
Back to SecondBasicViewController class, it looks like cleaner than before right? yes because we put all logic on another class, our job now is to bind the class to the UI / View layer
Define ViewModel
var viewModel = SecondBasicViewModel()
Bind the Output
    override func viewDidLoad() {
        super.viewDidLoad()
        title = "Second Basic"
        numberFormatterTextField.delegate = self

        viewModel.resultOddEven = { [weak self] result in
            self?.oddEvenResultLabel.text = result
        }

        viewModel.resultNumberFormatter = { [weak self] result in
            self?.numberFormatterResultLabel.text = result
        }
    }
Bind Odd/Even Button Action to the Input
    @IBAction func didTapFindOddEven(_ sender: Any) {
        viewModel.isEven(text: oddEvenTextField.text)
    }
Bind textField action to the Input
extension SecondBasicViewController: UITextFieldDelegate {
    func textFieldDidChangeSelection(_ textField: UITextField) {
        viewModel.numberFormatter(text: textField.text)
    }
}
We’re done, now Run your application and see the result still the same like on previous stage but our code much much better right? We just unlock our level to having knowledge of design pattern along with the Unit Test ?
Break Time
Relax a bit, we just finished the 2 stages before. In this area, I would like to ask you a simple question, have you feel benefits of using Unit Testing in iOS Development? here’s my answer:
- I do, one benefit of using them is I don’t need to check my function is running well by checking with running an app, just need to write the function and put all use case in unit test and make sure all passed, and I can prove that my apps is running well without need to check it manually.
- I do, if I’m working in large team, my logic will stay there and people who change my logic will not pass the use case and need to leverage it, so I can make sure my apps quality is still the best.
That’s my answer based on what I learnt from 2 stages before, what’s yours?
Stage 3 – Advance Unit Test
Welcome to Stage 3, in this stage you will learn:
- Everything you learn from previous Stage
- Dependency Injection and Mock Data
- Test your Model
without further ado, Stage 3 started! Start 3-Advance group, all UI has been provided so you don’t worry about it. The only left is creating the business process to showing product list.
| Goal |
|---|
Showing list of Product from ProductData.json as simulation we hit to API |
| Should cover negative case when failed to get data or failed to decode |
Dependency Injection
Here’s simple knowledge about Dependency Injection is we pass an object to other destination object, and the destination no need to define the implementation. Usually in iOS we can use Protocol and polymorphism technique like below:
- Create protocol.
protocol MyProtocol {
  func myFunction() -> Bool
}
- Create struct/class and define with the protocol before.
struct MyStruct: MyProtocol {
  func myFunction() -> Bool {
    return true
  }
}
- Imagine we will use the
MyStructin the ViewModel, we can just inject it by passing the struct to it.
struct MyViewModel {
  let myProtocol: MyProtocol
  init(myProtocol: MyProtocol) {
    self.myProtocol = myProtocol
  }

  func viewModelFunction() {
    if self.myProtocol.myFunction() { // will return true because of myFunction implementation always returning true
      print("true")
    } else {
      print("false")
    }
  }
}
If you’re looking at the code above, the viewModel need to receive the protocol type instead of struct type, why? because we can have another object that conform to the MyProtocol with different implementation in the function and just passed it to the viewModel. Also, with this implementation we can do Mock Data later.
Create Class for Network and Decoding JSON
- We need to have DI implementation so we can passing the I/O process to the viewModel.
protocol AdvancedNetworkProvider {
  func fetchProduct(completion: @escaping ((NetworkResult<ProductResult>) -> Void))
}
- Create struct that conform to protocol
AdvancedNetworkProvider
struct AdvancedUseCase: AdvancedNetworkProvider {
  func fetchProduct(completion: @escaping ((NetworkResult<ProductResult>) -> Void)) {

  }
}
- We need to read the file
ProductData.jsonand decode it toProductData.swift, put implementation to thefetchProduct()function
  func fetchProduct(completion: @escaping ((NetworkResult<ProductResult>) -> Void)) {
      guard let url = Bundle.main.path(forResource: "ProductData", ofType: "json") else {
          completion(.failed("URL Not found"))
          return
      }

      if let data = try? Data(contentsOf: URL(fileURLWithPath: url), options: .mappedIfSafe) {
          if let result = try? JSONDecoder().decode(ProductResult.self, from: data) {
              completion(.success(result))
          } else {
              completion(.failed("Failed when decoding"))
          }
      } else {
          completion(.failed("Failed converting to data"))
      }
  }
Done, we have created the struct that conform to the protocol for read the file and decode it to our model. You can change the implementation for example you need to do Network Call and read the JSON response from there, or maybe you can use to read from database, it can be anything base on your goal.
Create View Model
You know the drill from previous session right? yes, what you need to do is define the output and the input first, let’s start it in AdvancedViewModel.
Define the output in the viewModel class
// MARK: Output
var receiveData: (() -> Void)?
var onErrorReceiveData: ((String) -> Void)?
var doSideEffect: ((String) -> Void)?
- receiveData – callback to tell view layer that we got a new data.
- onErrorReceiveData – callback to tell view layer if we got an error.
- doSideEffect – side effect that may be happen when we click an item in the list.
Define the input in the viewModel class
// MARK: Input
func didLoad() { }
func didSelect(index: Int) { }
- didLoad – input to fetch the data when viewController did loaded.
- didSelect – input when an item on the list was clicked.
Don’t forget, we have to isolate the data source in the view model, so, we need to create properties for our data source and put it on view model class.
var products: [Product] = []
Define the UseCase Provider Dependency to our view model
class AdvancedViewModel {
  let useCase: AdvancedNetworkProvider

  init(useCase: AdvancedNetworkProvider) {
      self.useCase = useCase
  }
}
The last thing is we should add the implementation in the input function (don’t forget about that ?)
 func didLoad() {
      var result: NetworkResult<ProductResult>?

      let dispatchGroup = DispatchGroup()
      dispatchGroup.enter()
      useCase.fetchProduct { productResult in
          result = productResult
          dispatchGroup.leave()
      }

      dispatchGroup.notify(queue: .main) {
          guard let result = result else {
              self.onErrorReceiveData?("found error in network")
              return
          }

          switch result {
          case let .success(result):
              self.products = result.data
              self.receiveData?()
          case let .failed(message):
              self.onErrorReceiveData?(message)
          }
      }
  }

 func didSelect(index: Int) {
      guard !products.isEmpty else {
          doSideEffect?("error")
          return
      }
      doSideEffect?("something crazy \(products[index].name)")
  }
That’s it, pretty simple right? In this case we have implement DI and ViewModel, now it’s time to test it using Unit Test!
Create Unit Test
First thing to do is, we should define the use case for our function in view model.
| Input | Use Case |
|---|---|
| didLoad | Negative Case – should return failed on error |
| didLoad | Positive Case – should trigger output and equatable data source |
| didSelect | Negative Case – should return string of “error” |
| didSelect | Positive Case – should return string of “something crazy (product name)” |
After that, because our data source is coming from external (Network or Persistent Data) we need to prepare mock data first. Open 3-MockData.swift
import Foundation
@testable import TPWorkshopUnitTest

struct MockProductData {
    static func generateProductResult() -> ProductResult {
        return ProductResult(data: [
            Product(id: 1,
                    name: "lorem ipsum",
                    imageURL: nil,
                    price: "Rp 100",
                    shop: Shop(id: 1,
                               name: "toko serba ada",
                               location: "Indonesia"))
        ])
    }
}
- Create mock data or fake data to simulate the data we will get in unit test
- You can explore to put another data to simulate later
We entering the main part, still remember about protocol we create before right? not only for DI, those method is useful to create mock implementation like below
  struct MockPositiveWorkshopProvider: AdvancedNetworkProvider {
      func fetchProduct(completion: @escaping ((NetworkResult<ProductResult>) -> Void)) {
          let result = MockProductData.generateProductResult()

          completion(.success(result))
      }
  }

  struct MockNegativeWorkshopProvider: AdvancedNetworkProvider {
      func fetchProduct(completion: @escaping ((NetworkResult<ProductResult>) -> Void)) {
          completion(.failed("failed"))
      }
  }
- We can create 2 different struct that conform to our protocol, and we can change the implementation there.
- We can simulate negative and positive mock data, explore yourself for other use case.
That’s it, we just create the mock data both for the data itself and for implementation of provider. We can do the unit test, you can open 3-Advanced.swift and put the code below
didLoad use case
  func test_positive_didLoad() {
      let useCase = MockPositiveWorkshopProvider()
      let viewModel = AdvancedViewModel(useCase: useCase)
      let expectation = expectation(description: "should return product data")
      let resultExpectation = MockProductData.generateProductResult().data

      viewModel.receiveData = {
          XCTAssertEqual(viewModel.products, resultExpectation)
          expectation.fulfill()
      }

      viewModel.didLoad()
      waitForExpectations(timeout: 1, handler: nil)
  }

 func test_negative_didLoad() {
      let useCase = MockNegativeWorkshopProvider()
      let viewModel = AdvancedViewModel(useCase: useCase)
      let expectation = expectation(description: "should return error")

      viewModel.onErrorReceiveData = { message in
          XCTAssertEqual(message, "failed")
          expectation.fulfill()
      }

      viewModel.didLoad()
      waitForExpectations(timeout: 1, handler: nil)
  }
- Same as previous stage, we can use
expectationto simulate async job. - We can use XCTAssertEqual to assert the expected data with the result data coming from view model.
didSelect use case
  func test_positive_click_sideEffect() {
      let useCase = MockPositiveWorkshopProvider()
      let viewModel = AdvancedViewModel(useCase: useCase)
      let loadExpectation = expectation(description: "should return product data")
      let tapTriggerExpectation = expectation(description: "should return side effect")
      let resultExpectation = MockProductData.generateProductResult().data

      viewModel.receiveData = {
          XCTAssertEqual(viewModel.products, resultExpectation)
          loadExpectation.fulfill()
      }

      viewModel.doSideEffect = { message in
          XCTAssertEqual(message, "something crazy \(resultExpectation[0].name)")
          tapTriggerExpectation.fulfill()
      }

      viewModel.didLoad()
      wait(for: [loadExpectation], timeout: 1)
      viewModel.didSelect(index: 0)
      wait(for: [tapTriggerExpectation], timeout: 1)
  }

  func test_negative_click_sideEffect() {
      let useCase = MockPositiveWorkshopProvider()
      let viewModel = AdvancedViewModel(useCase: useCase)
      let tapTriggerExpectation = expectation(description: "should return error side effect")

      viewModel.doSideEffect = { message in
          XCTAssertEqual(message, "error")
          tapTriggerExpectation.fulfill()
      }

      viewModel.didSelect(index: 0)
      wait(for: [tapTriggerExpectation], timeout: 1)
  }
- In this case, because sideEffect only triggered when the data are exists, we need to call
didLoadfirst, then trigger thedidSelectafter that. - From the point before, we just simulate real-world implementation that
didLoadfunction should call first and when the data exists we can usedidSelect. waitis same aswaitForExpectation, which, the UT will waiting until the expectation fulfilled. We can put other expectation in the parameter.
We’re just finished set the UT, try cmd + u and make sure your use case all-green and passed! don’t forget always put good quality of UT so we can catch any use case right before releasing the apps ?
Bind to UI
Open AdvancedViewController, this part much easier after we create the business logic along with the unit test.
  let viewModel: AdvancedViewModel

  init() {
      viewModel = AdvancedViewModel(useCase: AdvancedUseCase())
      super.init(nibName: "AdvancedViewController", bundle: nil)
  }
- Define the viewModel and pass the parameter of our use case, here we use
AdvancedUseCase()
create function bindViewModel and bind the output.
  func bindViewModel() {
      viewModel.receiveData = { [weak self] in
          self?.collectionView.reloadData()
      }

      viewModel.onErrorReceiveData = { message in
          print(message)
      }

      viewModel.doSideEffect = { message in
          print(message)
      }
  }
call the function in viewDidLoad and don’t forget to trigger the input didLoad.
override func viewDidLoad() {
super.viewDidLoad()
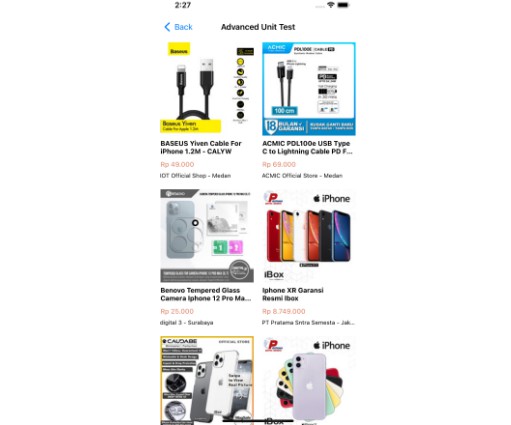
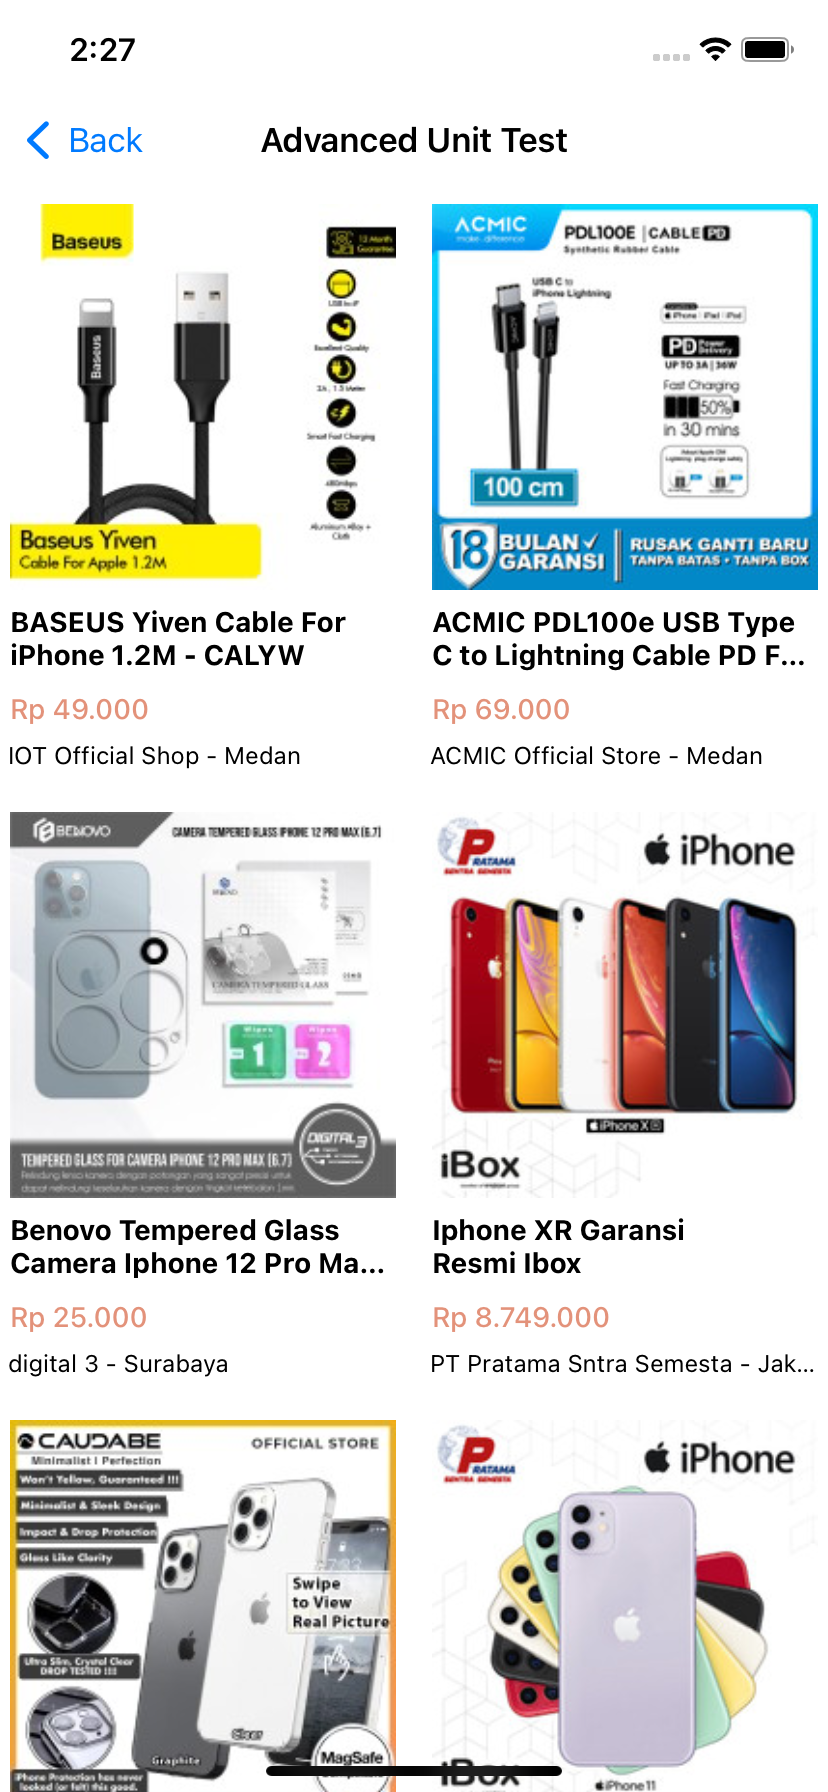
title = "Advanced Unit Test"
collectionView.register(UINib(nibName: "ProductCollectionViewCell", bundle: nil), forCellWithReuseIdentifier: "ProductCollectionViewCell")
collectionView.dataSource = self
collectionView.delegate = self
bindViewModel()
viewModel.didLoad()
}
final part, define the UICollectionView data source and delegate.
extension AdvancedViewController: UICollectionViewDataSource {
  func collectionView(_ collectionView: UICollectionView, numberOfItemsInSection section: Int) -> Int {
      return viewModel.products.count
  }

  func collectionView(_ collectionView: UICollectionView, cellForItemAt indexPath: IndexPath) -> UICollectionViewCell {
      let cell = collectionView.dequeueReusableCell(withReuseIdentifier: "ProductCollectionViewCell", for: indexPath) as! ProductCollectionViewCell
      cell.configure(product: viewModel.products[indexPath.row])
      return cell
  }
}

extension AdvancedViewController: UICollectionViewDelegateFlowLayout {
    func collectionView(_ collectionView: UICollectionView, layout collectionViewLayout: UICollectionViewLayout, sizeForItemAt indexPath: IndexPath) -> CGSize {
        return CGSize(width: (collectionView.frame.width / 2) - 4, height: 300)
    }
}

extension AdvancedViewController: UICollectionViewDelegate {
    func collectionView(_ collectionView: UICollectionView, didSelectItemAt indexPath: IndexPath) {
        viewModel.didSelect(index: indexPath.row)
    }
}
and we’re done! try running the apps cmd + R and see the result, you should see list of product there. Also, You just finished stage 4!!! As iOS Engineer this Unit Test is really common usage, because we get the data from network then put it in data source before we bind it to the UI.
Stage 4 – Wrap it up
Finally we reach end of the stage, we have cover essential part of the unit test:
- Basic unit test
- Leverage unit test with MVVM pattern
- Using Dependency Injection in Use Case Provider
- Use mock data
- Test async job
In this stage, you need to create an example apps and use knowledge you have learnt.

| Use Case |
|---|
Show Product List, the data can fetched from ProductData.json |
After x seconds, show the ticker. Ticker data coming from TickerData.json and called it in didLoad, if success should be putted the ticker data in cache |
| Ticker component always placed in top position |
Showing inspiration that coming from InspirationData.json, position of inspiration depends from field in JSON (dynamic position) |
All data sources which ProductData.json, TickerData.json, and InspirationData.json should be call on didLoad in paralell |
Notes: All UI and Model has been provided, you can just focus on business logic and unit test.
Good luck!
Challenge Hint
Hash Diffable Protocol
We’re not going use array of any in our data source, turns out, we have provided the HashDiffable protocol
protocol HashDiffable {
  var identifier: Int { get }
  func isEqual(to other: Any) -> Bool
}

extension HashDiffable where Self: Equatable {
    func isEqual(to other: Any) -> Bool {
        guard let other = other as? Self else {
            return false
        }

        return self == other
    }
}
This protocol can be use in our Struct, just conform the protocol and put identifier, for example:
extension Product: HashDiffable {
  var identifier: Int {
      return "product-\(id)".hashValue
  }
}
After we conform the protocol, we can create array of protocol and put any struct as long as the struct is conform to HashDiffable
var data: [HashDiffable] = []
Last but not least, in Unit Test, you can use isEqual function from the protocol like below:
internal func assertArrayHashDiffable(expectedResult: [HashDiffable], values: [HashDiffable]) {
      XCTAssertEqual(expectedResult.count, values.count, "An array count mismatch.")
      if expectedResult.count == values.count {
          expectedResult.enumerated().forEach { index, element in
              XCTAssertTrue(element.isEqual(to: values[index]), "expected index \(index) equal to \(type(of: values[index])) but get \(type(of: element)) instead")
          }
      }
  }
assertArrayHashDiffable usage:
assertArrayHashDiffable(expectedResult: resultData, values: expectedData)
Mock Cache/UserDefault/Persistent Data
If you get confuse how to mock cache/UserDefault/Persistent Data, congrats! I have solution for you, we can call it as Environment. The idea is same like Use Case provider, but we step it up to the next level, here’s the code:
struct PracticeEnvironment {
    static var loadTickerCache: ((String) -> Ticker?) = { key -> Ticker? in
        if let data = UserDefaults.standard.object(forKey: key) as? Data {
            let decoder = JSONDecoder()
            return try? decoder.decode(Ticker.self, from: data)
        }
        return nil
    }

    static var saveTickerCache: ((Ticker, String) -> Void) = { value, key in
        let encoder = JSONEncoder()
        if let encodedData = try? encoder.encode(value) {
            UserDefaults.standard.set(encodedData, forKey: key)
        }
    }
}
Use static variable, so we can use it either for real implementation or mock the implementation. How to use it?
class UnitTest {
  func test_user_default() {
      /*
      *  Mock implementation of process save and load cache data
      */
      var tickerMockData: Ticker?
      PracticeEnvironment.saveTickerCache = { _, _ in
          tickerMockData = MockData.generateTicker()
      }

      PracticeEnvironment.loadTickerCache = { _ in
          tickerMockData
      }


      // Get our data from the Environment
      guard let ticker = PracticeEnvironment.loadTickerCache("") else {
          XCTAssertNil("found nil on ticker cache")
          return
      }
  }
}
- Instead of using real implementation which directly putting the data to user default, we can simulate it by mock implementation and put the data to the local variable.
- You can use or get the data by getting it from static variable in Environment Struct.
- This approach will helping you when you’re going to mock implementation of persistent data, you can simulate it so you don’t have to clear the persistent data everytime you will running the unit test.
Mocking the Timer
While the Ticker function is binded by a Timer, we need to make sure that our unit test also cover that too. We can use sleep or timeout for that to wait until the timer ended. But, if you think that every function uses that function, your unit test testing time will get longer and longer. Instead we can mock the timer using depedencies injection.
First of all, because we want to mock the timer by using deps injection. Make sure that your viewModel init function already cover that
  init(useCase: PracticeNetworkProvider, timerProvider: Timer.Type = Timer.self) {
      self.useCase = useCase
      self.timerProvider = timerProvider
  }
Then inside the viewModel you can schedule the timer like you used to.
  timerProvider.scheduledTimer(withTimeInterval: 5, repeats: false, block: { _ in
      // do what you want here
  })
Voila! you done with the business logic, but now, how to test?
We can use MockTimer class that already provided in the project. This class will help us to advance time so we don’t have to wait until 5 seconds to do a function.
Inside your tests you can directly use something like this, for example:
  func test_fireDate() {
      var tickerMockData: Ticker?

      let yourExpectation = expect(description: "any_description")
      let useCase = Mock4PositiveWorkshopProvider()
      let viewModel = PracticeViewModel(useCase: useCase, timerProvider: MockTimer.self)

      viewModel.myOutput = {
          // Assert something here
          yourExpectation.fullfill()
      }

      viewModel.onFireDate()
      // By calling this we can proceed timer time that needed to execute onFireDate() function
      MockTimer.currentTimer.fire()

      wait(for: [yourExpectation], timeout: 1)
  }
Bind to UI
This course trying to giving you best knowledge in Unit Test, so you don’t have to worry about UI, here’s the code how to showing different component in UICollectionView:
  func collectionView(_ collectionView: UICollectionView, cellForItemAt indexPath: IndexPath) -> UICollectionViewCell {
      switch viewModel.data[indexPath.row] {
      case let data as Product:
          let cell = collectionView.dequeueReusableCell(withReuseIdentifier: "ProductCollectionViewCell", for: indexPath) as! ProductCollectionViewCell
          cell.configure(product: data)
          return cell
      case let data as Inspiration:
          let cell = collectionView.dequeueReusableCell(withReuseIdentifier: "InspirationCollectionViewCell", for: indexPath) as! InspirationCollectionViewCell
          cell.configure(inspiration: data)
          return cell
      case let data as Ticker:
          let cell = collectionView.dequeueReusableCell(withReuseIdentifier: "TickerCollectionViewCell", for: indexPath) as! TickerCollectionViewCell
          cell.tickerLabel.text = data.title
          return cell
      default:
          fatalError("can't read the data")
      }
  }

  func collectionView(_ collectionView: UICollectionView, layout collectionViewLayout: UICollectionViewLayout, sizeForItemAt indexPath: IndexPath) -> CGSize {
      switch viewModel.data[indexPath.row] {
      case is Product:
          return CGSize(width: (collectionView.frame.width / 2) - 4, height: 300)
      case is Inspiration:
          return CGSize(width: collectionView.frame.width - 4, height: 250)
      case is Ticker:
          return CGSize(width: collectionView.frame.width - 4, height: 50)
      default:
          fatalError("can't read the data")
      }
  }
Now, it’s time to try it by yourself, use the hint and explore how you use unit test to improve your apps quality.
Final Words
If you finished every stage and get better understanding of unit test, that’s really great for you! We can start using unit test as our development driver, here’s what we got from every stage we had:
- Frontend not only focusing on UI, but we have plenty of business logic, so start from business logic and thinking how the data can visualize our UI along with Unit Test can level-up your apps quality.
- You can manage your work easily, either you start UI first or business logic it’s your choice, because we have decentralized the critical layer which View and ViewModel to each file.
- Design Pattern ❤️ Unit Test – means any design pattern was born to integrate with unit test.
- You don’t have to test your apps manually, your job only need to fulfill the unit test and voila everything will run with what you will expected.
- Unit test will protect your code logic, so if someone change the logic they need to improve the UT as well.
Put your point there, I believe we still see many benefits of using unit test in our code. Thank you and see you!