Amazon Location Service Workshop – iOS
Location data is a vital ingredient in today’s applications, enabling capabilities ranging from asset tracking to location-based marketing.
With Amazon Location Service, you can easily add capabilities such as maps, points of interest, geocoding, routing, geofences, and tracking to applications. You retain control of your location data with Amazon Location, so you can combine proprietary data with data from the service. Amazon Location provides cost-effective location-based services (LBS) using high-quality data from global, trusted providers Esri and HERE Technologies.
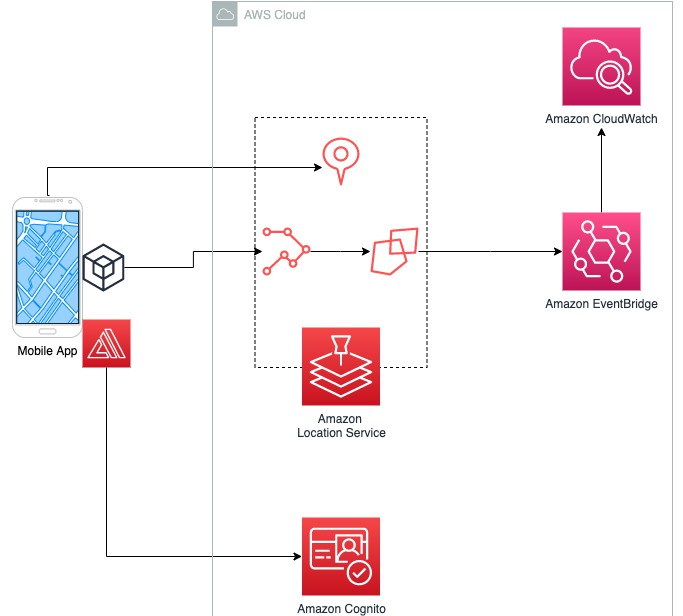
Architecture Overview

Stack
- Front-end – SwiftUI, iOS 12+, AWS Amplify for authentication/authorization, AWS SDK for Amazon Location Service APIs
- Backend – Amazon Location Service, Amazon EventBridge, Amazon Cognito, Amazon SNS
Deploying the solution
Prerequisites
For this walkthrough, you should have the following prerequisites:
- An AWS account
- A MacOS operating system
- XCode version 11.4 or later
- Node.js v12.x or later
- npm v5.x or later
- git v2.14.1 or later
- Cocoapods
- Clone this code repository, if you haven’t done it before.
git clone [email protected]:rochabr/AmazonLocationDemoiOS.git
- Switch to the project’s folder
cd AmazonLocationDemoiOS/AmazonLocationDemo_base
Setting up Amazon Location Services
Let’s start by creating a Place Index. Place indexes are used to perform geocoding and reverse-geocoding actions on Amazon Location. We will use it to search for places of interest on our application.
- Open the Amazon Location Service console at https://console.aws.amazon.com/location/
- In the left navigation pane, choose Place indexes.
- Choose Create place index.
- Fill out the following boxes:
- Name – Enter a name for the place index resource. For example, ExamplePlaceIndex. Maximum 100 characters. Valid entries include alphanumeric characters, hyphens, periods, and underscores.
- Description – Enter an optional description.
- Under Data providers, choose an available data provider to use with your place index resource.
- Under Data storage options, specify if you intend to store search results from your place index resource.
- Under Pricing Plan, choose answers that best fit how you intend to use your place index resource.
- (Optional) Under Tags, enter a tag Key and Value. This adds a tag your new place index resource. For more information, see Tagging your resources.
- Choose Create place index.
The next step of our solution consists of creating a new tracker and geofence collection on Amazon Location Services. Let’s start with the geofence collection:
- Open the Amazon Location console at https://console.aws.amazon.com/location/
- In the left navigation pane, choose Geofence collections.
- Choose Create geofence collection.
- Fill out the following boxes:
- Name – Enter a unique name. For example, iOSWorkshopGeofenceCollection.
- Description – Enter an optional description.
- Choose Create geofence collection.
You will now add the geofences that represent your places of interest. These geofences are created using GeoJSON files. You can use tools, such as geojson.io, at no charge, to draw your geofences graphically and save the output GeoJSON file. For this exercise, we will have a file that is ready to use. Let’s populate our collection:
- Open the Amazon Location console at https://console.aws.amazon.com/location/
- In the left navigation pane, choose Geofence collections.
- From the Geofence collections list, select the name link for the target geofence collection.
- Under Geofences, choose Create geofences.
- In the Add geofences window, drag and drop the file support/fences.geojson GeoJSON into the window.
- Choose Add geofences.
Our next step is to create a Tracker. This tracker will be used on the iOS client to detect any changes in position that the user generates. These changes are pushed back to Amazon Location Services, which analyzes the position against the geofence collection, previously created. If an ENTER or EXIT events are detected, Amazon EventBridge is triggered.
- Open the Amazon Location console at https://console.aws.amazon.com/location/
- In the left navigation pane, choose Trackers.
- Choose Create tracker.
- Fill out the following boxes:
- Name – Enter a unique name.
- Description – Enter an optional description.
- Choose Create tracker.
Now that you have a geofence collection and a tracker, you can link them together so that location updates are automatically evaluated against all of your geofences. When device positions are evaluated against geofences, events are generated. We will come back later to to set an action to these events. Let’s link a tracker resource to a geofence collection, first.
- Open the Amazon Location console at https://console.aws.amazon.com/location/
- In the left navigation pane, choose Trackers.
- Under Device trackers, select the name link of the target tracker.
- Under Linked Geofence Collections, choose Link Geofence Collection.
- In the Linked Geofence Collection window, select a geofence collection from the dropdown menu.
- Choose Link.
After you link the tracker resource, it will be assigned an Active status. Take note of your Geofence collection and Tracker names.
Create the Amazon EventBridge rule
The last piece we need to configure is how we should act when the user crosses a Geofence and generates an ENTER or EXIT event.
- Open the Amazon EventBridge console at https://console.aws.amazon.com/events/
- Choose Create rule.
- Enter a Name for the rule, and, optionally, a description.
- Under Define pattern, choose Event pattern.
- Under Event matching pattern, choose Pre-defined pattern by service.
- In Service provider, select AWS. Then, in Service name, select Amazon Location Service. Finally, in Event type, select Location Geofence Event
- Scroll down to Select targets, set the target as CloudWatch log group, and choose a name for your log group.
- Click on Create.
Mobile Clients – AWS Amplify
Project download and configuration
- Follow the instructions in this link to install Amplify and configure the CLI.
- Clone this code repository, if you haven’t done it before.
git clone [email protected]:rochabr/AmazonLocationDemoiOS.git
- Switch to the project’s folder
cd AmazonLocationDemoiOS/AmazonLocationDemo_base
- Initialize your project with the CocoaPods package manager by running the following command:
pod init
-
A new file named Podfile will be created. This file is used to describe your project’s packages dependency.
-
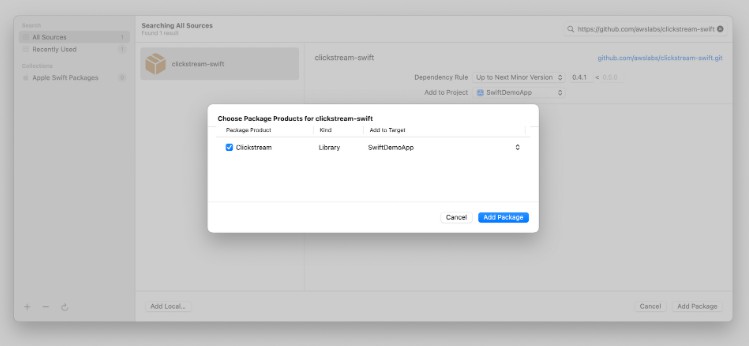
Open the Podfile in a file editor, and add Amplify and Amazon Location as pod dependencies. When you’re done, your Podfile will look similar to this example:
# Uncomment the next line to define a global platform for your project
# platform :ios, '9.0'

target 'AmazonLocationDemo (iOS)' do
  # Comment the next line if you don't want to use dynamic frameworks
  use_frameworks!

  # Pods for AmazonLocationDemo (iOS)
  pod 'AWSLocation'
  pod 'AWSMobileClient'
end

target 'AmazonLocationDemo (macOS)' do
  # Comment the next line if you don't want to use dynamic frameworks
  use_frameworks!

  # Pods for AmazonLocationDemo (macOS)

end
- Run the following command to install the AWS Location SDK:
pod install --repo-update
- Open your project by running on the terminal:
xed .
Init the Amplify project
- Initialize the Amplify project by opening a terminal and running:
amplify init
- Enter the following when prompted:
? Enter a name for the project
    AmazonLocationDemo
? Enter a name for the environment
    dev
? Choose your default editor:
    Xcode (Mac OS only)
? Choose the type of app that you're building
    ios
Using default provider  awscloudformation
? Select the authentication method you want to use:
    AWS Profile
? Please choose the profile you want to use
    Default
Upon successfully running amplify init, you should see two new created files in your project directory: amplifyconfiguration.json and awsconfiguration.json. If the files are not there, they need to be manually moved to your XCode project folder. This is required so that Amplify libraries know how to reach your provisioned backend resources. Make sure that the file target is point to your client projects.
Add the Amplify categories
Now that the Amplify project was created, we will add the categories that will complement the project.
- Add the authentication category by opening a terminal and running:
amplify add auth
- Enter the following when prompted:
? Do you want to use the default authentication and security configuration?
Default configuration
? How do you want users to be able to sign in?
Username
? Do you want to configure advanced settings?
No, I am done.
- Push the changes to the backend by running:
amplify push
With the auth category configured, we can now configure the Identity Pool to allow unauthenticated access.
Configure unauthenticated and authenticated users to allow access to Amazon Location
- Navigate to the root of your project and run the following command:
amplify console auth
- Select Identity Pool from Which console? when prompted.
- You will be navigated to the Amazon Cognito console. Click on Edit identity pool in the top right corner of the page.
- Open the drop down for Unauthenticated identities, choose Enable access to unauthenticated identities, and then press Save Changes.
- Click on Edit identity pool once more. Make a note of the name of the Unauthenticated role. For example, amplify-<project_name>-<env_name>–unauthRole.
- Open the AWS Identity and Access Management (IAM) console to manage roles.
- In the Search field, enter the name of your unauthRole noted above and click on it.
- Click +Add inline policy, then click on the JSON tab.
- Fill in the [ARN] placeholder with the ARNs of your tracker and place index which you noted above and replace the contents of the policy with the below.
{
   "Version": "2012-10-17",
   "Statement": [
       {
            "Effect": "Allow",
            "Action": "geo:SearchPlaceIndexForText",
            "Resource": "[ARN]"
        },
        {
            "Effect": "Allow",
            "Action": "geo:BatchUpdateDevicePosition",
            "Resource": "[ARN]"
        }
   ]
}
Modify your configuration files and initialize the mobile client
Now we have all Amplify categories configured in our project, let’s take a look at the code that is collecting the geofences and tracking the user’s movement.
- Open your project by running on the terminal:
xed .
- Open awsconfiguration.json and add the following lines to the end of the file, adding the proper region:
"Location": {
    "Default": {
        "Region": "<REGION ie: us-west-2>"
    }
}
- Modify AmazonLocationDemoApp.swift with the code below to initialize the AWSMobileClient SDK with the configuration from awsconfiguration.json
import SwiftUI
import AWSMobileClient


@main
struct AmazonLocationDemoApp: App {
    init() {
        configureAWSMobileClient()
    }


    var body: some Scene {
        WindowGroup {
            ContentView()
        }
    }

    func configureAWSMobileClient() {
        AWSMobileClient.default().initialize { (userState, error) in
            if let userState = userState {
                print("UserState: \(userState.rawValue)")
            } else if let error = error {
                print("error: \(error.localizedDescription)")
            }
        }
    }
}
- Build and run the app.
Add search capabilities to the iOS app
- On ContentView.swift, add an import statement for AWSLocation:
import AWSLocation
- Add the array that will hold the search results at the beginning of the MapView struct and pass the array as an argument to the MapView:
@State private var searchLocations = [MKPointAnnotation]()
MapView(centerCoordinate: $centerCoordinate, searchLocations: searchLocations)
- Add the searchForLocation function replacing <INDEX_NAME> with the PlaceIndex name that was created by you:
func searchForLocation(search: String){
	//setting bias position to user's location
	let biasPosition = [NSNumber(value: centerCoordinate.longitude), NSNumber(value: centerCoordinate.latitude)]

	//Creating the search request
	let request = AWSLocationSearchPlaceIndexForTextRequest()!
	request.text = search //Search text
	request.indexName = "<INDEX_NAME>" //Index name
	request.biasPosition = biasPosition //Adding bias to filter the results to a region
	request.maxResults = 10 //setting maximum results to 10

	//API Call
	let result = AWSLocation.default().searchPlaceIndex(forText: request)
	result.continueWith { (task) -> Any? in
	    if let error = task.error {
		print("error \(error)")
	    } else if let taskResult = task.result {
		print("taskResult \(taskResult)")
		var searchLocations = [MKPointAnnotation]()
		for result in taskResult.results! {
		    let lon = (result.place?.geometry?.point![0]) as! Double
		    let lat = (result.place?.geometry?.point![1]) as! Double

		    //Creating new Annotation based on the search response
		    let newLocation = MKPointAnnotation()
		    newLocation.title = result.place?.label
		    newLocation.subtitle = result.place?.addressNumber
		    newLocation.coordinate = CLLocationCoordinate2D(latitude: lat, longitude: lon)
		    searchLocations.append(newLocation)
		}

		//Updating array
		self.searchLocations = searchLocations
	    }
	    return nil
	}
}
- On MapView.Swift add another reference to the array that will hold the search results:
var searchLocations: [MKPointAnnotation]
- Change the updateUIView to add the search result markers to the map:
func updateUIView(_ view: MKMapView, context _: Context) {
	print("updating")

	//Add markers to map
	if searchLocations.count != view.annotations.count {
	    view.removeAnnotations(view.annotations)
	    view.addAnnotations(searchLocations)
	}
}
- Build and run the app. Search for a location(ie: Starbucks). The pins should be populated on the map.
Add tracking capabilities to the iOS app
The below steps describe how you can pass device location to the tracker resource you have created with Amazon Location Service:
- Add the following imports to the LocationManagement.swift file:
import AWSLocation
import AWSMobileClient
- Create an instance of AWSLocationTracker, and add conformance to AWSLocationTrackerDelegate, updating the tracker name and the region with your own values:
class LocationManagement: NSObject,
                          ObservableObject,
                          CLLocationManagerDelegate,
                          AWSLocationTrackerDelegate {  // Add AWSLocationTrackerDelegate conformance
    let locationTracker = AWSLocationTracker(trackerName: "<TRACKER_NAME>",
                                            region: AWSRegionType.<REGION_NAME>,
                                            credentialsProvider: AWSMobileClient.default())
}
By conforming to AWSLocationTrackerDelegate, the requestUserLocation method will be added. You can leave this empty for now, as in the following example:
func requestLocation() {
}
- Start tracking the device’s location with AWSLocationTracker. Inside locationManagerDidChangeAuthorization(_) add the following code in the authorized status scenario:
case .authorizedWhenInUse:
    print("Received authorization of user location, requesting for location")
    let result = locationTracker.startTracking(
        delegate: self,
        options: TrackerOptions(
            customDeviceId: "12345",
            retrieveLocationFrequency: TimeInterval(10),
            emitLocationFrequency: TimeInterval(30)))
    switch result {
    case .success:
        print("Tracking started successfully")
    case .failure(let trackingError):
        switch trackingError.errorType {
        case .invalidTrackerName, .trackerAlreadyStarted, .unauthorized:
            print("onFailedToStart \(trackingError)")
        case .serviceError(let serviceError):
            print("onFailedToStart serviceError: \(serviceError)")
        }
    }
Note: Make sure to update the customDeviceId to an assigned deviceId or remove the parameter to have a random device ID assigned for this device. The assigned deviceId will be persisted across app restarts.
Note: The example configures the tracking to retrieve location data every 10 seconds and send the location updates to Amazon Location Service every 30 seconds. The default values are 30 seconds for retrieveLocationFrequency and 300 seconds for emitLocationFrequency.
Note: startTracking should be called after the user has authorized the app to retrieve device location data. Make sure to remove the call to startUpdatingLocation() as that will continuously retrieve a stream of location updates, rather than tracking the location at an interval.
- Update the body of requestLocation method by calling locationManager.requestLocation(), as in the following example:
class LocationManagement: NSObject, ObservableObject, CLLocationManagerDelegate, AWSLocationTrackerDelegate  {
  // ...
  func requestLocation() {
    locationManager.requestLocation()
  }
  // ...
}
Note: requestLocation will be called on the retrieveLocationFrequency interval.
- When your app retrieves location updates, pass the data for location tracking to update your tracker and continue performing your app logic, as in the following example:
class LocationManagement: NSObject, ObservableObject, CLLocationManagerDelegate, AWSLocationTrackerDelegate  {
  // ...
  func locationManager(_ manager: CLLocationManager, didUpdateLocations locations: [CLLocation]) {
    print("Got locations: \(locations)")
    locationTracker.interceptLocationsRetrieved(locations)
  }
  // ...
}
- (Optional) Listen for tracking events to be notified when the tracker sends data to Amazon Location Service and when the tracker has stopped. The following example shows how this can be implemented:
func onTrackingEvent(event: TrackingListener) {
    switch event {
    case .onDataPublished(let trackingPublishedEvent):
        print("onDataPublished: \(trackingPublishedEvent)")
    case .onDataPublicationError(let error):
        switch error.errorType {
        case .invalidTrackerName, .trackerAlreadyStarted, .unauthorized:
            print("onDataPublicationError \(error)")
        case .serviceError(let serviceError):
            print("onDataPublicationError serviceError: \(serviceError)")
        }
    case .onStop:
        print("tracker stopped")
    }
}
- Pass onTrackingEvent to startTracking()
let result = locationTracker.startTracking(
                delegate: self,
                options: TrackerOptions(
                    customDeviceId: "12345",
                    retrieveLocationFrequency: TimeInterval(10),
                    emitLocationFrequency: TimeInterval(30)),
                listener: onTrackingEvent)
Note: onDataPublished will be triggered for each successful call to Amazon Location Service. The trackingPublishedEvent payload contains the request containing locations sent and the successful response from the service.
Note: onDataPublicationError will be triggered for each attempt made to send location data to Amazon Location Service and had failed with an error.
Note: onStop will be triggered when the tracker has been started and stopTracking was called.
- (Optional) To debug your app, you can enable verbose logging during development, when the app starts up:
func application(_ application: UIApplication, didFinishLaunchingWithOptions launchOptions: [UIApplication.LaunchOptionsKey: Any]?) -> Bool {
  // Override point for customization after application launch.
  AWSDDLog.sharedInstance.logLevel = .verbose
  AWSDDLog.add(AWSDDTTYLogger.sharedInstance)

  //...
  return true
}
-
You have now successfully set up AWSLocationTracker in your app. Build an run the app. Check the log group created on CloudWatch for geofencing updates.
-
Stop tracking: When you want to prevent the tracker from continuing to store and emit location data, call the following method:
func stopTracking() {
    locationTracker.stopTracking()
}
- Tracking status: You can also check if the tracker is currently tracking by calling the following method:
func isTracking() -> Bool {
    locationTracker.isTracking()
}
Cleaning up
Delete Amplify resources
- On the terminal, navigate to your project folder and run the following command:
amplify delete
- Select yes, when prompted.
Delete Amazon Location Services resources
- Open the Amazon Location console at https://console.aws.amazon.com/location/
- In the left navigation pane, choose Geofence collections.
- Select the Geofence collection you created and click Delete geofence collection
- Type delete in the field and press Delete.
- In the left navigation pane, choose Trackers
- Select the Tracker you created and click Delete tracker
- Type delete in the field and press Delete.
Delete Amazon Event Bridge resources
- Open the Amazon EventBridge console at https://console.aws.amazon.com/events/
- Navigate to Events -> Rules
- Select the rule you want to delete.
- Click Delete.
- Click Delete, again, when prompted.
Security
See CONTRIBUTING for more information.
License
This library is licensed under the MIT-0 License. See the LICENSE file.