WinRes App
A macOS application which serves two purposes:
1. Adds keyboard shortcuts to move and resize windows
Assign keyboard shortcuts to:
- Zoom the active window
- Minimize the active window
- Move the active window to the left side of the screen
- Move the active window to the right side of the screen
2. Works as an app switcher
Switch to a specific app using a keyboard shortcut. For example, assign ⌥1 to switch to your browser and ⌥2 to switch to your terminal app.
The switching logic is the following:
- If the app is not running, launch the app
- If the app is running, but there are no visible windows of the app in the current space, open a new window of the app
- If there are visible app windows in the current space, then switch to a window of the app
- If an app window is in the focus, switch to the next app window
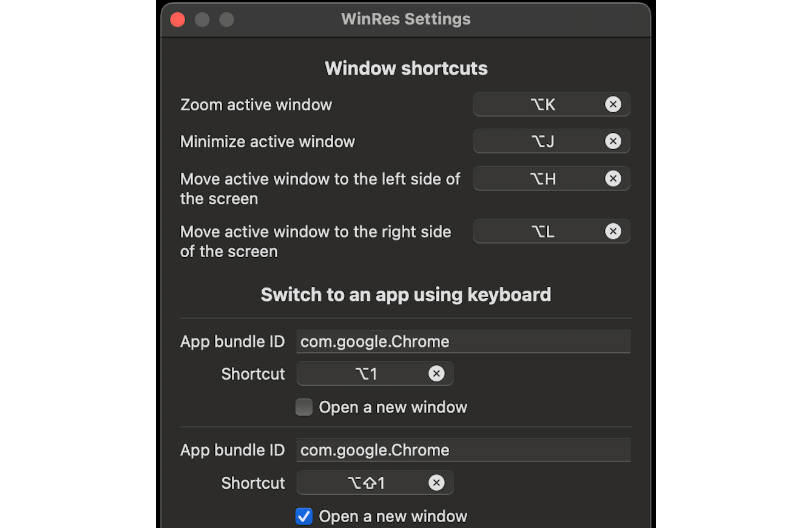
Screenshots

Installation
Go to the releases page and download the latest app version.
How to use
After launching the WinRes app, you should see its icon in the menu bar. Click on it and select “Settings”. At this point, the app may already request the Accessibility permissions (depending on your macOS version). Grant the requested permissions at your discretion, but the app won’t work without the Accessibility permissions.
In the settings window, you can assign keyboard shortcuts for the window actions (e.g. Zoom active window, Minimize active window, etc.).
Also, you can assign shortcuts to quickly switch between applications. Let’s say you want to open Google Chrome with a keyboard shortcut.
To do so, we’ll need to know the bundle ID of the Google Chrome app.
To get it, use the following terminal command: osascript -e 'id of app "Google Chrome"'.
The command should return com.google.Chrome. Specify this value in the “App bundle ID” field,
then click on the “Shortcut” field to assign a shortcut. If you want to always open a new window of the app, check the “Open a new window” checkbox.
Build
To build the WinRes app:
- Open this project in Xcode
- In the menu bar, go to
Product>Archive - In the
Archiveswindow that opens, select the version you want and clickDistribute App - Select
Copy Appas the distribution method - Choose a name and location, then click
Export - Use the Disk Utility to create a
dmgfile from theappfile you created in the previous step, see how to do so here
Why
I tried to replicate a similar window management experience that I have on my Linux machine, but on macOS. Why not use existing solutions like Rectangle and rcmd, you may ask? The existing solutions are great, but they don’t offer the exact experience I’m looking for. Also, I wanted a pet project, so I decided to implement the WinRes app.
Implementation details
The WinRes app mainly relies on two APIs:
- API to simulate keyboard presses, e.g. simulate
Command+Nto open a new window - The accessibility API to select menu bar items, e.g. select
Window->Move Window to Left Side of Screento move the window. Why not use the App Shortcuts in the macOS keyboard settings which basically do the same (they allow you to assign keyboard shortcuts to menu bar items)? The answer is simple: it did not work stable for me. Sometimes the assigned shortcuts were not working at all. So instead, I used the accessibility API to implement these shortcuts in the WinRes app.