Tracking Geographic Locations in AR
Track specific geographic areas of interest and render them in an AR experience.
Overview
In this sample app, the user marks spots on a map or camera feed to create a collection of anchors they view in augmented reality (AR). By rendering those anchors as virtual content in an AR view, the user can see a nearby anchor through the camera feed, move to its physical location, and continue to move to any subsequent anchors in the collection. If a virtual anchor that the user is moving toward isn’t visible in the camera feed, the user can refer to its pin in the map view and advance until the virtual anchor becomes visible.
Geotracking configuration (ARGeoTrackingConfiguration) combines GPS, the device’s compass, and world-tracking features in AR to track specific geographic locations. By giving ARKit a latitude and longitude (and optionally, altitude), the sample app declares interest in a specific location on the map.
During a geotracking session, ARKit marks this location in the form of a location anchor (ARGeoAnchor) and continually refines its position in the camera feed as the user moves about. ARKit provides the location anchor’s coordinates with respect to the scene, which allows the app to render virtual content at its real-world location or trigger other interactions.
For example, when the user approaches a location anchor, an app may reveal a virtual signpost that explains a historic event that occurred there. Or, to form a street route, an app could render a virtual anchor in a series of location anchors that connect.

- Note: ARKit supports geotracking only with the device’s rear camera.
Configure the Sample Code Project
The sample app demonstrates geotracking coaching, which requires iOS 15. The Xcode project defines a deployment target of iOS 15.
Geotracking requires a device with A12 Bionic chip or later, and cellular (GPS) capability. Set the project’s run destination to a device. ARKit doesn’t support iOS Simulator.
Ensure Device Support
The sample app checks whether a device supports geotracking at the application entry point, AppDelegate.swift:
if !ARGeoTrackingConfiguration.isSupported {
    let storyboard = UIStoryboard(name: "Main", bundle: nil)
    window?.rootViewController = storyboard.instantiateViewController(withIdentifier: "unsupportedDeviceMessage")
}
If the device doesn’t support geotracking, the sample project stops. Optionally, an app can present an error message and continue the session at a limited capacity without geotracking.
Display an AR View and Map View
The sample project renders location anchors using an ARView. To reinforce the correspondence between geographic locations and positions in the session’s local space, the sample project also displays a map view (MKMapView) that marks the anchors from a top-down perspective. The app displays both views simultaneously by using a stack view (UIStackView) with the camera feed on top. See the sample’s View Controller Scene within the project’s Main.storyboard.
Check Availability and Run a Session
To place location anchors with precision, geotracking requires a better understanding of the user’s geographic location than is possible with GPS alone. Based on a particular GPS coordinate, ARKit downloads batches of imagery that depict the physical environment in that area and assist the session with determining the user’s precise geographic location.
This localization imagery captures the view mostly from public streets and routes accessible by car. As a result, geotracking doesn’t support areas within the city that are gated or accessible only to pedestrians.
Because localization imagery depicts specific regions on the map, geotracking only supports areas where Apple has collected localization imagery in advance. Before starting a session, the sample project checks whether geotracking supports the user’s location by calling checkAvailability(completionHandler:).
ARGeoTrackingConfiguration.checkAvailability { (available, error) in
    if !available {
        let errorDescription = error?.localizedDescription ?? ""
        let recommendation = "Please try again in an area where geotracking is supported."
        let restartSession = UIAlertAction(title: "Restart Session", style: .default) { (_) in
            self.restartSession()
        }
        self.alertUser(withTitle: "Geotracking unavailable",
                       message: "\(errorDescription)\n\(recommendation)",
                       actions: [restartSession])
    }
}
ARKit requires a network connection to download localization imagery. The checkAvailability function returns false if a network connection is unavailable. If geotracking is available, the sample project runs a session.
let geoTrackingConfig = ARGeoTrackingConfiguration()
geoTrackingConfig.planeDetection = [.horizontal]
arView.session.run(geoTrackingConfig, options: .removeExistingAnchors)
- Note: If geotracking is unavailable in the user’s current location, an app can suggest an alternative area if
checkAvailability(at:completionHandler:)returnstruefor a nearby location.
Coach the User for Geotracking Status
To begin a geotracking session, the framework undergoes several geotracking states. At any point, the session can require action from the user to progress to the next state. To instruct the user on what to do, the sample project uses a ARCoachingOverlayView with the .geotracking goal.
func setupCoachingOverlay() {
    coachingOverlay.delegate = self
    arView.addSubview(coachingOverlay)
    coachingOverlay.goal = .geoTracking
Instruct the User Based on Geotracking State
After the app localizes and begins a geotracking session, the sample app monitors the geotracking state and instructs the user by presenting text with a label.
self.trackingStateLabel.text = text
As the user moves along a street, the framework continues to download localization imagery as needed to maintain a precise understanding of the user’s position in the world. If the .geoDataNotLoaded error occurs after the session localizes, it may indicate a network issue. If this error persists, the app may ask the user to check the internet connection.
While the session runs, the status reason notAvailableAtLocation occurs if the user crosses into an area where ARKit lacks geotracking support. To enable the session to continue, the sample project presents text to guide the user back to a supported area.
case .notAvailableAtLocation: return "Geotracking is unavailable here. Please return to your previous location to continue"
Coach the User as the Session Runs
A geotracking session maps geographic coordinates to ARKit’s world-tracking local space, which requires basic world-tracking support. If environmental circumstances impair the device’s world-tracking condition, the geotracking coaching overlay alerts the user and displays instructions to resolve the problem.
For example, if the user travels too quickly, the device’s camera feed may not contain sufficient features that ARKit requires to model the environment. In this case:
- The framework sets world-tracking state to
limited. - The geotracking session observes the world-tracking status change and sets the geotrackingstatus reason to geoWorldUnstable.
- Coaching overlay activates and displays the text: “Slow down”.
The sample app disables the user interface until the user responds to the coaching.
func coachingOverlayViewWillActivate(_ coachingOverlayView: ARCoachingOverlayView) {
    mapView.isUserInteractionEnabled = false
    undoButton.isEnabled = false
    hideUIForCoaching(true)
}
ARKit dismisses the coaching overlay when the tracking status improves, and the app reenables the user interface.
func coachingOverlayViewDidDeactivate(_ coachingOverlayView: ARCoachingOverlayView) {
    mapView.isUserInteractionEnabled = true
    undoButton.isEnabled = true
    hideUIForCoaching(false)
}
Create an Anchor When the User Taps the Map
The sample project acquires the user’s geographic coordinate (CLLocationCoordinate2D) from the map view at the screen location where the user tapped.
func handleTapOnMapView(_ sender: UITapGestureRecognizer) {
    let point = sender.location(in: mapView)
    let location = mapView.convert(point, toCoordinateFrom: mapView)
With the user’s latitude and longitude, the sample project creates a location anchor.
geoAnchor = ARGeoAnchor(coordinate: location)
Because the map view returns a 2D coordinate with no altitude, the sample calls init(coordinate:), which defaults the location anchor’s altitude to ground level.
To begin tracking the anchor, the sample project adds it to the session.
arView.session.add(anchor: geoAnchor)
The sample project listens for the location anchor in session(didAdd:) and visualizes it in AR by adding a placemark entity to the scene.
func session(_ session: ARSession, didAdd anchors: [ARAnchor]) {
    for geoAnchor in anchors.compactMap({ $0 as? ARGeoAnchor }) {
        // Effect a spatial-based delay to avoid blocking the main thread.
        DispatchQueue.main.asyncAfter(deadline: .now() + (distanceFromDevice(geoAnchor.coordinate) / 10)) {
            // Add an AR placemark visualization for the geo anchor.
            self.arView.scene.addAnchor(Entity.placemarkEntity(for: geoAnchor))
To establish visual correspondence in the map view, the sample project adds an MKOverlay that represents the anchor on the map.
let anchorIndicator = AnchorIndicator(center: geoAnchor.coordinate)
self.mapView.addOverlay(anchorIndicator)
Create an Anchor When the User Taps the AR View
When the user taps the camera feed, the sample project casts a ray at the screen-tap location to determine its intersection with a real-world surface.
if let result = arView.raycast(from: point, allowing: .estimatedPlane, alignment: .any).first {
The ray cast result’s translation describes the intersection’s position in ARKit’s local coordinate space. To convert that point to a geographic location, the sample project calls the session-provided utility getGeoLocation(forPoint:).
arView.session.getGeoLocation(forPoint: worldPosition) { (location, altitude, error) in
Then, the sample project creates a location anchor with the result. Because the result includes altitude, the sample project calls the init(coordinate:altitude:) anchor initializer.
- Note: For more on ray casting, see raycasting collection.
Assess Geotracking Accuracy
To ensure the best possible user experience, an app must monitor and react to the geotracking accuracy. When possible, the sample project displays the accuracy as part of its state messaging to the user. The session populates accuracy in its geoTrackingStatus in state .localized.
if geoTrackingStatus.state == .localized {
    text += "Accuracy: \(geoTrackingStatus.accuracy.description)"
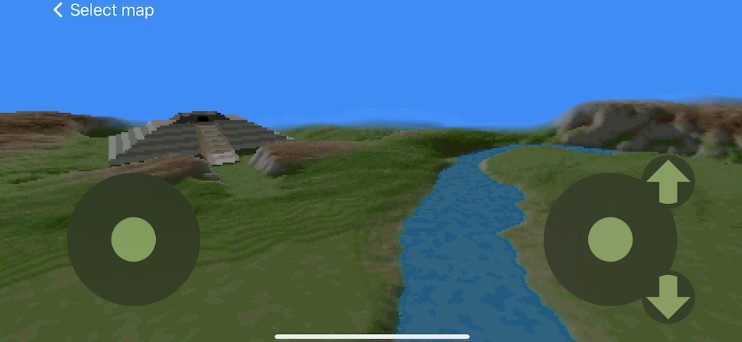
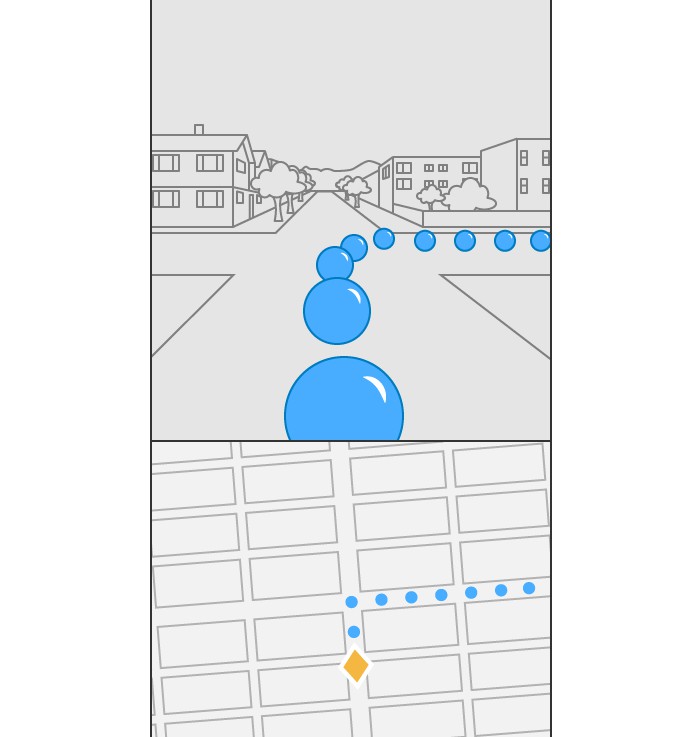
An app renders location anchors using an asset that’s less exact if geotracking is off by a small distance, such as when accuracy is .low. For example, the sample app renders a location anchor as a large ball several meters in the air rather than an arrow pointing to a real-world surface.
Center the Map as the User Moves
The sample project uses updates from Core Location to center the user in the map view. When the user moves around, Core Location notifies the delegate of any updates in geographic position. The sample project monitors this event by implementing the relevant callback.
func locationManager(_ manager: CLLocationManager, didUpdateLocations locations: [CLLocation]) {
When the user’s position changes, the sample project pans the map to center the user.
let camera = MKMapCamera(lookingAtCenter: location.coordinate,
                         fromDistance: CLLocationDistance(250),
                         pitch: 0,
                         heading: mapView.camera.heading)
mapView.setCamera(camera, animated: false)